Notifications and Alerts
The Notifications and Alerts feature allows an admin supervisor to configure and create different types of alerts. The Notifications & Alerts option is displayed in Ignite, only if the employee who is logged in has a System Administrator or Advanced supervisor license assigned to them.

-
It is required that the MiCCB server installed ha HTTPS/SSL enabled.
Access to https://miccb-alarms.mitel.io is necessary for Notifications and Alerts to function.
-
Log into the Ignite using an employee with a supervisor license.
-
Go to Option > Notifications & Alerts. The Notifications & Alerts page is displayed.
-
Click +ADD ALERT.
- Enter a descriptive name in the Name field. This will be displayed when the alert is triggered.
-
From the Category drop-down list, select the type of device that will be alerted. The list of options that are available under the Category drop-down list are Employee, Queues, and Queue Groups.Note:
-
After the Category is selected, the list of devices that can be alerted will be displayed. This will include all devices that can be alerted for that category, that is all employees, queues or queue groups.
-
If Employees or Queues is selected, only devices that are RealTime enabled will be added to the selection list. Multiple devices can be selected by checking the box next to the device. You can also search for a device by name by entering all or part of the name in the Search for field of the drop-down list.
-
-
From the drop-down list, select the employees, queues or queue groups that the alert will be applied to. At least one device must be selected.
-
Enable the Send notifications to others option if you want other employees to receive a notification in Ignite when an alert is triggered or cleared.Note: The alerts created by a supervisor can be viewed, edited, and deleted only by that supervisor.
-
Select the other employees whom you want to notify from the Select other employees drop-down list.
-
Set the threshold limit on how often an alert can be retriggered. For example, if an alert was created that alerted on Calls Waiting in a Queue > 1, and if the threshold was set to 1 min, then the alert would be triggered once there were 2 or more calls in queue and cleared once the waiting calls dropped to 1 or less. However, if calls waiting in queue went back up to 2 within the threshold time range, the alert would not be triggered. By default, the threshold is set to 30 seconds and the minimum threshold limit is 10 seconds.
-
If the Alert during business hours option is selected, the alert will only be evaluated during open business hours that are set on the selected queues.Note: This checkbox is applicable only if the Queue category is selected.
-
If the Send OS notification toaster option is selected, when the alert is triggered or cleared, a popup notification will be sent to the Ignite users that are registered for the alert. This notification is only displayed if Ignite does not have focus.Note: You must allow notifications from the browser. For more information about enabling alert notifications see Alert Notifications.
-
If Notification ringtone is selected, a beep sound will be played every time an alert is triggered or cleared.
-
If Alert per interaction is selected, the alert condition(s) will be evaluated against every inbox item for the selected employee(s).Note: This checkbox is applicable only if the Employee category is selected.
-
Select one or more Media Type options to trigger alerts when interactions of the selected media types are true against the condition created.Note: This checkbox is applicable only if the Employee category is selected.
-
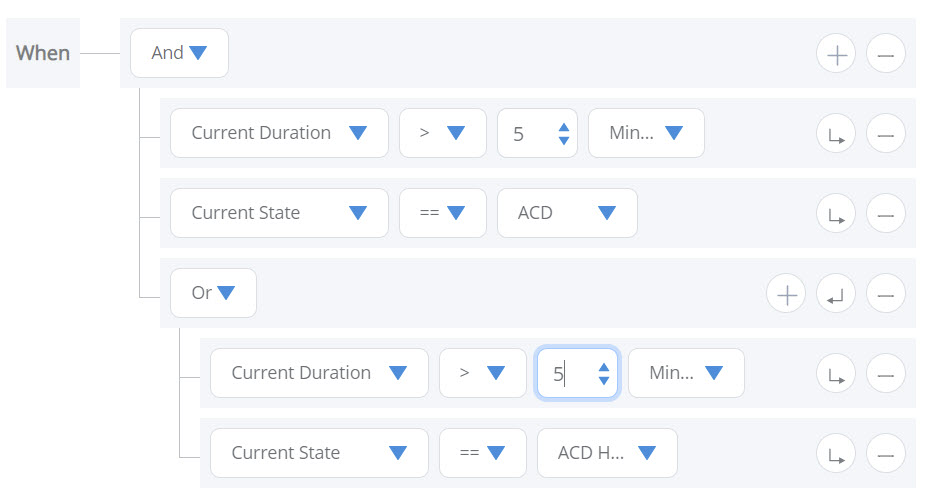
The Condition Builder allows you to create custom conditions which you would like to alert on. The condition builder is very flexible and will allow you to create complex AND/OR conditions that satisfy any business needs.Note: At least one condition must be entered. The condition options displayed vary depending on the alert category and whether Alert per interaction is selected.
-
To add a condition, click on the input field Click here to build alert conditions… . Select the value that you want to evaluate from the first drop-down list. For example in the above image Current Duration, then select the comparison operator from the middle drop-down list. Select the value to compare to from the last drop-down list. The expression for the alert will display in the Conditions field. For more information about condition builder scenarios see Condition Builder.
-
To add an additional condition, click the
 Group button and then click the
  Add button. Edit the new condition as desired. You can modify the expression to group the conditions with And, where both conditions must be true for the alert to be triggered, or with Or, where any of the conditions can be true for the alert to be triggered.
 -
You can use the Group button to create nested conditions. Each grouping is like adding parentheses to the condition. The Conditions field will show you the expression that will be evaluated for the alert.
-
Once you have defined all the data for alert, click the Save button.Note: The Save button will be disabled until all the mandatory (*) fields have a value selected.
The customized alert will be set and will be displayed in the Notifications & Alerts page.