This section demonstrates how to build a workflow that uses an LDAP connection to a Windows Active Directory domain to retrieve phone numbers and transfer the caller to the retrieved extension.
This example is composed of a main workflow and a subroutine that contains an LDAP query. The caller is presented with a menu that prompts them to enter the extension of the party they wish to reach. If they know the extension they can dial it at any time or they can dial by name (by pressing 1) or choose to speak to the operator (by pressing 0). When the caller chooses option 1, the workflow is directed to the Dial By Active Directory (DialByAD) subroutine. Subroutines are recommended when a call process contains many activities or repeating tasks. In this case, the DialByAD subroutine contains several activities. Segregating it from the main workflow simplifies the process.
The following figure depicts the final, post-configuration version of the Dial Active Directory workflow.

The following figure depicts the final, post-configuration version of the DialByAD subroutine.

Preliminary configuration
Before creating the workflow, you must configure the required variables and prompts.
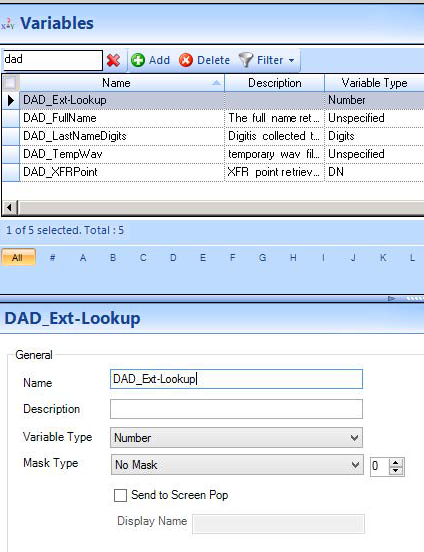
Create the following list of variables along with their associated variable type. (See the following figure.)
After creating the variables, configure applicable prompts as shown in the following table.
| Prompt Name | Script |
|---|---|
| DialAD – Main Menu | Thank you for calling. If you know the extension of the party you wish to reach, dial it now. To dial by name, press 1. For operator assistance, press 0. |
| DialAD – Name from Dialpad | Using your touchtone keypad, please type the last name of the person you wish to reach, followed by the pound (#) sign. |
|
DialAD – Did you mean ... Note:
This prompt references the variable DAD_TempWav created earlier |
<DAD_TempWav> If this is the person you want to reach, press 1. If not, press star (*). |
Creating the main Dial Active Directory workflow
- Click IVR Routing > Workflows.
- Click Add and select Voice > Inbound as the workflow type from the drop-down list.
- In the Properties pane, configure the workflow properties as needed.
- Add an Answer activity and a Hang Up activity onto the Workflows canvas.
- After the Answer activity, add a Menu activity.
- Click Save.
The next step in creating the Dial Active Directory workflow is configuring the Menu activity.
- Select the Menu activity on the Workflows Canvas and, in the Properties pane, configure the Menu properties.
- Enter an appropriate Name for the menu and add a Prompt to play a greeting message to the caller (DialAD – Main Menu, as shown in the following table).
See the following figure for suggested configuration settings.
Figure 4. Main Menu activity properties configuration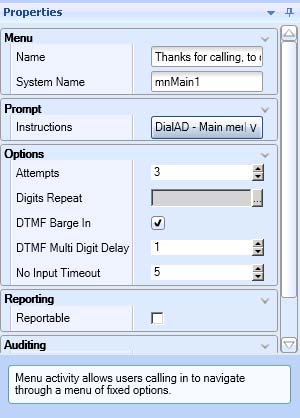
- Right-click the Menu activity and add the three digit options as follows: 1 - Dial by AD, 0 - Operator, and Any Characters.
Note:
The In Between Digit Delay function allows the system to wait for one second (default value) after hearing the first DTMF tone from the caller to see if another digit will be pressed before processing the call.
- In the Properties pane, configure the Menu options.
Note:
It is important to give each menu option branch an appropriate name as doing so simplifies the troubleshooting process when interpreting log files.
See the following figure.
Figure 5. Menu option configuration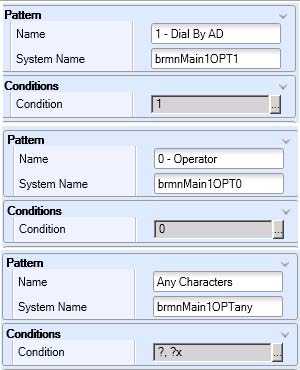
- In the 0 – Operator and the Any Characters branches of the menu options, add a Transfer activity.
- Right-click the Transfer activity that follows 0 – Operator and select Destination.
- In the Properties pane, after Destination, type the extension that reaches the operator in your organization.
- Right-click the Transfer activity that follows Any Characters and select Destination.
- Configure the Destination as the variable <<LastMenuCollectedDigits>>.
This sets the entry that is received by the Menu activity as the transfer point.
- Name the Timeout, Invalid, and Failure branches of the Menu activity according to best practices. Use the nomenclature br<PARENT_MENU><OPT>.
Following this naming convention simplifies the troubleshooting process when searching through log files. See the following table for an example of best practice naming conventions.
- Click Save.
Table 2. Best practice naming convention example Menu branch Naming convention Timeout brmnMain1OPTTIME Invalid brmnMain1OPTINV Failure brmnMain1OPTFAIL
Now that the main Dial Active Directory workflow has been configured, the DialByAD subroutine must be configured and added to the overall workflow.
Configuring the DialByAD subroutine
If the caller knows the last name of the person they are trying to reach, they enter the matching digits in their dial pad. The dial pad compare feature is used to support this search function. The first step in being able to access this functionality is to collect the digits. This is done via a Collect Digits activity within the subroutine.
- Click Subroutines > Add > Voice > Inbound.
- In the Properties pane, after Name, type DialByAD.
- Add a Collect Digits activity to the subroutine.
- Select the Collect Digits activity and, in the Properties pane, after Name, type Get Last Name and after System Name, type cdGetLastName.
- Configure the Go To activities in the Timeout and Invalid branches to return to the Get Last Name Collect Digits activity.
See the following figure.
Figure 6. Collect Digits activity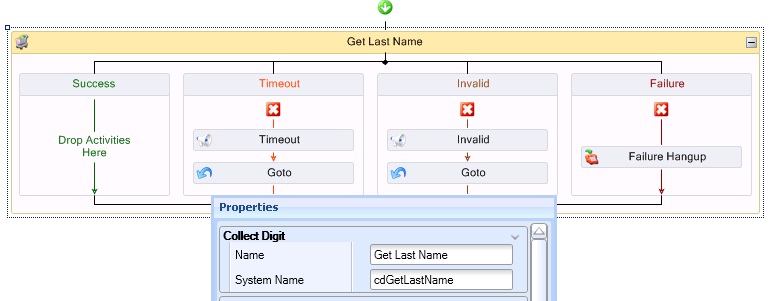
- Name the Success, Timeout, Invalid, and Failure branches according to best practices, as shown in the following table.
Table 3. Best practice naming convention example Menu branch Naming convention Success brcdGetLastNameSUCC Timeout brcdGetLastNameTIME Invalid brcdGetLastNameINV Failure brcdGetLastNameFAIL - Right-click the Get Last Name Collect Digits activity and select Edit Variable Settings.
The Collect Digits settings window opens.
- Select the appropriate options for each value in the Collect Digits settings window.
The Variable should be unique to this workflow and be of the Variable Type Number. In this case, the variable <<DAD_Ext-Lookup>> is used.
Note:This example uses a greeting that asks the caller to enter the last name of the person they are trying to reach by using their dial pad and pressing pound (#) when finished. The settings and greeting verbiage you choose are dependent on your environment and needs.
- Click OK.
- Click Save to save the subroutine.
This example performs a lookup based on the last name of the employee in Active Directory. However, the procedure can easily be converted to use the first name or a different value altogether. When a caller successfully enters digits they are branched down the Success branch in the Collect Digits activity. In the Success branch, a Query to Active Directory is inserted to search for the requested employee. Prior to this action, a new data provider must be created.
Configuring the LDAP data provider
- Click Data providers > Add and select LDAP from the drop-down list.
- Enter the appropriate settings for the Active Directory domain, including a user with read access.
- Click Test Connection to attempt to connect to the domain.
This example connects to a local domain labeled 'PFSE Domain'.
- Click Save.
Configuring the Active Directory LDAP query
This example queries based on the employee’s last name and returns their extension to which the call is then transferred. The Last Name, Display name, and Telephone number fields from the user object in Active Directory are accessed. In addition, the objects will return a .wav file so the names can be read back to the caller. It is suggested that each employee record their name to use as a customized .wav file. In this example, the customized employee name .wav files are stored in the Telephones tab in Active Directory. Note that this location must be accessible from the IVR Routing instance performing the query and readback. (See the following figure.)

- Add a Query activity to the Success branch of the Get Last Name Collect Digits activity.
- Select the Query activity and, in the Properties pane, enter an appropriate Name and System Name.
This example uses 'Get User from AD – PFSE.LOCAL' and 'qrPFSEAD' respectively.
- Name the Success and Failure branches in adherence with best practices. In this case, Success: brqPFSEADSUCC and Failure: brqrPFSEADFAIL.
- Right-click the Query activity and select Edit Database Provider.
- In the Select Connection window, choose the appropriate provider.
This example uses PFSE Domain.
- Right-click the Query activity and select Edit Query Definition.
- Under Query Type, select Advanced Query and, under Settings, enter the following query: select info,telephoneNumber,CN from 'LDAP://PFSE.LOCAL where objectClass='user' AND sn = '@LastName'.
An advanced query is necessary in this example to enable the return of multiple variables. If there was only a need for a single variable, a simple query would suffice.
- Click Execute.
- In the Parameters window, select the Value of ‘76’ for @LastName and select the Use Dialpad Compare check box.
The value of ‘76’ is translated into the following when using the dialpad compare feature: p, pn, Po, Q, Qm, Qn, Qo, R, Rm, Rn, Ro, S, Sm, Sn, So.
- Click Run.
The command runs and the Database Lookup window for the Advanced Query opens.
- Confirm correct configuration by clicking the Test Results tab and checking the info column to ensure the expected result(s) were returned.
- In the Variable Assignment tab, select appropriate variables for the returned values.
In this example, CN is used for the common name of the Active Directory object (display name in Active Directory) and telephoneNumber for the extension of the user being queried. The information from the Telephones tab is also returned as it contains the location of the .wav file to be played. (See the following figure.)
Figure 8. Variable assignment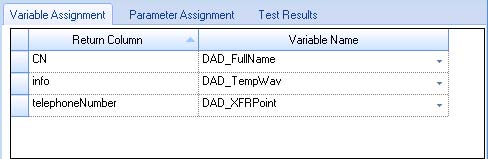
- In the Parameter Assignment tab, select the variable that was populated in the Collect Digits activity, ‘cdGetLastName’. In this case, DAD_Ext-Lookup.
Configuring the parameter assignment with a variable replaces the query with the appropriate run-time information. (See the following figure.)
Figure 9. Parameter Assignment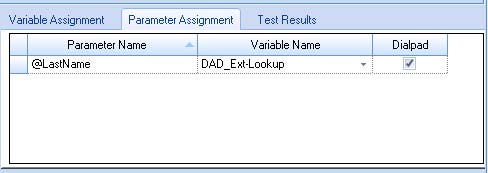
Configuring the Success branch of the query
Now that information has been retrieved via the LDAP query, the process loops through the results until the correct one is found. The customized employee name .wav file is played and the caller is asked if that is the individual they want to reach. Once the correct name is found, the caller is transferred to that destination and the workflow is terminated.
- Add a Menu activity into the Success branch of the Query activity (Get User from AD – PFSE.LOCAL).
- Select the Menu activity and, in the Properties pane, enter appropriate information for the Name and System Name.
This example uses 'Did you mean…?' and 'mnDidYouMeanQ', respectively.
- Under Prompt, in the Properties pane, select Existing Prompt from the drop-down list and choose the prompt called DialAD – Did you mean …
- Right-click the Menu activity and add a digit option for 1.
- Name the Menu branches in accordance with best practices, as shown in the following table.
Table 4. Best practice naming convention example Menu branch Naming convention 1 brmnDidYouMeanQOPT1 Timeout brmnDidYouMeanQTIME Invalid brmnDidYouMeanQINV Failure brmnDidYouMeanQFAIL - In the Failure branch, add Hang Up activity
- In the Timeout and Invalid branches, remove the default Play and Go To activities.
- Removing these activities ensures that if the returned employee extension is not the correct one, the parent Query activity will move on to the next result found and offer it to the caller instead.
- In the Digit option 1 branch, add a Play activity, a Transfer activity, and a Hang Up activity.
- Name the activities, according to best practices, as shown in the following table.
Table 5. Option 1 activity naming example Activity Name System Name Play Transferring your call pfTransferring Transfer Xfr To Extension xfrToExt Transfer Branch Failure brxfrToExtFAIL Hang Up Hangup After Transfer hgTransfer - Choose an applicable prompt for the Play activity.
This example uses a prompt called 'DAD – Transferring' that plays a .wav file that says: 'Transferring your call now.'
- Right-click the Transfer activity and select Destination.
- In the Select a device window, select Variable and choose the appropriate variable assigned in the LDAP query.
- Click Save.