Performing in-call actions
- Put calls on hold and retrieve calls from hold
- Tag calls with Account Codes.
- Tag calls with Classification Codes
- Transfer calls (DESKTOP)
- Initialize Conference calls
- Transition to alternate interaction types
- Merge calls (DESKTOP)
- Contact agents before transferring calls and requesting help
Putting calls on hold and retrieving calls from hold
At times, agents may have to put a call on hold. Ignite displays a paused icon over calls on hold so they can be easily identified.
Calls on hold may not be transferred until hold is removed.
- Put a call on hold
- Retrieve a call from hold
- In the Folders pane, click Inbox.
- In the List pane, select the active call.
- In the Action bar, click the Hold button.
- In the Conversation window, click Hold.
- Click Inbox and select a call, or hover over the item avatar, and click Hold.
- Click Inbox and select a call, or hover over the item avatar, and click Hold.
- In the Folders pane, click Inbox.
- In the List pane, select the call on hold.
- In the Action bar, click Remove Hold.
- In the Conversation window, click the Remove Hold button.
- Click Inbox and select a call or hover over the item avatar and click Remove Hold.
Tagging calls with Account Codes
Account Codes identify services, departments, or other elements of the contact center. They are numerical codes with predefined meanings that are used for reporting purposes. You can apply multiple Account Codes during an interaction. The duration of each Account Code is measured from when the Account Code is entered until either the end of the call or the time a new Account Code is entered. Agents tag calls with Account Codes in Ignite to indicate in reports what the interaction segment was about.
For example, an agent handling calls for three catalog companies enters an Account Code of ‘01’ to indicate the customer is inquiring about Company A. Later in the interaction, the agent enters an Account Code of ‘06’ to indicate that the customer is now inquiring about Company A’s mail-out services.
Agents can tag calls with multiple Account Codes. Account Codes must be entered during the call and cannot be entered after the call has ended.
- Ignite (WEB) enables agents to filter Account Codes rather than sorting them by categories.
- Select a call or hover over the item avatar and click Classify.
- Select an Account Code. You can type the name or number of a Code in the Search field.
Note:
If you enter a number in the search field, you can apply the Code by pressing ‘Enter’ when prompted.
Tagging calls with Classification Codes
- You can apply multiple Classification Codes, and this can be done at any point during the (call or interaction) or its Work Timer. All Classification Codes applied to a call are pegged with the full call duration, from the time the call arrives until the call ends. This includes transfer time. It also includes Work Timer duration if 'Include queue work timer as part of handling time' is enabled on the queue. If the same code is entered twice, it is not double pegged in reporting statistics.
- You can apply multiple Classification Codes, and this can be done at any point during the (call or interaction) or its Work Timer. All Classification Codes applied to a call are pegged with the full call duration, from the time the call arrives until the call ends. This includes transfer time. If the same code is entered twice, it is not double pegged in reporting statistics.
- Classification Codes can be ‘forced’, meaning the agent must enter a Classification Code either during the call or when in Work Timer to remain within compliance.
- Account Codes can only be entered during a call, but Classification Codes can be entered during or after a call (while in Work Timer). There are often scenarios within which you set single or multiple Account Codes during a call and then set a Classification Code when the call terminates.
Classification Codes are only supported for ACD voice (calls or interactions).
During a call, apply Classification Codes as you would Account Codes, using the list of Account Codes in the ‘Set Account Code’ rolling panel in the Sidebar or in the 'History and Account Code' section of the Preview pane.
- In the Sidebar, click the Classify button to open the Classify rolling panel.
When the call ends, the Classify button displays (and flashes if forced Classification Codes are enabled) and Work Timer is activated.
- Select the applicable Classification Code from the list that displays and click Apply.
Note:
If you are handling more than one item in the Inbox, for example, one email and one call, and you apply a Classification Code during the call, it will be applied to the call regardless of which item is currently selected in the Inbox. If you apply a Classification Code after the call when in Work Timer, the voice interaction stays in your Inbox and you must use the ‘Classify’ button in the Sidebar to apply a Classification Code to the voice interaction.
- If Work Timer has not been configured to automatically cancel after entering a Classification Code, cancel Work Timer by clicking the Remove Work Timer button in the Sidebar.
Note:
Forced Classification Codes prevent canceling Work Timer until a Code is entered. Failing to enter a Classification Code before Work Timer expires or is removed by entering Busy/Make Busy or DND can result in a default Classification Code of ‘-1 Non-Compliant’ applied automatically.
To tag a call with a Classification Code after a call ends (WEB)
During a call, apply Classification Codes as you would Account Codes, but select ‘Classification’ in the Classify dialog window.
- Click Enter a Classification Code.
- Select a Classification Code. You can type the name or number of a Code in the Search field.
Note:
If you enter a number in the search field, you can apply the Code by pressing ‘Enter’ when prompted.
Transferring calls (DESKTOP)
You can transfer calls to internal and external destinations. Internal transfer destinations include destinations programmed in the voice media server or in a cluster of voice media servers. External transfer destinations include dialable numbers not programmed in the voice media server or in the cluster of voice media servers. For example, agents in the Support queue receiving calls concerning account renewals can transfer these calls internally to the Sales queue, or agents can transfer calls externally to a supervisor’s cell phone.
To receive transfers devices must be enabled to handle the interaction's media type.
DESKTOP - Call transfers in Ignite are blind or supervised. In blind transfers, there is no communication with transfer destinations before sending calls. The system transfers the call immediately to the destination and the transfer is completed once the destination answers the call. The system does not monitor the outcome of the transfer. In supervised transfers, you contact transfer destinations before sending calls.
Agents who are logged out, in DND, Offline (WEB), or whose presence is Unknown cannot receive transferred calls, but the call can be transferred to their voicemail. Agents who are either in Busy/Make Busy or at their call Workload limit can receive transferred calls.
Call transfers in Ignite are always blind transfers. In blind transfers, there is no communication with transfer destinations before sending calls. Calls are transferred immediately, and the system does not monitor the outcome.
To perform a supervised transfer, you must use MiCollab Client, Contact Center Softphone, Contact Center PhoneSet Manager or Ignite Web. See the MiContact Center Business User Guide for more information.
- You cannot transfer calls on hold. Hold must be removed before the call can be transferred.
- You may only transfer interactions if you have the appropriate permissions.
- Blind transfer calls to a voice-enabled employee or queue
- Blind transfer calls to a dialable number
Note:
This option is only available with Click to Call. For more information, see "Contacting agents before transferring calls".
- Perform a supervised transfer using Merge (DESKTOP)
- Perform a supervised transfer using Click to Call and Merge (DESKTOP)
Note: This option is only available with Click to Call. For more information, see "Contacting agents before transferring calls".
- When on a call, in the Action bar, click Transfer.
- Select the Internal Transfer radio button and select a voice-enabled employee or queue. Expand the device list if necessary. You can search for an internal transfer destination by typing the name of a voice-enabled employee or queue in the ‘Search’ field.
- Click Transfer.
Note: You can also transfer calls from the Conversation window of the active call. Click the Transfer button in the bottom toolbar to initiate a transfer and select the transfer destination as described above.
- When on a call, in the Action bar, click Transfer.
- Select the External Transfer radio button and, in the Transfer To: field, type a dialable number. Enter this number as you would on a phone, including any digits required for outbound dialing.
Note:
Invalid entries return an error message. Re-type a valid entry and click ‘Transfer’.
- Click Transfer.
Note: You can also transfer calls from the Conversation window of the active call. Click the Transfer button in the bottom toolbar to initiate a transfer and select the transfer destination as described above.
- Click New Call. The call to be transferred is put on hold.
- Type the name or number of the contact to which you want to transfer the call.
- Click Dial Number.
If the destination does not agree to accept the call and hangs up, on the original call, click Remove Hold.
- If the destination accepts the call, confirm with the destination that they can handle the call.
- In the Conversation window of the destination, click Merge Conversations.
- Click the Hang up button.
- When on a call, in the Action bar, click Transfer.
- In the Transfer window, select an available agent.
- Select Click to Call to initiate a voice call.
Click to Call automatically places the caller on hold.
- If the destination does not agree to accept the call and hangs up, on the original call, click Remove Hold.
- If the destination accepts the call, confirm with the destination that they can handle the call.
- In a Conversation window, click Merge Conversations.
- Click the Hang up button.
Transferring calls (WEB)
You can perform either a blind or a supervised transfer of a voice call from Web Ignite. To perform either type of transfer, you make a consultation call to another party (the available queues, employees, external, or Active Directory contacts) and then decide whether you want to transfer the call immediately (blind transfer) or wait to talk to the other party before you transfer the call (supervised transfer). You can also modify the call to make it a conference while talking to the consultative party.
Transition to alternate conversation types
During an interaction, agents can transition to an alternate interaction type if the agent is associated with that media type and if the customer’s relevant contact details are available. Agents can also edit contact information during an interaction.
See the "Transitioning from one conversation type to another (WEB)" section in this guide.
Requesting help
You can request help from other voice-enabled employees by clicking the Request Help Call Control button in the Sidebar. When you click the button, you can enter either a valid DN in the free form text box or select an employee from a pre-populated list. The system dials the DN, and the employee is added to the call when they accept.
Employees who accept requests for help join the call in Silent Monitor mode and are not audible unless they escalate to Coach or Barge.
Help requests to queues or to external numbers are not supported
The Request Help button is available as soon as a call is delivered to your Inbox. You can send multiple requests for help during a call, but you can only send one request at a time. Requests sent to employees in unavailable states fail.
The Request Help button is not available when a call is on hold.
- ln the Sidebar, click the Request Help button
Ignite displays a list of voice-enabled employees and enables you to look up contacts in the Active Directory (AD)
- In the Request Help window, do one of the following:
- Select a voice-enabled employee from the list
- In the Search box, enter a voice-enabled employee or AD contact's dialable number
- In the Search box, enter the name of a voice-enabled employee or AD contact
- Click Call.
Note:
You cannot cancel requests in progress. The Request Help button is disabled (turns gray) while the call is being established. Hover over the button with your mouse to view the connection status in a tool tip.
- If the request is answered within 180 seconds, notification that the request help is established is displayed, and the Request Help icon is displayed next to the caller's icon and on the Inbox item. The Request Help Call Control button is no longer available until the employee that answered the Request Help call hangs up.
- If the request is declined or times out, a notification that the request help was declined is displayed. The Request Help Call Control button is available, and the employee can make a new Request Help call.
- Click the Request Help icon in the handling icons.
Ignite displays a list of voice-enabled employees and their ACD status.
- In the Request Help window, do one of the following:
- Select a voice-enabled employee from the list
- In the text box, enter a voice-enabled employee's dialable number
- In the Search box, type the name or dialable number of a voice-enabled employee
- Click Call.
Note:
You cannot cancel requests in progress.
- If the request is answered within 15180 seconds, a notification that the request help is established is displayed, the Request Help icon is displayed next to the caller's icon and on the Inbox item. The Request Help icon is no longer available till the employee that answered the Request Help call hangs up
- If the request for help is not answered within 15180 seconds, the request times out and you can make another request for help.
The length of time a request help call rings for is defined in the Ignite configuration. By default, duration is set to 180. See the KB article SO3146 in Mitel Knowledge Management System for information on how to change this, and how it interacts with the Agent COS.
Contacting agents before transferring calls
You can choose to instant message or call other employees(DESKTOP and WEB) to alert them of an incoming transfer.
DESKTOP - The Click to Call option is not displayed when agents are in Do Not Disturb or absent from their agent groups.
While on a call, initiating Click to Call begins a consultation call with the agent. The original caller is put on hold until the end of the consultation call.
- If an agent has multiple voice agents, Ignite provides call control for the number associated with the currently active voice agent
- DESKTOP - Click to IM does not support group IM sessions.
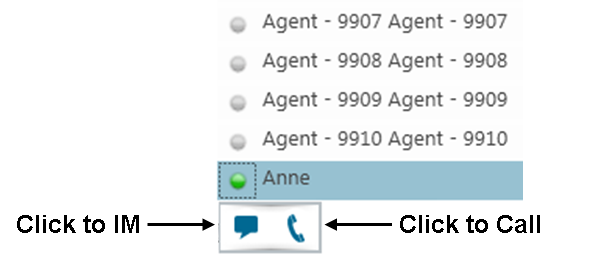
- In the Transfer window, select an available agent.
- Select Click to IM to initiate an IM session or select Click to Call to initiate a voice call. See the following figure
- Click Contacts.
- If the destination is not a recent contact, type its name or number in the Search field.
- Hover over the destination’s avatar and click Call.
Handling calls using the Active Call window (WEB)
When on a call, agents can use the Active Call window for basic call handling options.
For procedures on specific call handling actions supported in the Active Call window, see the appropriate sections of this guide.
For procedures on using Contacts to reach another person, see the appropriate sections of this guide.
- When on a call, click the Phone button.
- Choose a call handling option.
- To close the Active Call window, click the Phone button.