Selecting and customizing card designs
When you first open an agent, employee, or extension monitor, you can select a card design on the Add/Remove device IDs window:
- The Classic card displays the agent state, time in the state, presence, agent/employee name, agent login ID/employee ID, and extension number (or queue name for voice agents on ACD or on ACD Hold)) and presence.
- The Caller ID card displays the caller name and number (ANI), the number the caller/employee dials for incoming/outgoing calls, (DNIS) caller collected digits (requires IVR Routing Collect Caller Entered Digits), such as account numbers, the state, time in the state, presence, agent/employee name, agent login ID/employee ID, and extension number (or queue name for voice agents on ACD or on ACD Hold.
- The Call Cost card displays the same statistics as the Caller ID card, with the addition of call cost statistics.
- Custom cards you create and share
The Caller ID card is the default card design. You can use this card design, or select the Classic card or a customized card. You can create new card designs or copy existing card designs and modify them. For example, you can add or remove text and variables from cards and rearrange the information displayed. You can share card designs with other employees. When you select a card design for an agent, employee, or extension monitor, it is applied to all monitors of that type.
To select a card design
- Right-click an open position or time monitor and click Properties.
- Click Layout > Card design.
- Under Profile name, select a profile.
- Click OK.
To customize cards
- Under Card design,
- If you want to create a card design, click New.
- If you want to edit an existing card design, select a card design and click Edit.
- If you want to create a card design based on the Caller ID card or the Classic card, select either card and click Copy.
- On the New card design window, type the name of the new card design.
- If you want to share the design with other employees, select Share design.
- Click OK.
- Select the card and click Edit.
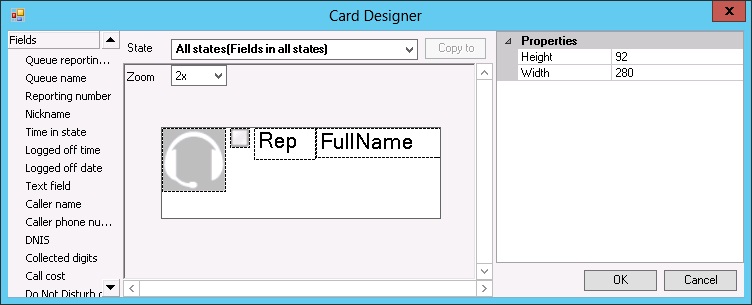
See the following figure.
- After State, select a state for the card design.
You can use the same card design for all states or you can customize cards for specific states.
- Under Fields, select a field type and drag and drop it to the card design.
- If you want to resize the field, click the field and use your pointer to move or resize the field.
- If you want to change the properties for a field, click the field and change the properties in the right pane of Card Designer.
- If you want to change the size of the card design preview, after Zoom, select a different magnification value from the list.
- Add additional fields to the card.
- Select Copy to if you want to copy the current design to the card of a different state.
- Click OK.
The new card design appears on the Card design list.
- Click OK.
Figure 1. Card Designer window
↑