Clustering enables multiple MBG servers to communicate with one another via TCP, sharing data in order to provide the following services:
Zones — When you first create a cluster, all MBGs are added to a single zone, named “Default”. To facilitate load balancing and isolate devices by region or function, you can subdivide the default zone into logical cluster zones.
Load balancing — By assigning a “weight factor” to each node in the cluster, you can distribute MiNET devices as you wish, either balancing the load equally between nodes or specifying that some nodes handle more traffic than others. The ratio of connected devices will approximately match the ratio of node weights that have been programmed in a cluster or cluster zone.
Scalability — By configuring a cluster, you increase the maximum number of devices that can be connected. To ensure system availability in the event a node fails, the cluster should include an extra MBG in an N+1 arrangement.
Resiliency — Two forms of protection are provided for MiNET devices:
Run Time Resiliency resiliency enables a device to reconnect to a node in the cluster after the device has become disconnected.
Boot Time Resiliency resiliency enables a device to connect to its own, local MBG whenever it starts or reboots.
To create a new cluster, you designate one MBG as "master" and another as "slave". You can then add other slaves to the cluster, designating them as "peer nodes". In the case of a master node failure, any slave node has the option to take ownership of the cluster as master.
Data is shared among all nodes in the cluster, with the master node being the authoritative data holder. Once cluster communications are established, the master node will “push” data to the slaves until they are synchronized with the master. When a slave joins the cluster, its existing database is deleted and a new database is provided by the master.
All nodes in the cluster contribute their licenses to the cluster pool. Any node that requires a license (for connections, compression, tap requests, or trunks) takes it from the pool. If the pool does not contain enough licenses to supply the node, the request fails and an alarm is generated. When a node is removed from a cluster, the licenses it originally contributed are also removed. Any licenses that it procured from the pool after joining the cluster are returned to the pool. If nodes without licenses are added to the cluster, they will also take from the pool as required.
Communication is maintained even if the cluster nodes are running different versions of MBG software. This enables load balancing and license sharing to remain in effect during major software upgrades (ie. from release 8.1 to 9.0). For example, a cluster with two nodes, MBG1 (the master node) and MBG2 (the slave node), can be upgraded by taking the master offline, installing the new software, bringing it back online, and then taking the slave offline and installing new software on it. For detailed instructions, see the following section.
Upgrading an MBG Cluster
Notes:
Do not attempt to update the MBG or cluster configuration after starting the process. Any changes you make, such as programming sets or trunks, will be lost when the slaves synchronize with the master.
As you proceed with the upgrade, the MBG Dashboard will reflect the state of the individual nodes, not of the complete cluster. The nodes will display the same settings once they are synchronized and the upgrade is complete.
Back up the Cluster Nodes:
On each node in the cluster, access the MBG main page. In the left-pane, under Administration, click Backup to perform a full MSL system backup. See the Mitel Standard Linux Installation and Administration Guide for detailed instructions.
Upgrade the Master Node:
Access the MBG main page on the master node.
(Optional) Redirect MiNet sets from the master node to other nodes in the cluster:
Note: The following steps are required only if your implementation includes MiNet sets.On the master node, click the System tab and then click Dashboard.
For the master node, click the Modify node icon.
In the Cluster weight of current node field, select 0. Click Save.
Wait for the sets to be redirected.
Stop the MBG service:
On the System tab of the master node, click Dashboard.
To stop the service immediately, click Stop. To stop the service after calls have completed, click Courtesy Down.
Upgrade MSL and MBG software on the master node.
If you are upgrading from MBG 8.x or earlier to MBG 9.2 or later, set the SSL cipher suite on the master node:
Note: If you are upgrading from MBG 9.0 or 9.1 to MBG 9.2 or later, the following steps are not required.On the master node, click the System tab and then click Settings.
In SSL Ciphers, select 8.x Compat. Click Save.
Start the MBG service:
On the System tab of the master node, click Dashboard.
Click Start. The Cluster Status field on the Dashboard will report a mismatch between major software versions. In this state, partial cluster functionality is available (including license sharing and set load balancing) but configuration updates will not be possible until all nodes have the same software version.
(Optional) Redirect MiNet sets back to the master node:
On the master node, click the System tab and click Dashboard.
For the master node, click the Modify node icon.
In the Cluster weight of current node field, select the original value (eg. 90 or 100). Click Save.
Wait for the sets to be redirected.
Upgrade the Slave Nodes:
Access the MBG main page on a slave node.
(Optional) Redirect MiNet sets from the slave node to other nodes in the cluster:
Note: The following steps are required only if your implementation includes MiNet sets.On the slave node, click the System tab and then click Dashboard.
For the slave node, click the Modify node icon.
In the Cluster weight of current node field, select 0. Click Save.
Wait for the sets to be redirected.
Stop the MBG service:
On the System tab of the slave node, click Dashboard.
To stop the service immediately, click Stop. To stop the service after calls have completed, click Courtesy Down.
Upgrade MSL and MBG software on the slave node.
Start the MBG service:
On the System tab of the slave node, click Dashboard.
Click Start.
(Optional) Redirect MiNet sets back to the slave node:
On the slave node, click the System tab and then click Dashboard.
For the slave node, click the Modify node icon.
In the Cluster weight of current node field, select the original value (for example 90 or 100). Click Save.
Wait for the sets to be redirected.
Repeat steps 1 through 6 for all slave nodes.
Wait for the cluster to synchronize. The Cluster Status field on the Dashboard should report that the nodes are successfully clustered.
Reset the SSL Cipher Suite on the Master Node:
Note: The following steps are required only if you are upgrading from MBG 8.x or earlier to MBG 9.2 or later.
Access the MBG main page on the master node.
Reset the SSL cipher suite on the master node:
On the master node, click the System tab and then click Settings.
In SSL Ciphers, select Default. Click Save.
Clustering Restrictions
MBG clustering has the following restrictions:
All nodes in the cluster must be able to reach all ICPs on the ICP list.
All devices must be able to reach all nodes in their primary and backup cluster zones.
Each node must be reachable using a unique IP address.
Each ICP must be reachable using a unique IP address.
Load balancing cannot be applied to MiCollab Client softphones, IP-DECT phones, SIP clients orthe MiVoice Business Console.
You cannot mix software releases within a cluster (for example, one node running Release 8.1 and another node running Release 9.0 is not supported).
Cluster Zones
A cluster zone is a non-overlapping subset of nodes within an existing cluster. By defining cluster zones, you enable traffic to be separated for geographic or functional purposes. For example, if you have servers in North America and Asia, it is a good idea to create a cluster zone for each region. Your devices can then be placed in the appropriate zone. This reduces network latency and optimizes the use of bandwidth, plus ensures that load balancing is performed correctly, with North American nodes only handling local traffic unless there is a problem with connectivity. In another example, if your enterprise includes users with distinctly different roles, you can assign them to unique cluster zones. In this way, you can keep trials users separate from regular users, or high-priority users separate from low-priority users.
When you first create a cluster, all nodes are added to a single zone, named "Default". To subdivide the Default zone, simply add one or more new cluster zones, name them (eg. "Trials"), and then direct devices to interact with a specific zone first.
After configuring a cluster zone, you should select a backup zone to act as a fallback in the event that the MBGs in the cluster zone become unavailable. For example, if your system has two cluster zones, "Default" and "Trials", the backup zone for "Default" will be "Trials" and the backup zone for "trials" will be "Default". See Cluster Zone Example.
Load Balancing
The "weight factor" that you apply to a node determines its participation in load balancing. To inform the cluster that a given node should handle more than an equal share of the load, increase its weight. If the node should handle less, lower the weight. For instance, assume there is a cluster of three nodes with weights of 50, 50 and 100. The two smaller servers (lower weights) will each handle roughly one quarter of the total load, while the third server will handle the remaining half of the load. If one of the three servers requires down time, simply change its weighting to zero and all its traffic will be directed to the other two nodes.
The weight factor represents a relative ratio between nodes. For example, if the master node is assigned a weight of 100, and slave node 1 is assigned a weight of 50, then the slave is given roughly 50% of the connection-handling capacity of the master.
Bear in mind that if you have created cluster zones, the weighting applies to specific zones, not to the entire cluster. For example, if you have two cluster zones, you can configure different weighting in each zone. Since Zone 1 contains two servers of equal capacity, assign a weight of 10 to both nodes; this will result in equal load balancing. But since Zone 2 has a new, high-capacity server and an old, low-capacity server, assign a weight of 20 to the first and 10 to the second; this will result in the newer server handling twice the load of the older server. This can be expressed as a formula: num-sets-connected-to-node = total-num-sets-in-zone x (weight-of-node / total-weight-of-all-nodes-in-zone) where total-weight-of-all-nodes-in-zone refers to nodes that are up.
Automatic load balancing can only be applied to traffic for MiNET IP Phones. It cannot be applied to the MiVoice Business Console, IP-DECT phones, MiNET softphones or SIP clients. However, it is possible to configure SIP clients to point to specific nodes by configuring a unique DNS name for each one. You can also direct SIP clients to multiple ICPs using DNS.
Resiliency
MiNET devices in a clustered environment are protected with two forms of resiliency: "Run time" and "Boot time".
Run Time Resiliency
Run time resiliency is required in case a MiNET device becomes disconnected from its current node due to a network problem or the node going offline. Should this occur, the device will attempt to reestablish a connection by consulting a "redirect list" of up to four IP addresses that it has received from MBG. The redirect list is comprised of the following:
the device's current node
up to two random, currently connected nodes in the device's own cluster zone
one random, currently connected node in the backup zone (if a backup zone has not been defined, the Default zone is used instead)
For example, if the device is currently connected to MBG1, and MBG1 is taken offline for maintenance, calls that are in progress will be dropped (unless they are locally streamed) and the device will immediately consult the redirect list and attempt to reestablish the connection. First it will try to connect to MBG1, but because MBG1 is offline this attempt will fail. The device will then attempt to connect to up to two other nodes in its own cluster zone. If these attempts fail, finally the device will attempt to connect to a node in its backup cluster zone.
Note:
Run time resiliency can only be used in a clustered environment.
The redirect list is considered a "soft" list because it is stored in RAM.
MBG re-sends the redirect list to MiNET devices whenever they are started or rebooted, and whenever the cluster configuration changes.
In the event a node becomes disconnected from the cluster, it can take up to three minutes for it to rejoin the cluster after the original problem has been resolved.
Boot Time Resiliency
When any MiNET device (including a non-clustered device) starts or reboots, it employs boot time resiliency to connect to its own, local MBG. It does this by checking its network configuration, which stored in non-volatile FLASH memory, and employs this to search for MBG. The network configuration is comprised of the following:
Resiliency List: An optional Resiliency List of up to four IP addresses can be configured on MBG and sent to 53xx Series MiVoice IP Phone. In a clustered environment, these addresses are typically for nodes belonging to the device's own cluster zone.
Teleworker IP: MiNET devices operating in teleworker mode will have a Teleworker IP address (programmed by pressing 7 key on bootup on most phones).
DHCP: If the device does not have a Resiliency List or Teleworker IP, DHCP is used to obtain an IP address.
For example, when a user reboots her MiNET device, the device will first check whether it has received a Resiliency List. If the list has not yet been configured or downloaded, the device will then check whether it has a Teleworker IP address. If the Teleworker IP address has not been configured, the device will obtain an IP address from a DHCP server.
Note: Boot time resiliency can be used in either a clustered or non-clustered environment.
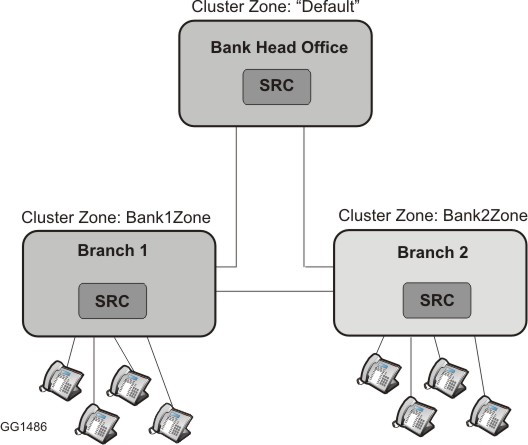
Cluster Zone Example
You can split a cluster into "zones" and then configure sets to have an affinity for a specific zone. If a cluster contains two geographically separate nodes, for example, two nodes in North America (Zone 1) and two nodes in Asia (Zone 2), then North American devices are configured to have an affinity for Zone 1 to minimize latency. If cluster Zone 1 is not available, then the North American devices will attempt to use Zone 2.
In the example illustrated below, a cluster of MBG servers with SRC is used in a Banking business that consists of a Head Office and two branch offices. Each branch office must handle the recording of its own connected sets. Branch 1 is assigned a cluster zone called "Bank1Zone" and all the phones at Branch 1 are configured to have affinity for "Bank1Zone". In the same way, Branch 2 sets are configured to have affinity for Bank2Zone. Head Office is the "Default" cluster zone and acts as the fallback for Bank1Zone. Bank2Zone acts as the fallback for Default, and Bank1Zone acts as the fallback for Bank2Zone.