
The CloudLink chat integration with MiCollab is a two-step process. In the first step, a connection is established between CloudLink and MiCollab and MiCollab users are activated on the CloudLink platform. In the second step the CloudLink chat is activated for the MiCollab users.
To enable CloudLink Integration
Prerequisite: As a MiCollab administrator, you can enable CloudLink Chat on MiCollab if you have the credentials for your administrator account on CloudLink. If you do not have the credentials, contact the Mitel channel partner. Also, ensure that the MiCollab server is in Integrated Mode.
In the MiCollab Administrator portal, under Configuration click MiCollab Settings.
On the right pane, the MiCollab Settings page opens.
In the CloudLink Integration tab, click the Connect CloudLink button.
A confirmation message appears that you are being redirected to the Mitel Authentication Portal for authentication.
NOTE: Ensure that the web browser pop-up blocker is disabled. This is mentioned in the confirmation message which redirects to the Auth Portal.
NOTE: If the Mitel Auth portal opens in an IE browser, the user should enable the Protected Mode (navigate to Internet options>Security>Protected Mode), otherwise the browser stops working after the credentials are entered and does not proceed with the authorization
Click OK to proceed.
In the Mitel Authorization Portal, enter your CloudLink account admin username (as given in the welcome E-mail that you received during CloudLink account creation) and then click Next.
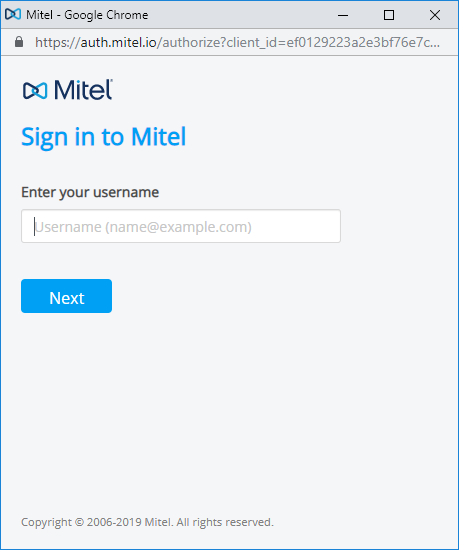
Enter the CloudLink account admin password and click Next.
The authentication process begins.
When the authentication is completed successfully, as indicated in the authentication status, MiCollab automatically starts the process of activating all the MiCollab users on CloudLink.
NOTE: If the authentication fails for reasons such as – auth portal pop-up time-out, token generation failed in the background, admin closed portal pop-up during the process, or no response from portal due to network issues, the error status notifies authentication has failed. If this happens, repeat the steps of this procedure from Step 2.
When the authentication is completed, MiCollab automatically starts the process of activating all MiCollab users on CloudLink.
The MiCollab admin can monitor the progress on the number of failed and successful users activated from the CloudLink Activation Summary.
NOTE: Users, who are on two different peered servers, having the same e-mail address, will be treated as a single user on CloudLink.
NOTE: After the integration is complete, the users who are on MiCollab Server but not on DeployU are not automatically synced (Deployment Profile status Un-Deployed). Import the users into DeployU by performing a manual import function (MiCollab Client Deployment > Import Users) or deploy the users manually from MiCollab Server Manager > Applications > Users and Services.
Failed User Report:
If the activation process fails, the MiCollab administrator can view a list of users for whom it failed and the reasons for the failure by downloading the Failed User Report, from the CloudLink User Activation Summary. After reviewing the report, the admin can apply below steps for resolving the errors.
NOTE: For CloudLink chat, at network firewall level, the following firewall related exceptions must be considered: The network firewall must allow access to CloudLink URLs on mitel.io (https on port 443). These URLs (*.mitel.io/*) should be reachable from MiCollab Server, PCs, which are used for opening the MiCollab Admin Portal and the PCs and mobile phones where MiCollab Client is running.
Proxy Exception List:
If your organization uses a web proxy, you may need to add the CloudLink server address to your proxy exceptions list. To add the server to your proxy exceptions list:
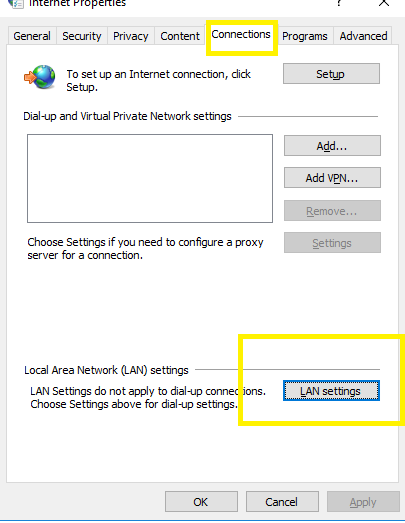
From Control panel, select Internet Options.
Under Connections tab, select LAN settings.
Enable the Use a proxy server for your LAN setting.
Enter the proxy address and the Port number and enable the Bypass proxy server for local addresses setting.
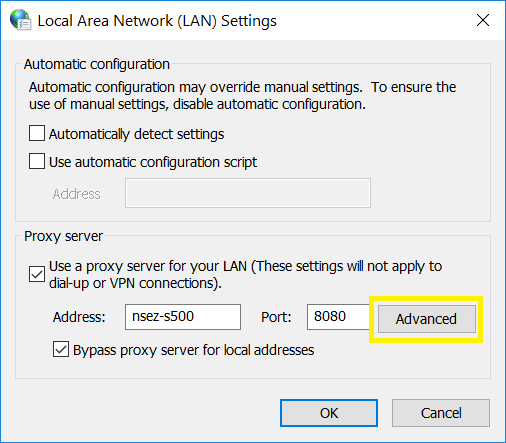
Click Advanced.
Add *.mitel.io in the Proxy Exceptions list box.
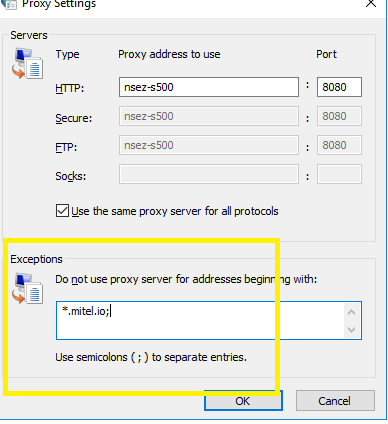
Click OK.
To enable and disable CloudLink Chat
Once user activation is done, proceed to the next step and click on the Enable CloudLink Chat button to start CloudLink Chat for the activated MiCollab users.
Enabling CloudLink chat automatically disables MiCollab chat. All existing MiCollab chats will be archived and will be available to users as read-only.
NOTE: CloudLink chat is not supported for failed users (failed due to reasons stated above), users with legacy clients or users running earlier version of Next Gen Clients (Releases earlier to 9.0).
NOTE: At a time, either MiCollab chat or CloudLink chat will be enabled. Chat between peer servers will not work if CloudLink chat is not enabled on all servers or if the servers are not using the same CloudLink account.
The Disable CloudLink Chat option disables CloudLink chat for MiCollab users. Disabling CloudLink chat for MiCollab users automatically enables MiCollab chat back for the users.
NOTE: It is recommended that the operations of enabling or disabling CloudLink chat be done during off hours because the process might impact the server performance.
To deactivate CloudLink Integration
The Disconnect CloudLink option terminates the connection between the CloudLink platform and MiCollab and disables the CloudLink features for all MiCollab users. To re-connect to CloudLink Platform, you must enable CloudLink integration from the MiCollab Administrator portal. See, Procedure: To enable CloudLink Integration.
MiCollab administrator can reconnect to CloudLink chat as long as the CloudLink account created for CloudLink chat integration with MiCollab is not deleted by the CloudLink administrator from the CloudLink Accounts Console.
NOTE: When the CloudLink is disconnected, the account details, user detail, and chat history remain preserved in the CloudLink. The CloudLink administrator can delete the user information (deletion of user will also delete their chats) from CloudLink through the CloudLink Accounts Console.
NOTE: To deactivate or delete the CloudLink account information, Mitel partners need to be contacted. Account deletion will delete all the users' information (including their chats) from the CloudLink account.
NOTE: If the users and their account information are retained in CloudLink, the users chat history is preserved securely in the CloudLink. To retrieve the chat history of one or more users, the partner or the administrator can make a legal request to Mitel in compliance with GDPR or local laws.
To re-establish CloudLink Connection
The CloudLink connection tokens are preserved securely in the MiCollab. In error conditions or when the connection tokens are lost, the following warning message is displayed.

To re-establish the connection, the account administrator must login again using CloudLink administrative account credentials.
Troubleshooting
| Scenario | Resolution |
| When two accounts (for example, personal and IP console) have the same email ids, the users using the IP console would see the chat conversation of the user and vice versa | Use a separate email id for two different accounts which is not used by any other user in the setup. Accounts with the same email id would be treated as a single chat account. |
Multiple user accounts with same primary email id When two user accounts (for example, MiTeam guest user and MiCollab user) have the same primary email id, the second user will be created without a primary email. This impacts all the features (such as, CloudLink Chat, MiTeam, and so on) which depend on primary email and will not work for the user. For example, If a MiTeam guest user exists on MiCollab Client server with primary email (for example, john@xyz.com), then you create a MiCollab user on MiCollab Server with the same primary email. This will create a user on MiCollab Client server but without a primary email for the user. This happens because the same primary email is being used for another account (MiTeam guest user account). |
|
The below section addresses the errors in the failed user report (csv import) and possible corrective action. For any other issues, please contact the Mitel Support with issues and log details.
| Failure reason / Error in CSV Report | Possible correction step to admin |
UCA Error - 412, Server not in integrated mode |
The MiCollab server is not in an integrated mode. Change the server to Integrated and retry the process. |
UCA Error - 400, Validation Error: User info must not be empty |
Check the user information in MiCollab Client Service. User information must not be null or blank. |
UCA Error - 400, Validation Error: Cloud Link GUID missing |
Check the user information in MiCollab Client Service. Try to delete and recreate the user. |
UCA Error - 400, Validation Error: Primary Email missing |
Check the user's primary email information in MiCollab Client Service. User’s email id should not be null, and it should be a valid id. |
UCA Error - 500, No user found with email: <email_id> |
Check the user's existence with the available email addresses in MiCollab Client Service. |
UCA Error - 500, Multiple users found with email: <email_id> |
Check the number of users associated with that particular email address in MiCollab Client Service. Only one user should be associated with one email address. |
UCA Error - 500, <THIS STRING WILL VARY BASED ON THE EXCEPTION SCENARIO> |
Unexpected error occurred at MiCollab Client Service. Try restarting the UCA services and retry the process. |
SAS Error – User’s Email/UC service not available |
Edit the user from USP and add/update the email address of the user if it is not pre-existing. |
| Edit the user from USP and provide the login id to enable the user for UCA service. | |
| CloudLink
Error - 500,
Email address is invalid |
Check and update the correct email id of the user from the USP page. Once the correct email id is provided, the MiCollab server will auto-trigger the user activation in CloudLink. |
| CloudLink
Error - 400,
Missing Unique Identifier |
Click the Retry Failed User button available under MiCollab Setting > CloudLink Integration |
| CloudLink
Error - 500,
Internal server error |
Click the Retry Failed User button available under MiCollab Setting > CloudLink Integration. If the issue still persists, check the public internet connectivity from MiCollab server. |
| CloudLink
Error - 401,
Unauthorized |
Click the Retry Failed User button available under MiCollab Setting > CloudLink Integration. |
| CloudLink
Error - 404,
Account Not Found |
Click the Retry Failed User button available under MiCollab Setting > CloudLink Integration. Check the accounts existence on CloudLink Accounts Console. |
| CloudLink
Error - 409,
User Already Exists |
Check whether the user exist in CloudLink Accounts Console. |