Managing Users
The Users page of a customer account contains a list of all the users in that customer account. All users in a customer account may interact with each other using various Mitel applications after CloudLink integration is enabled on these applications.
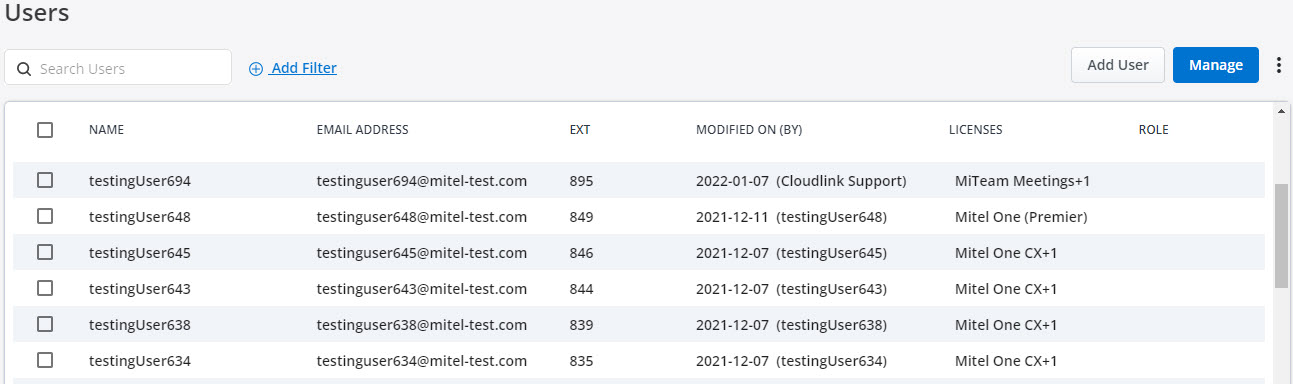
The Users page enables Mitel Partners and Account Admins of a customer account to add, edit, view, and search for a user; enable or disable administrative rights for a user; reset a user's password; resend welcome email to a user; assign products and licenses to a user; and delete a user from that account.
To access the Users page of a customer account:
- Mitel Partner: Click the account from the Accounts page. The Account Information page opens and the Users option will be displayed in the navigation menu in the left side of the Accounts Console Dashboard. Click the Users option.
- Account Admin: Click the Users option from the navigation menu in the left side of the Accounts Console Dashboard.
Add User
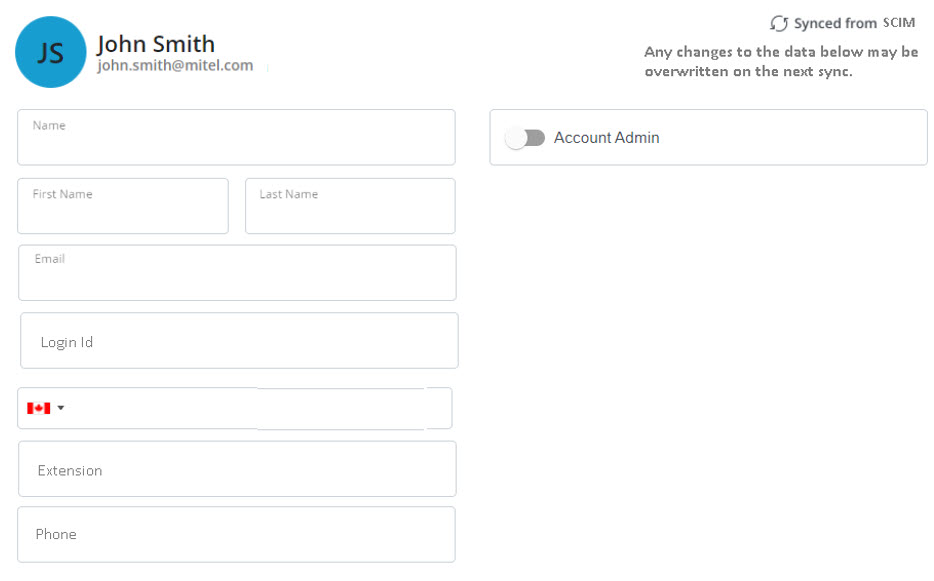
Mitel Partner and Account Admin can add users to customer accounts. An Account Admin of a customer account can add users to that account. To add a new user, click the Add User button. You must enter the following details in the form that opens.
- Enter a name in at least one of the fields among Name , First Name, and Last Name. This will be displayed as the NAME of the user in the Users page.
- Enter a valid email address for the user in the Email field. Make sure that you do not enter an email address already assigned to an existing user in the customer account.Note: If an error One or more of the attribute values are already in use is displayed while adding a user see, the Knowledge Based article (HO4817 CloudLink - Active Directory Managing disabled active directory accounts).
To enable administrative rights for the user, slide the Account Admin toggle button to the right. Click Create. A welcome email is sent to the user's email address, and the user’s edit page opens where the Partner or the Account Admin can assign licenses to the user.
To disable the administrative rights for a user, slide the Account Admin toggle button to the left and click Save.
You can also add users in bulk to a customer account in the CloudLink Accounts Console by using the bulk import feature. For more information, see Bulk Import of Users.
Filter Users
The + Add Filter  button in the Users page enables the Account Administrator or Mitel Partner to filter the list of users in an account by user type and the products for which they have licenses to. To filter, click the +Add Filter button. A drop-down list is displayed.

To filter the list of users by user type, select Property. From the list of properties that are displayed, choose any type of property. To view a list of administrative users, all users, registered or unregistered users, PBX users, MiCloud or IoT connected users, click the respective options from the Property list: Admins, Users, Registered, Unregistered, PBX Users, MiCloud Connected, IoT Connected, or Inactive.

To filter the list of users based on the products for which they have license to, select Product. The products for which a user is licensed are displayed under the Product list.
Search for Users
In the Search bar, type the name or the email address of the user you are searching for. The Users page displays a list of matching users as you type the letters.
Import Users
To add users in bulk to a customer account, select the customer account and click Import Users. For more information about adding users in bulk to a customer account, see Bulk Import of Users.
Edit User
To edit the details of a user, click the user and edit the user details in the form that opens. You can edit the Name, First Name, Last Name, Email address, and mobile number of a user; assign MiTeam Meetings license to a user (if applicable); enable or disable the Account Admin toggle button; resend the welcome email to a user; reset the password of an Account Admin; or Delete a user. Click Save to save the changes or Cancel to discard the changes.
- If a user is created from an external source (such as from SCIM, PBX, or any other source except the Accounts app), some of the fields may be disabled for edit in the Accounts app. If any change is made in the source, the data may be overwritten on the next sync.
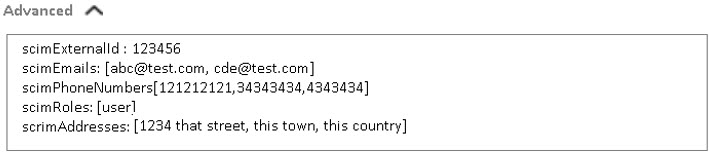
- If a user is imported from SCIM, the User Edit page displays an Advance section, which contains the SCIM data for users.
Assign a User as Account Admin
To enable administrative rights for a new user, slide the Account Admin toggle button to the right in the user details form when you create the user. The toggle button turns blue when a user is set as an Account Admin. To enable or disable administrative rights for a user, click the user from the Users page and in the user details form that opens, slide the Account Admin toggle button respectively to the right or to the left.
Reset Passwords
To reset the password of all users in a customer account at once, click the Manage option and from the panel that opens, click Reset passwords for all. To reset the password of selected users, select the users from the Users page and do either of the following.
- Click the
 icon. From the panel that opens, click Reset passwords.
 - Click the Manage option and from the panel that opens, click Reset passwords.
An email containing the Reset Password link is sent to the user’s registered email address.
Send Welcome Email
To send a welcome email to all the users in the customer account at once, do either of the following:
- Click the icon from the Users page and from the panel that opens, click Send welcome emails to all or,
- Click the Manage option from the Users page, and from the panel that opens, click Send welcome emails to all.
To send a welcome email to selected users, select the users from the Users page and do either of the following:
- Click the icon from the Users page and from the panel that opens, click Send welcome emails or,
- Click the Manage option from the Users page, and from the panel that opens, click Send welcome emails.
Manage
Clicking the Manage option in the Users page of a customer account opens a panel that displays the number of MiTeam Meetings licenses available for that account and options, to assign MiTeam Meetings license to users, to unassign MiTeam Meetings license of existing users, to send welcome emails to all users, and reset the password of users.
- the account has MiTeam Meetings integration turned on and MiCollab integration turned off.
- the account has at least one MiTeam Meetings subscription/order assigned to it.
- the account is not a Partner Account.
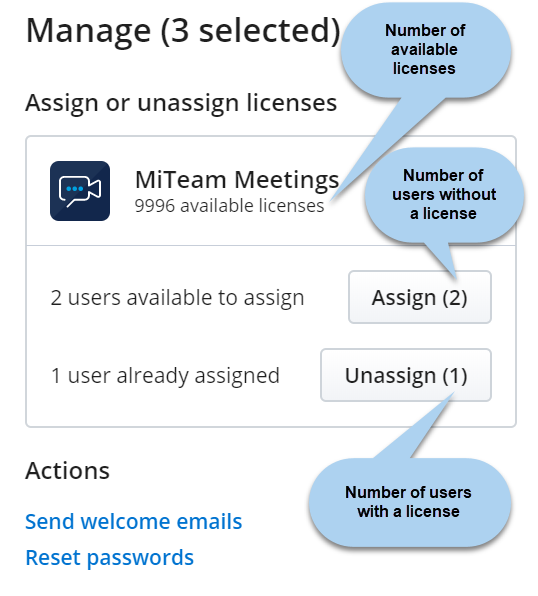
- To assign MiTeam Meetings license to all the users in the customer account at once, click the Manage option, and click Assign all from the panel that opens.
- To unassign MiTeam Meetings license of all the users in the customer account at once, click the Manage option, and click Unassign all from the panel that opens.
- To assign MiTeam Meetings license to selected users, select the users from the Users page, click the Manage option, and click Assign from the panel that opens.
- To unassign MiTeam Meetings license to selected users, select the users from the Users page, click the Manage option, and click Unassign from the panel that opens.
Delete User
- From the Users list page:
Select the check box associated with the user(s) whom you want to delete, and click the
icon.From the panel that opens, click Delete users. Delete Selected User(s)? dialog box is displayed.
Type the word delete, and click Delete.
- From the User details page:
Select the user from the Users page and scroll down to the bottom of the page.
Click Delete. Delete User dialog box is displayed.
Type the word delete, and click Delete.
The user will be deleted.
- You cannot delete a Mitel Partner, or a user synced from MiCloud Connect.
- Deleting a user synced from a PBX will only remove the CloudLink account of the user and will not delete the user from the PBX. After deletion, the user will continue to be listed in the Users page of the CloudLink Accounts console. To add a CloudLink account to the user again, the Account Admin must send a welcome email to the user.
- Deleting the SCIM users synced from Azure Active Directory will only remove the CloudLink account of the user and will not delete the user from Azure Active Directory.