The NuPoint Unified Messaging system offers a programmable RS-232 message waiting application that allows you to set up either the built-in COM port 2 or a single port of an optional add-in serial card to provide the necessary AT commands to be sent to an external modem.
The modem line port is in turn connected to an ONS port on the PABX which allows NuPoint UM to turn on and off message waiting lamps in a similar way as that done by the DTMF-to-PBX message waiting application.
Mitel recommends that external US Robotics modems be used for this application. Other modems will work, however, Mitel cannot provide support in troubleshooting other vendor modems.
The following switch settings need to be set on the US Robotics Sportster modem:
US Robotics Switch Settings
| 1 | 2 | 3 | 4 | 5 | 6 | 7 | 8 |
| down | up | down | down | up | up | down | down |
Note: The NuPoint Unified Messaging system expects to see the string 'NO CARRIER' returned by the modem after each message waiting activation. If the modem does not send this string, the NuPoint Unified Messaging system treats it as a failure and queues the message waiting task again and again (up to 18 times). The US Robotics modem with the switches set as above will meet this requirement and will work. If you do not have a modem that returns the 'NO CARRIER' result code, the message waiting application will not work.
Perform the following steps to configure the programmable RS-232 MWI using a modem:
-
From the navigation tree, click Offline Configuration > Edit Offline Configuration. The Offline Configuration navigation tree opens.
-
When prompted to Duplicate Active Configuration, click Yes.
-
Click External Applications.
-
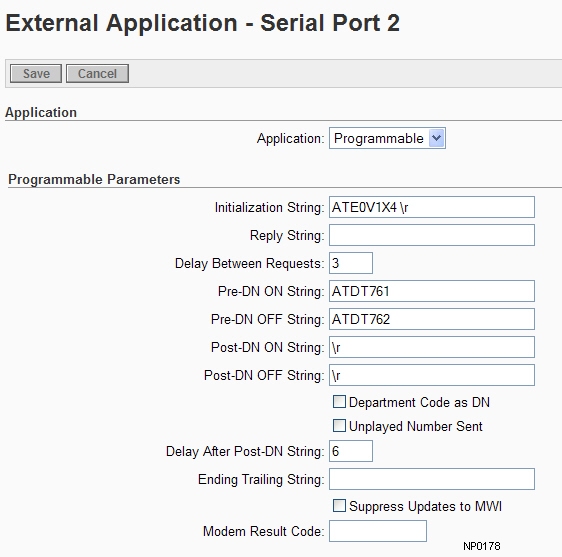
Select a free Serial Port and then select Programmable from the Applications list. Set up the parameters as shown below.
-
In the navigation tree, select Commit Changes and Exit. Confirm the commit. Your changes are now saved to the duplicate (inactive) configuration. Configuration changes will not take effect until you have activated the inactive configuration.
-
To complete the RS-232 message waiting application, you must now assign the correct message waiting type to the mailboxes that will be using it.