-
manually, or
-
by configuring the server to obtain the date and time from a Network Time Server on the internet. A network time server communicates the time to other computers over the Internet using Network Time Protocol (NTP).
-
Under Configuration, click Date and Time.
-
Click Set System Time Zone and select your time zone from the list.
-
Enter the date and time in the fields provided.
-
Select Enable Network Time Server to instruct the server to periodically synchronize the system clock to a network time protocol (NTP) server. If you select this option, enter the hostname or IP address of the NTP server in the field provided.
-
Click Save.
-
Click Enable Network Time Server.
-
Enter the hostname or IP address of a Network Time Server.
-
Click Save.
-
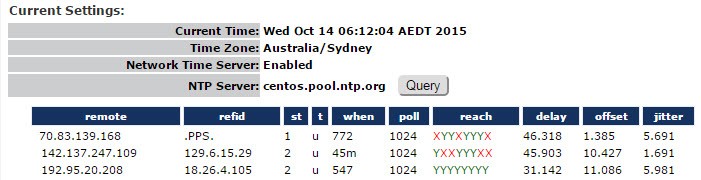
After you have saved the hostname or IP address of a new Network Time Server, click the Query button. Clicking the Query button issues the ntpq -c peers Linux command.
-
The command results are displayed for the NTP server (or for a list of servers if a pool is referenced by the specified hostname or IP address).

-
After a few minutes, press Query again. An * appears in front of one of the NTP servers. The * indicates that the system time is being synchronized with that NTP server.
The following table provides the meaning of the command output:Command output Meaning remote The hostnames or IP addresses of the remote NTP servers to which the system can be synchronized (based on the pool of available NTP servers). The character that precedes the hostname or IP address indicates the following: * The system time is being synchronized with the NTP server. # The host is selected for synchronization, but distance from the host to the server exceeds the maximum value. o The host is selected for synchronization, and the PPS signal is in use. + The host included in the final synchronization selection set. x The host is the designated false ticker by the intersection algorithm. . The host is selected from the end of the candidate list. - A host discarded by the clustering algorithm. blank Indicates a host is discarded due to high stratum and/or failed sanity checks. refid The current source of the synchronization for the remote host. st The stratum used by the remote host. The lower the number, the closer you are to the time source. Stratum 16 indicates that the system is not synchronized with a time server. t The type of clock used on the NTP server (L stands for local clock; u for an Internet clock). when The number of seconds since the last poll. poll The number of seconds between NTP transactions. When this time expires, the NTP daemon polls the remote time server. The polling results are displayed in the "reach" field. reach The status of the last eight NTP transactions, with each transaction represented by a colored letter. The letter "Y" in green indicates that a response was successfully received from the remote time server. The letter "X" in red indicates that a response was not received. Since this field is a circular log buffer, it is continually refreshed, with the most recent result on the right and the oldest on the left.
Example: If the field contains XXXXXXYY, the two most recent NTP transactions have been successful while the previous six have failed.
delay Indicates the time, in milliseconds, between an NTP request and the answer. offset The difference in milliseconds between the time on your local computer and that on the NTP server. Jitter The error rate in your local clock, expressed in milliseconds.
-
Click Disable Network Time Server and then click Save.
-
Select your time zone.
-
Enter the date and time in the fields provided.
-
Click Save.