Reach Through - Configuration
Configure MiVoice Business Administrator Account for Reach Through
Enable SNMP Agents
Enable the SNMP agents on every MiVoice Business network element in the SDS Admin Group. This procedure clears the alarm that is generated when you start sharing between the MiVoice Business servers.
- Launch the browser.
-
Navigate to the IP address of the MiVoice Business server.
-
Log into the System Adminstration Tool.
-
Navigate to Voice Network ⇒ Admin Groups
-
Click Change.
-
Select the admin group name.
-
Click Save.
-
Navigate to System Properties ⇒ System Administration ⇒ SNMP Configuration
-
Click Change.
-
Check 'Yes' for 'Enable SNMP Agent'.
-
Set a contact.
-
Set a location
-
Set the Read Only Community to 'public'.
-
Set the Read/Write Community to 'public'.
-
Click Save.
Import MiVoice Business Mitel Root Certificate to Browser
MiVoice Business web server uses a Mitel signed certificate to encrypt web connections. A common certificate is used for all MiVoice Business platforms. To support reach through navigation from MiCollab server manager to the MiVoice Business system administration tool you must download this common Mitel Root Certificate from one of the MiVoice Business servers and import it into your Internet Explorer or FireFox browser as a ‘Trusted Root Certification Authority’.
-
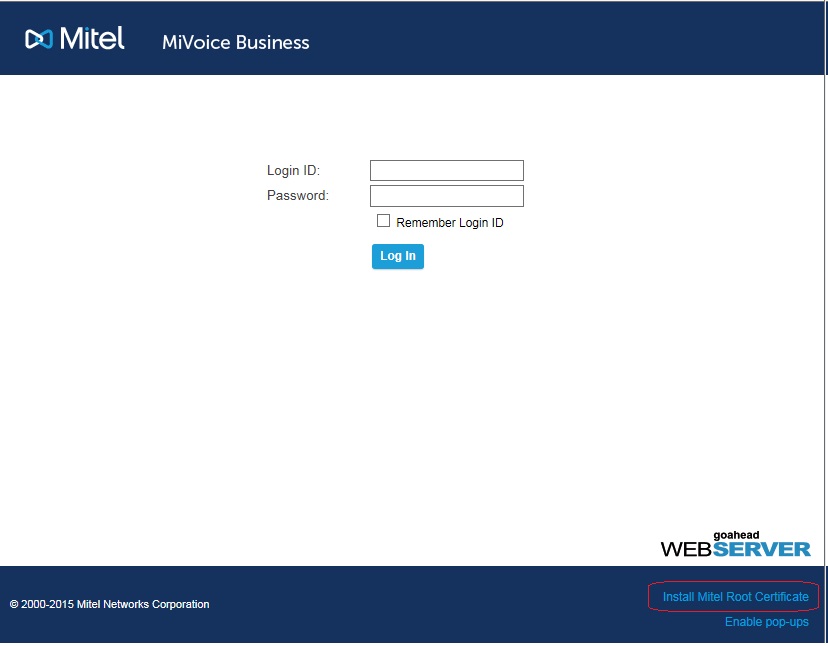
Access the log in page of the MiVoice Business System Administration tool.
-
Click Install the Mitel Root Certificate.
-
Save the Mitel Root Certificate to a location on your PC hard drive.
-
Follow the instructions for your Internet Explorer or FireFox browser to import the file.
For Internet Explorer browsers only, you must also add the MiVoice Business servers to the ‘Local intranet’ security zone:
-
Under Tools, click Internet Options.
-
Click Security, click Local intranet, and then click Sites.
-
Click Advanced and add the IP addresses of the MiVoice Business systems as websites.
-
Click Close.
Upload or Import Trusted Root Certificate
If the trusted Mitel root certificate is not installed on your PC, you will receive security certificate warnings when you access MiVoice Business tools, such as the System Administration Tool.
To prevent these warnings from appearing, you install the Mitel Root Certificate in your browser. The certificate is the same one for both Internet Explorer and Firefox.
Upload MiVoice Business Mitel Root Certificate to MiCollab Server
-
Access the log in page of the MiVoice Business System Administration tool.
-
In the bottom right corner of the login screen, click Install Mitel Root Certificate.
-
Follow the instructions for your browser.
OR
Import MiCollab Web Server Certificate to Your Browser
-
Log into the MiCollab server manager.
-
Under Security, click Web Server.
-
Click the Web Server Certificate tab.
-
Select Download the current web server certificate.
-
Click Perform.
-
Click Download.
-
Select Open with WinZip and click OK.
-
Extract the certificate file to a folder on your local PC.
-
Import the certificate file from your PC into your browser as a "Trusted Root Certification Authority".
To import the certificate into Internet Explorer:
-
Launch Internet Explorer.
-
Select Tools and then click Internet Options.
-
Click the Content tab and then click the Certificates button.
-
Select Trusted Root Certification Authorities and click Import. The Certificate Import Wizard opens.
-
Click Next.
-
Click Browse.
-
Browse to the downloaded mitelcert.cer file and click OK.
-
Click Next.
-
Select Place all Certificates in the following store.
-
Click Browse.
-
Select Trusted Root Certification Authorities.
-
Click OK.
-
Click Next.
-
Click Finished.
-
Click Yes. An Import was successful dialog appears.
-
Click OK.
After the certificate is installed, exit Internet Explorer, and then restart it. You can now log in to MiVoice Business and not receive the security certificate warnings.
To import the certificate into Firefox
-
Launch Firefox.
-
Navigate to the IP address of the MiVoice Business server.
-
Click I Understand the Risks followed by Add Exception...
-
Clear the Permanently store this exception check box, and then click Confirm Security Exception.
-
After you confirm the exception, the MiVoice Business System Admin Login page is displayed. You can now install the Mitel Root Certificate..
-
Click the Firefox button at the top of the Firefox window and select Options ⇒ Options (or select it from the Tools menu if the Menu Bar is showing).
-
Click Advanced ⇒ Certificates (or Encryption in older versions of FireFox ⇒ View Certificates.
-
Make sure the focus is on the Authorities tab and then click Import.
-
Navigate to the mitelcert.cer file you saved and click Open.
-
In the resulting dialog box, select Trust this CA to identify websites and Trust this CA to identify software developers.
-
Click OK.
-
Click Ok.
After the certificate is installed, exit FireFox, and then restart it. You can now log in to MiVoice Business and not receive the security certificate warnings.
Set up Security Exceptions for Application Reach Through
The popup blocker must be disabled and security exceptions created as these interfere with application reach through.
Internet Explorer
-
Launch Internet Explorer.
-
Select Tools and then click Internet Options.
-
Click the Security tab.
-
Select the 'Local intranet' zone.
-
Click Sites.
-
Click Advanced.
-
Add the IP addresses for MiVoice Business servers to add them to the zone. Use https://<IP address>.
-
Click Close.
-
Click OK.
-
Click the Privacy tab.
-
Clear the Turn on Pop-up Blocker check box or add the IP addresses for the MiVoice Business servers to the list of websites to allow (under 'Settings').
-
Click OK to close the Internet Options dialog.
Firefox
-
Launch Firefox.
-
Click the Firefox button at the top of the Firefox window and select Options > Options (or select it from the Tools menu if the Menu Bar is showing).
-
Choose Content.
-
Clear the Block pop-up windows check box or click Exceptions and add the IP addresses of the MiVoice Business servers to the list of websites to allow.
-
Click OK to close the Options dialog.
Extend the MiVoice Business System Administration Security Session Timeout
By default, System Administration Tool sessions time out after 15 minutes of user session inactivity. You can adjust the time out period as follows:
-
Launch the browser.
-
Navigate to the IP address of the PRIMARY MiVoice Business server.
-
Log in (Login ID 'system', Password 'default').
-
Click System Administration Tool.
-
Navigate to System Properties ⇒ System Administration ⇒ System Security Management.
-
Click Change.
-
Set the User Session Inactivity Period to 720.
-
Click Save.
Trust the Self-signed Certificate
To avoid receiving trusted certificate warnings when using the server manager interface, perform this procedure:
-
Launch the browser.
-
Navigate to the Local IP address of the MiCollab server manager (that is https://<ip of MiCollab>/server-manager)
-
You are prompted to stop because the server uses a self-signed certificate.
-
Override the default choices and continue to the server.
-
Login (Username = admin, Password = default).
-
Navigate to Security ⇒ Web Server Certificate.
-
Select Download the current web server certificate.
-
Click Download.
-
The web server certificate is saved as a zip file.
-
Open the zip file and extract the certificate contained within it.
-
Import the certificate into your browser.
Internet Explorer
-
Launch Internet Explorer.
-
Select Tools and then click Internet Options.
-
Click the Content tab and then click Certificates.
-
Select Trusted Root Certification Authorities and click Import. The Certificate Import Wizard opens.
-
Click Next.
-
Click Browse.
-
Browse to the extracted certificate (.crt) file and click OK.
-
Click Next.
-
Select Place all Certificates in the following store.
-
Click Browse.
-
Select Trusted Root Certification Authorities.
-
Click Ok.
-
Click Next.
-
Click Finished.
-
Click Yes. An Import was successful dialog appears.
-
Click Ok.
After the certificate is installed, exit Internet Explorer, and then restart it. You can now log in to MiCollab and not receive the security certificate warnings.
Firefox
-
Launch Firefox.
-
Click the Firefox button at the top of the Firefox window and select Options ⇒ Options (or select it from the Tools menu if the Menu Bar is showing).
-
Click Advanced ⇒ Certificates ⇒ View Certificates.
-
Make sure the focus is on the Authorities tab and then click Import.
-
Navigate to the extracted certificate (.crt) file you extracted from the zip above and click Open.
-
In the resulting dialog box, select Trust this CA to identify websites and Trust this CA to identify software developers.
-
Click Ok.
-
Click Ok.
Add IP Addresses to MiCollab Trusted Network (MiVB Multi-Instance platforms only)
If your system is a MiVoice Business Multi-Instance platform, you must add the IP addresses of the MiVoice Business System Administration Tool and the IP address of the Multi-Instance manager to the MiCollab trusted network.
For example, if the IP address of the system administration tool is 10.46.26.100, you would need to add the following IP addresses to the MiCollab trusted network:
10.46.26.100
10.46.26.101.
A simpler option is to just add the subnet to the trusted network (that is, 10.46.26.1).
To add the IP addresses to the MiCollab trusted network, see Configure Networks.
Remove Embedded Voicemail from the default template
MiCollab default templates create directory numbers with a mixture of n and n+1 length (1000, 1*000, 10*00) and so forth. This format is incompatible with embedded voice mail. MiCollab Release 7.0 and later uses the default template as the basis for MSCR calls to create new phones, regardless of which role is selected. Therefore, you must remove the embedded voice mail feature from the default template in the MiVoice Business.
-
Launch a new browser.
-
Navigate to the IP address of the MiVoice Business server.
-
Log in (Login ID 'system', Password 'default').
-
Click System Administration Tool.
-
Navigate to Users and Devices ⇒ Templates ⇒ User and Service Templates.
-
Right-click on the Voicemail template and choose Delete Voicemail then click OK in the confirmation dialog.