Manage Third-Party Certificates from an Alternate Certificate Authority
To enable remote client stations to log in and MiCollab Mobile Client users to establish connections, you can purchase an SSL certificate from a alternate third-party Certificate Authority and then import it onto the MSL server.
If you have an MSL application server deployed in LAN mode with an MBG / Web Proxy server in the demilitarized zone (DMZ) or network edge, your remote clients will connect to the MSL server through the MBG / Web Proxy server. For this configuration, purchase an SSL certificate for the MBG / Web Proxy server and then share the certificate and private key file with the LAN-based MSL servers.
If you have MSL application servers deployed in LAN mode behind a corporate firewall, your remote clients will connect to the MSL servers through the firewall. For this configuration, purchase a unique SSL certificate for each MSL server.
Supported Formats
-
PEM certificates typically have extensions such as .pem, .crt, .cer, and .key. They are Base64 encoded ASCII files and contain "-----BEGIN CERTIFICATE-----" and "-----END CERTIFICATE-----" statements. Server certificates, intermediate certificates, and private keys can all be put into the PEM format. Apache and similar servers use PEM format certificates. Several PEM certificates, including the private key, can be included in a single file, one below the other, but most platforms, such as Apache, expect the certificates and private key to be in separate files.
-
PKCS#12 or PFX format is a binary format for storing the server certificate, any intermediate certificates, and the private key in one encryptable file. PFX files usually have extensions such as .pfx and .p12. PFX files are typically used on Windows machines to import and export certificates and private keys.
MSL supports the SHA-2 cryptographic hash function, along with variants such as SHA-256.
Configuration Example
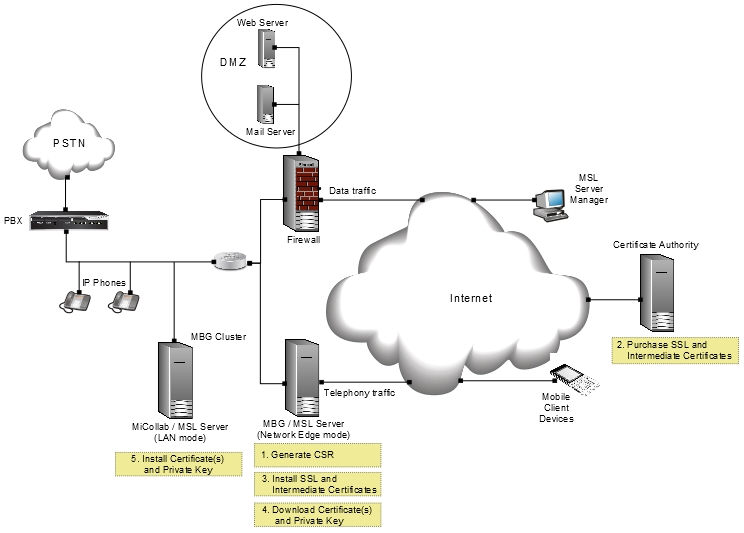
The illustration, below, demonstrates the five basic steps that must be completed to implement a third-party SSL certificate when you have an have an MSL application server in LAN mode with an MBG / Web Proxy on the network edge. First, generate the certificate signing request (CSR) on the MBG / Web Proxy. Second, submit the CSR to the CA, complete the online registration forms and purchase your web server certificate and intermediate certificates. Third, install the certificates on the MBG / Web Proxy (the MSL server that was used to generate the CSR). Fourth, download the certificates and private key from the MBG / Web Proxy. Fifth, install the certificates and private key on the MSL application server on the LAN. The application server can be equipped with Mitel software such as MiVoice Business, MiCollab Client, Open Integration Gateway, Oria or, as illustrated below, MiCollab.
Programming Steps
-
Generate a CSR and Purchase the SSL Certificate OR Enroll for a web server certificate issued by Enterprise CA using SCEP
-
Install the SSL Certificate Files on other MSL Servers (required only if your deployment has LAN-based MSL application servers accessed via an MBG / Web Proxy)
-
Uninstall the SSL Certificate (required only if you wish to resume using the default self-signed certificate)
Enroll for a web server certificate issued by Enterprise CA using SCEP
To automatically enroll for a web server certificate issued by a local Enterprise CA using the Simple Certificate Enrollment Protocol (SCEP), select the Enterprise CA - SCEP Enrollment option.
-
Log into the MSL Server Manager.
-
Under Security, click Web Server.
-
Click the Web Server Certificate tab.
-
Select Enterprise CA - SCEP Enrollment option.
-
Click Perform.
-
Fill out the SCEP form:
-
CA Address: the FQDN or IP address of the SCEP server
-
URI Path: the URI to use in SCEP communication (defaults to Windows SCEP URI for clients)
-
Enrollment Password: the enrollment challenge password if required
-
Common Name: the Common Name to use in the Certificate Signing Request (CSR) (defaults to the system hostname)
-
Alternate Name(s): the Subject Alternate Name(s) to include in the CSR
-
-
Click Get Certificate.
-
Upon submitting the form, the data is validated and access to the SCEP server is verified. On successful verification, the SCEP enrollment is initiated to request a certificate, a progress status of the SCEP transaction is provided.
-
If the enrollment request is rejected, check the SCEP server for the details of the failure.
-
If the enrollment request is in pending state, the administrator of the SCEP server needs to approve or deny the certificate request.
-
-
Reload the MSL server manager for the newly acquired web server certificate to take effect.
Generate a Certificate Signing Request (CSR) and Purchase the SSL Certificate
You need a certificate signing request (CSR) in order to purchase an SSL certificate from an alternate third-party Certificate Authority (CA).
-
Log into the MSL Server Manager.
-
Under Security, click Web Server.
-
Click the Web Server Certificate tab.
-
Select Generate a new Certificate Signing Request (CSR), and then click Perform.
-
Enter the information required to generate a certificate signing request (CSR). If you have previously generated a CSR, the previously entered values are displayed.
Note: When completing the fields, use first capital letters only (for example Ontario, not ONTARIO).Field Name Description Country Name (two letter code) Enter the two-letter International Organization for Standardization- (ISO-) format country code for the country in which your organization is legally registered. Examples are, CA for Canada and US for United States. State or Province Name Enter the full name of state or province where your organization is located. Do not abbreviate. The first letter of the name entered must be a capital with remaining letters lower case. For example, you would enter "Ontario" for Mitel Corporation. Locality Name The Locality Name is the city, town, route used in the mail address of the organization that is submitting the CSR. Enter the full name of the city in which your organization is located. Do not abbreviate. Organization Name The Organization Name is the name used in the mail address of the organization / business submitting the CSR. Enter the name under which your organization / business is legally registered. The listed organization must be the legal registrant of the domain name in the trusted certificate request. If you are enrolling as an individual, please enter the certificate requestor's name in the Organization field, and the DBA (doing business as) name in the Organizational Unit field. Organizational Unit Name Enter the organization unit or department name. Use this field to differentiate between divisions within an organization. For example, "Engineering" or "Human Resources." If applicable, you may enter the DBA (doing business as) name in this field. Common Name Enter the common name for the service to which you plan to apply your certificate. A web browser checks this field. It is required.
The common name can be entered as a fully qualified domain name (FQDN) or as a domain name with a wild card character (e.g. *.example.com) in order to generate a wild card certificate request.
The default value presented in this field is the FQDN of the server including the domain name (for example, mbg.example.com).
-
Check to ensure that you have entered all the required information correctly before you generate the CSR. If you need to make changes, regenerate the file. Do NOT modify the text of the generated file in a text editor such as Notepad.
-
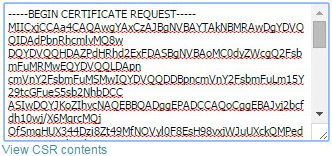
Click Generate Certificate Signing Request. The system generates a CSR file.
-
Copy the text of the CSR file.
-
Access the web site of a Certificate Authority and purchase a certificate. You will be prompted to do the following:
Note: Each Certificate Authority has unique requirements. Accordingly, you may not be prompted for all of the steps listed below, and some of the field names may vary.-
Select the number of domains you wish to protect:
-
Single domain: Select this option if your implementation has one MSL server on a single domain (eg. www.domain.com and domain.com).
-
Multi-domain: Select this option if your implementation has multiple MSL servers on a specific number of domains (eg. www.domain.com and domain.com, plus three sub-domains).
-
Multi-domain and wildcard: Select this option if your implementation has multiple MSL servers with a large number of sub-domains (eg. eg. www.domain.com and domain.com, plus an unlimited number of sub-domains).
-
-
Enter your account and contact details in the CA web form:
-
Login Name and Password.
-
Name, Email Address, and Telephone Number.
-
Organization Name and Address.
-
Domain Name.
Note: Some CAs may prompt you to enter the Subject Alternate Names (SANs) or wildcard domain in this step. For more information on these entries, see below. -
Web Server Software.
Note: Select Apache. Other options are not supported on the MSL platform. -
Hashing Algorithm.
-
-
Paste the text of the CSR file into the CA web form.
-
If you have purchased a certificate for multiple domains or a wildcard domain, enter the following in the CA web form:
-
Subject Alternate Name (SAN): Enter the domain name for each service (or "virtual host") in the LAN that you want to include in this certificate. For example, if your deployment includes a number of MSL application servers on the LAN, you would enter the FQDN of each server such as micollab.mitel.com, mivb.mitel.com, and micollabclient.mitel.com. If these addresses are not configured correctly, remote client access to the LAN-based services will be denied.
Note: You can also enter an IP address as a SAN if your users are accessing an MSL application server from the internal network rather than through the MBG / Web Proxy. Typically, you would do this for testing purposes or to enable direct access from the LAN.
-
Wildcard: To consolidate your domain and unlimited sub-domains into a single SSL certificate, enter a wildcard domain name. For example, if your deployment includes numerous MSL application servers on the LAN (for example, MiCollab, MiVoice Business, MiCollab Client, MiCollab Unified Messaging, generic MSL, and Oria), you can include them all by entering an FQDN such as *.mitel.com.
-
-
-
Complete the purchase transaction. The Certificate Authority will do the following:
-
Send you the certificate files.
These include your SSL server certificate and, if required, intermediate certificates. An intermediate certificate is a subordinate certificate issued to establish a certificate chain that begins at the CA's trusted root certificate, carries through the intermediate and ends with your own SSL server certificate. Some CAs provide a single intermediate certificate while others provide multiple intermediate certificates. There should be no need to open and inspect the files, provided that they are in the correct format and that the intermediate certificates have been bundled into a single file by the CA. Consult the documentation provided by your Certificate Authority for instructions to obtain, unzip and identify exactly which files you need to use.
Note:-
If your CA requires you to open a number of intermediate certificates and assemble them into a single bundled file, perform this task with a text editor that employs Unix line formatting. Do not use an editor that employs Windows line formatting such as Notepad.
-
The intermediate certificate is required for MiCollab Mobile Client deployments; without it, client connections will fail and users will be unable to download their deployment configurations.
-
Contact the administrator for the domain used in a CSR.
The administrator is identified using information supplied when your organization originally registered its internet FQDN.
-
-
Upload the certificate files to a location that is accessible to the MSL server.
Install the SSL Certificate Files on the MSL Server
Use the following procedure to install the certificate files that you received from the alternate third-party Certificate Authority onto the MSL server that generated the CSR. The Upload and install a web server certificate option supports only certificates and keys based on RSA algorithm for upload.
-
Log into the MSL Server Manager for the system that was used to generate the CSR.
-
Under Security, click Web Server.
-
Click the Web Server Certificate tab.
-
Select Upload and install a web server certificate, and then click Perform.Note:
This option only supports certificates and keys based on RSA algorithm for upload.
-
Select the SSL certificate:
-
Beside the SSL Certificate field, click Browse.
-
Navigate to the SSL certificate, select it and click Open.
-
-
If you also received an Intermediate SSL certificate, select it as well:
-
Beside the Intermediate SSL Certificate field, click Browse.
-
Navigate to the Intermediate SSL certificate, select it and click Open.
Note:-
In some cases, the CA will provide multiple intermediate certificates. Consult the CA's documentation to determine which of these certificates you should use and, if necessary, how to assemble them into a single bundled file.
-
The intermediate certificate is required for MiCollab Mobile Client deployments; without it, client connections will fail and users will be unable to download their deployment configurations.
-
-
Click Install Web Server Certificate. If there is a problem with the certificate chain of trust, MSL will display an error message instructing you to take corrective action. You may need to contact your CA for assistance.
-
Restart the server to ensure all components and services that require the certificate are informed of the certificate's presence. Perform this step at a time of low system activity.
Install the SSL Certificate on other MSL Severs
If your deployment includes LAN-based MSL application servers accessed via an MBG / Web Proxy server, use the following procedure to install the certificate files on them. This is a two-step process. First, you must download the web server certificate, intermediate certificates (if installed), and private key file corresponding to the SSL server certificate from the MBG / Web Proxy. Second, you must upload these files to the LAN-based MSL servers.
Download certificates
-
Log into the MSL Server Manager for MBG / Web Proxy (the system that was used to generate the CSR).
-
Under Security, click Web Server.
-
Click the Web Server Certificate tab.
-
Select Download the current web server certificate, and then click Perform.
-
Click Save, navigate to the location you wish to store the file, and then click Save. The downloaded file is in ZIP format. It includes the web server certificate, intermediate certificates (if installed), and private key file.
-
Unzip the files and upload them to a location that is accessible to the other MSL servers in your network.
Upload certificates
-
Log into the MSL Server Manager for a LAN-based MSL server.
-
Under Security, click Web Server.
-
Click the Web Server Certificate tab.
-
Select Upload and install a web server certificate, and then click Perform.Note:
This option only supports certificates and keys based on RSA algorithm for upload.
-
Select the SSL certificate:
-
Beside the SSL Certificate field, click Browse.
-
Navigate to the SSL certificate, select it and click Open.
-
-
If you also received an Intermediate SSL certificate, select it as well:
-
Beside the Intermediate SSL Certificate field, click Browse.
-
Navigate to the Intermediate SSL certificate, select it and click Open.
-
-
Import the private key pair created on the other MSL server:
-
Beside the SSL Private Key field, click Browse.
-
Navigate to the SSL Private Key file, select it and click Open.
-
-
Click Install Web Server Certificate.
-
Restart the server to ensure all components and services that require the certificate are informed of the certificate's presence. Perform this step at a time of low system activity.
Note: Some services, such as the MiCollab Client Service and WebRTC, are restarted automatically as soon as you install the certificate. This removes the need for you to restart the server manually. -
To prevent fraudulent use of your certificates, delete the certificate and private key files from any media they are stored on.
Uninstall the SSL Certificate
-
Log into the MSL Server Manager.
-
Under Security, click Web Server.
-
Click the Web Server Certificate tab.
-
Select Uninstall the third-party web server certificate, and then click Perform. The MSL system uninstalls the SSL certificate and returns to using the default self-signed certificate.
Verify the Installed SSL Certificate
-
Log into the MSL Server Manager.
-
Under Security, click Web Server.
-
Click the Web Server Certificate tab.
-
View details at the top of the page:
Field Name Details Issuer Lists the following information for the certificate authorization company that issued the certificate: C: country code ST: state or province L: locality name (for example: city name) O: name of the certificate authorization authority OU: name of the organizational unit CN: server hostname Authority/ emailAddress: email address of the Certificate Authority Certificate Name The Common Name that identifies the fully qualified domain name associated with the certificate. Alternate Name(s) The FQDNs of each service (or "virtual host") included in the certificate. Valid From Date and time when the certificate takes effect. Expires Date and time when the certificate expires.
Note: Events are raised prior to, and on the date of expiry of the certificate. Ensure to regularly check the event viewer or configure email alerts.- Certificate already expired: MAJOR
- Expires in less than 1 week: MINOR
- Expires in less than 3 weeks: WARNING