Create Google Integration
To integrate Google into Workflow Studio, perform the following steps:
- Log into Workflow Studio.
- Under Library, click Integrations.
The Integrations Hub screen is displayed.
- In the Integrations Hub, click See details next to the Google integration tile.
- Click Connect.
- Click Next.
- Click Add new to add a new connection using OAuth2 Authorization Code, OAuth2 JWT Bearer, or API Key.Figure 1. Google Integration – Add connection
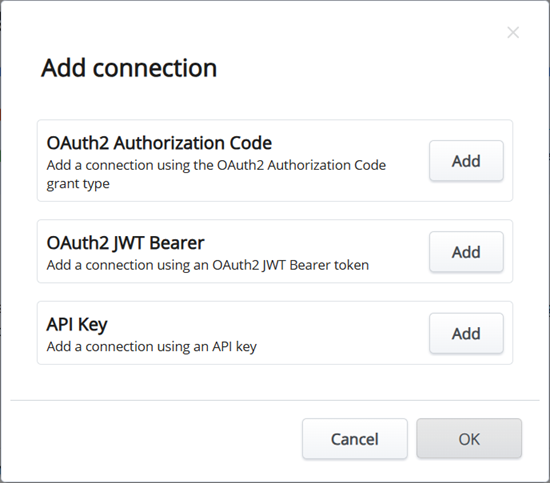
The OAuth2 options are used to access the server resources, such as Google Drive – File upload or Google Drive – Get file contents actions. If Google APIs that require access to user data are called, an OAuth2 connection is required.
- The OAuth2 Authorization Code option allows the application to access resources on behalf of a user.
- The OAuth2 JWT Bearer option allows the application to access resources without user interaction. This option is used when accessing resources that are not user-specific.
- The API Key option can be used to enable access to Google Places within the Schedule activity, or any other Google APIs that access public data, such as Google Maps or Google Translate.
To add the connection using the OAuth2 Authorization Code option, perform the following steps:
- Click Add next to OAuth2 Authorization Code and click OK.
- Click Complete Setup.
The OAuth2 Authorization Code - Configure this connection screen is displayed.
Figure 2. OAuth2 Authorization Code – Configure this connection
- In the OAuth2 Authorization Code - Configure this connection screen, enter the client_id and client_secret available in the Google API Console when setting up OAuth 2.0.
- Enter the scope value.
The scope value will vary depending on what is required to be accessed by the connection. For more details on scope values, refer to https://developers.google.com/identity/protocols/oauth2/scopes.
- Click Create.
The Google Login page is displayed to authenticate the entered information for the connection.
- Complete the authentication in Google page.
The Connection Complete screen is displayed to confirm the success of the third-party integration.
- Click Continue.
The connection is now displayed in the list.
To add the connection using the OAuth2 JWT Bearer option, perform the following steps:
- Click Add next to OAuth2 JWT Bearer and click OK.
- Click Complete Setup.
The OAuth2 JWT Bearer - Configure this connection screen is displayed.
Figure 3. OAuth2 JWT Bearer – Configure this connection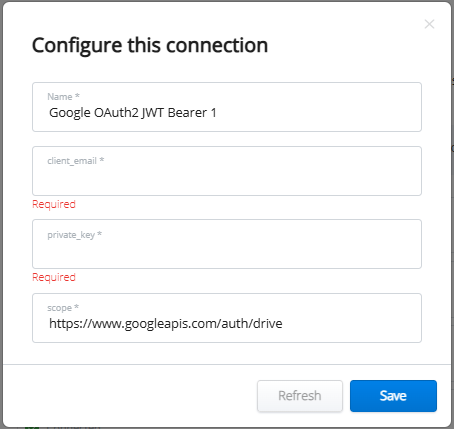
- Enter the
client_emailandprivate_keyvalues provided from the Google API Console. Note that these values should refer to the service account email, not a specific user email. - Enter the scope value.
The scope value will vary depending on what is required to be accessed by the connection. For more details on scope values, refer to https://developers.google.com/identity/protocols/oauth2/scopes.
- Click Create.
The Connection Complete screen is displayed to confirm the success of the third-party integration.
- Click Continue.
The connection is now displayed in the list.
To add the connection using the API Key option, perform the following steps:
- Click Add next to API Key and click OK.
- Click Complete Setup. The API Key - Configure this connection screen is displayed.Figure 4. API Key – Configure this connection

- Enter the Google API Key value provided from the Google API Console when setting up the API key.
- Click Create.
The Connection Complete screen is displayed to confirm the success of the third-party integration.
- Click Continue.
The connection is now displayed in the list.
If the integration does not display as Connected, click on the gear icon and confirm that all the settings are entered correctly.