A Welcome Email is the email message that new users receive when their account is created. Typically a Welcome Email contains welcome text and user login credentials. The Welcome Email is derived from the default email template through customization. A service provider creates and edits email templates in System > Email Template.
Oria displays the Welcome Email in the receiver's language as long as that language is supported.
Important: If you need to stop Welcome Email messages from being sent from MiCollab, you must disable the option from MiCollab (after upgrading to Oria 5.3).
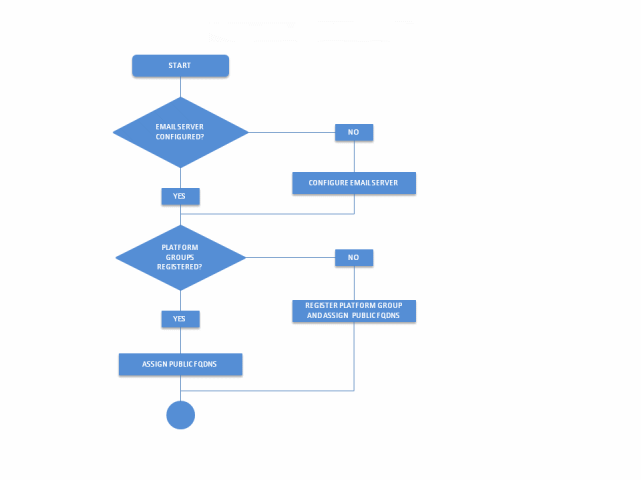
The following flowcharts outline the steps required for setting up and generating the Welcome Email:
Figure 1: Register Platform Group and Setup Email Server
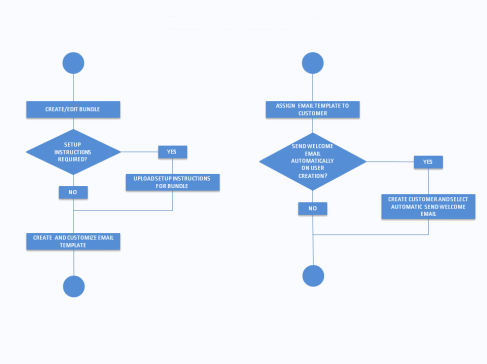
Figure 2: Create Bundle and Email Template
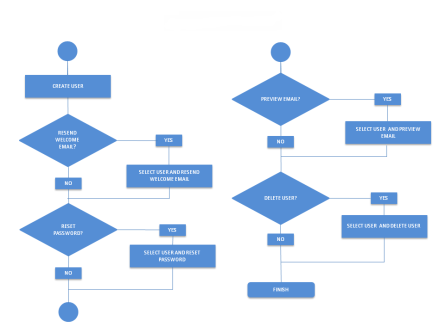
Figure 3: User Creation and Welcome Email
You can send a Welcome Email manually by selecting the user and then selecting the "Send Welcome Email" action. Or you may prefer to send the Welcome Email automatically to all users when they are created. Bulk Import supports the automatic sending of the Welcome Email on user creation. When users are added using Bulk Imports the Welcome Email is automatically sent to each user. Oria provides a default email template with pre-populated content and all services enabled for both new installs and product upgrades. You cannot delete the default email template.
Any setup instructions that you upload are sent with the Welcome Email and they are also accessible from the user’s My Services page.
A Welcome Email can contain the following types of information:
• Customized content
• List of services the user has access to
• User name and password
• Links to services
• Links to application downloads
The Subject, Greeting, and Footer text fields all support international text (UTF-8).
The default Email template contains editable pre-populated content and has all options enabled:
• Sender’s email address in the format donotreply@<OriaPublicFQDN>.com. The service provider can change the sender’s email address if required.
• Greeting text.
• Footer text.
• Subject text: "Welcome to the User Portal," <lastname, firstname of the user as a suffix>
Note: The Subject field supports plain text only.
• All the options are selected for the email and portal.
• Branding in the email is picked up from the service provider’s branding. The banner image is used in HTML email messages.
A service provider must assign customer administrators the Email capability in the Admin Bundle to allow them to resend the Welcome Email, reset passwords, and preview email messages. The automatic sending of the Welcome Email on user creation is always set by the service provider.
The email capability in Admin Bundle is required to let the Customer Admin send Welcome Emails, Reset passwords and Preview Emails. If a customer is not assigned with a bundle with the email capability, only the service provider can "login as" a customer administrator to resend Welcome Emails or reset passwords. The customer administrator will not see those actions.
However, enabling or disabling the email capability from the Admin bunde does not affect the automatic sending of Welcome Emails on user creation. The automatic sending of the Welcome Email is governed by a checkbox in the add/edit cutomer page.
Here is a summary of the permissions granted for email templates and messages:
• Email template privileges are managed through Operations profiles.
• Only the service provider can create email templates.
• A service provider should not include the email capability in the Admin Bundle assign to a customer if the permission to send email messages is not wanted.
• A service provider configures whether Welcome Email messages are automatically sent when a user is created. This will be done while creating the customer.
• A customer can send Welcome Email messages only when the Welcome Email template is assigned to them by a service provider.
• A customer can resend a Welcome Email or reset a password when assigned a bundle with those rights.
• With email rights, a customer can upload instructions when configuring the email template.
The instructions are sent with the email and also appear in the My Services page.
You can customize the information in the Welcome Email and have it automatically sent when a customer adds a new user to the portal. Service providers assign email templates to Customers during Customer creation. Customers can then use the templates to send automatic email messages with relevant information. For example, sending a reminder email message when a password is reset.
Access to the Welcome Email feature is granted through:
• Any operations profile with the permission to create customers has access to the Welcome Email feature.
• All the Admin bundles that allow you the creation of users has access the Welcome Email feature.
1 Configure the username in the subject of the email and choose whether the name a suffix or a prefix.
2 Add a custom header and footer. Headers and footers can contain HTML content.
3 Customize the email message as required. You may want to include a note for users who have Next Gen Mobile SIP Phones that they will receive an email with instructions on how to install the MiCollab for Mobile application.
4 Choose the options to include in the email for the user, for example the user name, pass- word, links to application downloads and so on. Only the selected option appear in the email message or the services page.
5 (optional) Upload setup instructions that you want to send as an attachment.
1 Click Customer > View Customers.
2 Select the Customer and click the Log in as Customer icon.
3 From the Customer Administrator portal, click the Users and select the user.
4 Click More > Preview Email.
1 Click Customer > View Customers.
2 Select the Customer and click the Log in as Customer icon.
3 From the Customer Administrator portal, click the Users and select one or more users.
4 Click More > Resend Welcome Email.
1 Click Customer > View Customers.
2 Select the Customer and click the Log in as Customer icon.
3 From the Customer Administrator portal, click the Users and select one or more users.
4 Click More > Reset Passcode.
A service provider or anyone with email template privileges can create and configure email templates for customers. Customers then use the templates to send email messages with specific information in them to one or more customers. For example, an email message that reminds users to change their password.
1 From the System tab click Email Template and then click Create Email Template.
2 Enter the email template details and select the content to include in the email message.
