Using Carrier Network for Managing Calls
You can connect all outgoing and incoming calls using the carrier network in your phone via the native dialer instead of the Mitel One app.
Note:
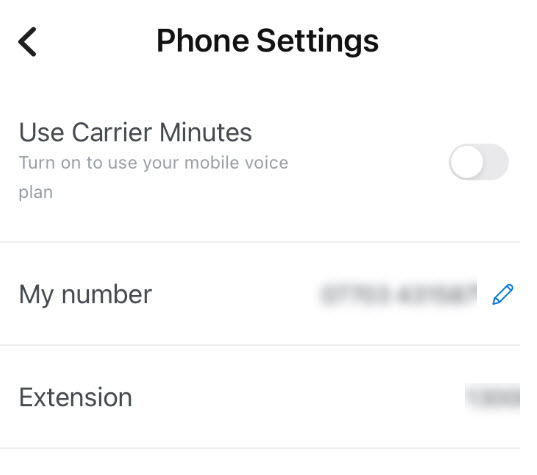
- The Use Carrier Minutes toggle is disabled by default.
- You must verify your mobile number to use this functionality. For more information, see Verify your Mobile Number.
- The Use Carrier Minutes toggle was previously known as Use GSM.
To enable the toggle:
- Tap your avatar at the top left of the app screen. A panel opens.
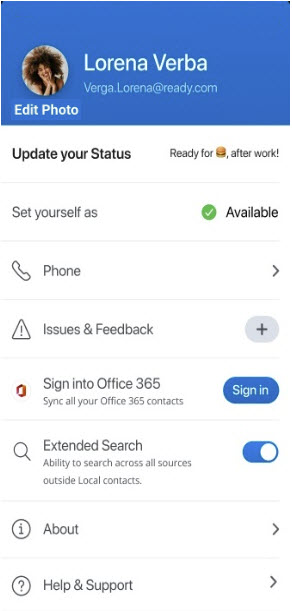
- Tap Phone. The Phone Settings panel opens.
- Slide the Use Carrier Minutes toggle to the right.
During a carrier call, the call features available in the application’s call screen are not supported. When this toggle is disabled, calls are placed and received over a Wi-Fi or LTE network via the Mitel One app, and all call features are supported.
Note the following requirements, limitations, and characteristics for calls placed and received over a carrier network:
- Carrier calls require configuration of the MiVoice Office 400 PBX for your Mitel CloudLink account. For details, see the Configure GSM Call Through Feature section of either of the two Configure MiVoice Office 400 PBX topics located here and here.
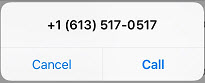
- When the following dialog appears while placing a carrier call, tap the Call option to give the app permission to place the call. The phone number displayed in this dialog is not the number you are calling; it is an internal routing number that also appears in your mobile phone's native call history screen.
- You cannot block your outbound caller ID. This means you cannot dial a block caller ID code (for example, *67) before placing a carrier call and cannot enable a setting on your phone (or on a website or app used to manage your phone) to block your caller ID.
- Your outbound caller ID displays the DDI phone number of your MiVoice Office desk phone.
↑