Contacts Menu
The Contacts menu in the Mitel One mobile application provides access to your business and personal contacts. By default, contacts are displayed in alphabetical order. Whenever your business contacts are added, changed, or deleted in the Mitel Cloud, the directory in the app is automatically updated. Optionally, you can allow the app to access the personal contacts on your mobile phone. To learn more, see Find a Contact.
The primary number of a contact will be the first business phone number by default. If the contact does not have a business number, the mobile number becomes the primary number, and if there is no mobile number, the home number becomes the primary number.
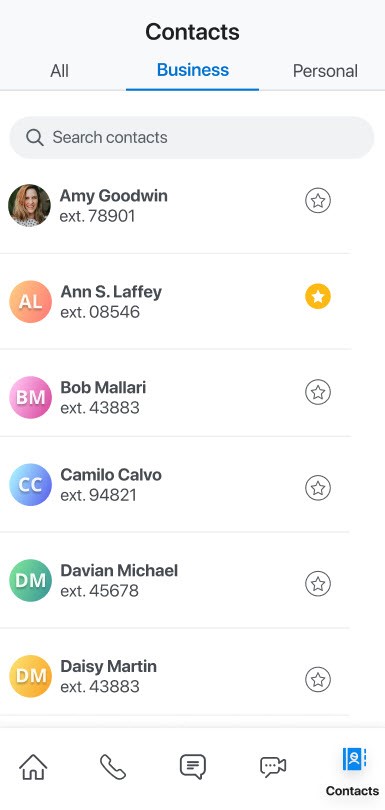
The Contacts menu has the following tabs:
- All — Displays all contacts, including business and personal.
- Business — Displays all contacts from the PBX and corporate Office 365 contacts.
- Personal — Displays all personal contacts synced from the user’s mobile phone.
Contacts in the Mitel One mobile application are synchronized with the consolidated directory contacts, which include contacts from directories configured through the PBX (Public and Private Phonebook) and contacts from directories configured through the Open Interfaces Platform (OIP), which may include the Active Directory (AD). The Microsoft Office 365 contacts (if the Microsoft Office 365 integration is enabled) and the consolidated directory contacts are not displayed in the Contacts menu by default. These are displayed in the Contacts menu only when you perform a search.
The extended search is available to you only when an OIP is connected, depending on the configuration.
- When the Extended Search toggle button is disabled (the default option), the search results displayed in the All tab and the Business tab include only contacts from the PBX Phonebooks (Public and Private).
- When the Extended Search toggle button is enabled, the search is an extended search and the search results displayed in the All tab and the Business tab include contacts from all configured directories including the OIP.
For information about enabling and disabling the Extended Search toggle button, see the Manage Mitel One Settings section.
- The Extended Search toggle button will not be displayed in the Settings panel when OIP is not connected.
- The results displayed for the extended search depend on the configuration made by your Account Administrator in the MiVoice 400 PBX and in the OIP Alpha Quick & Dial Service settings. The Account Administrator can update the OIP directory configurations in the OIP web portal (Configurations > Server > Services > Alpha Quick & Dial Service).
- The first time you attempt to access Personal contacts after installing Mitel One, you are requested to agree to the Consent form to allow the sync of your personal phone contacts.
Your contacts are represented in the Contacts menu by different types of avatars.
- If a contact has uploaded an image, it is displayed as that person's avatar.
- If a contact has not uploaded an image, the avatar defaults to that person's initials.
- If a contact does not have the Mitel One application, the avatar displays a blue phone icon (), which means you can call this person (at the person's Mitel desk phone), but cannot message that person.
- The avatar of a User Group created in the PBX (MiVoice Office 400) displays the icon followed by the Name of the Group, if any.
The Search icon (![]() ) in the Contacts menu enables you to search through the contact list to quickly find the contact with whom you want to communicate. For more information, see Find a Contact.
) in the Contacts menu enables you to search through the contact list to quickly find the contact with whom you want to communicate. For more information, see Find a Contact.
To view the details of a contact, tap the contact from the Contacts menu or Home screen. The contact's information panel appears displaying the phone number(s) and email address.
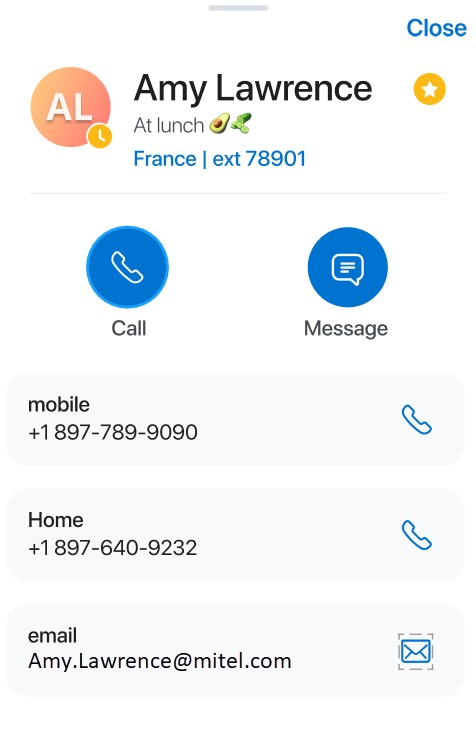
Following is a summary of how to use the icons and contact options shown in the preceding image.
 — Tap this icon to add the contact as your favorite contact.Note: The Mitel One Mobile application does not support adding Microsoft Office 365 contacts as your favorite contact.
 — Tap this icon to unfavorite a contact.
 — Tap this icon to call the primary telephone number of the contact.
 — Tap this icon to open the messaging window where you can message the contact.
- mobile — Displays the contact's mobile phone number. Tap the associated
 icon to call the contact's mobile phone number.
 - Home — Displays the contact's home phone number. Tap the associated icon to call the contact's home phone number.
- email — Displays the contact's email address. Tap the associated
 icon to send an email to the contact.
Mitel One users can search for their Office 365 contacts using the Contacts tab. Office 365 contacts are external contacts and are available to everyone in the organization via the various supported Outlook clients. These contacts are created and managed by Office 365 administrators.
- A CloudLink Account Administrator must enable Microsoft Office 365 integration for your account in the Mitel Administration. For more information about integrating Microsoft Office 365, contact your Account Administrator or see Integrating Microsoft Office 365 with Mitel Administration.
- The IT administrator of your organization must enable Office 365 contact synchronization for your user account. For more information, contact your Azure administrator or see Set up directory synchronization for Microsoft 365.
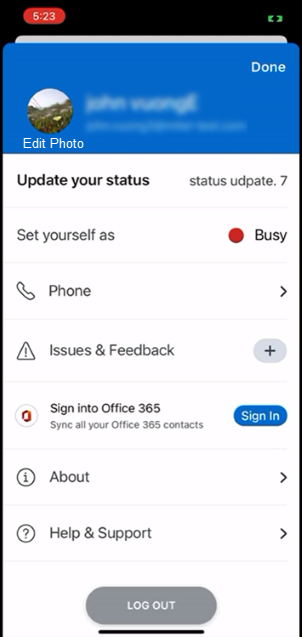
- After Microsoft Office integration is enabled for your account, you must sign in with Microsoft Office 365 account in Mitel One. To sign in, do either of the following:
- Click your avatar. From the settings page that opens, click Sign In to sign in with your Microsoft Office 365 account. Click Continue in the confirmation dialog box.
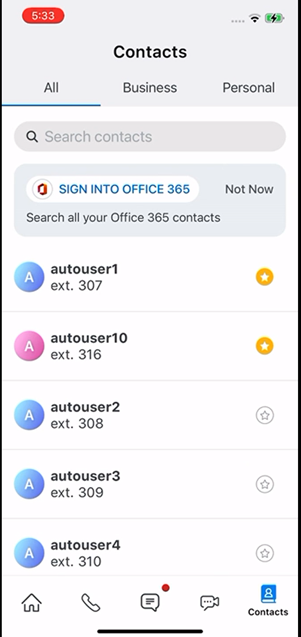
- Navigate to Contacts > All tab. Click SIGN INTO
OFFICE 365, and then click Continue to sign in with your Microsoft Office
365 account. Note: Clicking Not Now cancels the procedure.
- Click your avatar. From the settings page that opens, click Sign In to sign in with your Microsoft Office 365 account. Click Continue in the confirmation dialog box.
You will be signed in with your Microsoft Office 365 account and can search for organizational contacts. To sign out from your Microsoft 365 account, click Sign Out in the settings page. Click Continue to confirm the sign out.
You can also decline signing in with your Microsoft Office 365 account from the Contacts menu. To do this, click Not Now next to the SIGN INTO OFFICE 365 button.
When you search for a contact in the Mitel One Mobile application, the application process the top 250 results fetched from Microsoft Office 365. A combined list of business contacts and Office 365 contacts are then displayed under the All tab with 50 results at a time. To find a specific contact or to refine the search, you can either continue adding letters to the search field, or scroll down the list.