Opening the soft phone
- In the Contact Center Client ribbon, click Soft Phone
- Click the Soft Phone icon in the toolbar ribbon.
The Soft phone configuration window opens.
See the following figure.
Figure 1. Soft phone configuration window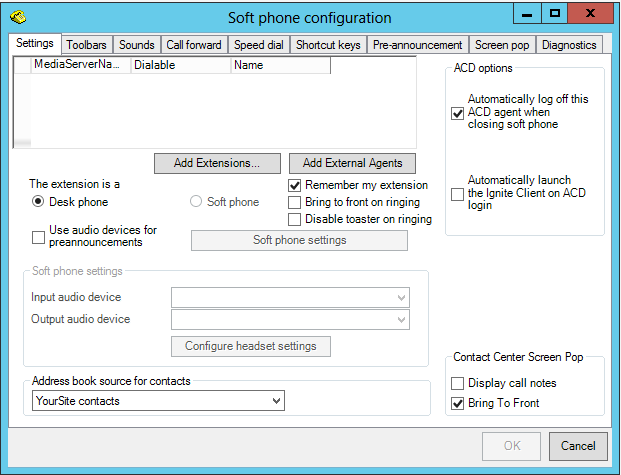
- Click Add Extensions to search and select from all internal standard extensions, hot desk extensions, and external hot desk user extensions.
- Click Add External Agents to search and select from all external hot desk agent extensions.
- Select your phone extension from the list of extensions.
- If you have Contact Center PhoneSet Manager, click Desk phone. If you have Contact Center Softphone, click Soft phone.
- If you want to log on automatically to the soft phone with your phone extension the next time you open the current profile, select the Remember my extension check box.
You must save the current profile before you quit the soft phone for this option to work.
If you are a hot desk user who participates in the use of PINs, the PIN login dialog box opens. If you are a hot desk user who does not participate in the use of PINs, go to step 10.
Note:When logging in as an External Hot Desking Agent or a hot desking user who is not set up to use a PIN login, if the PIN entry window displays, do not enter a PIN just click Login.
- Type your Login PIN.
If you want Contact Center Client to remember your Login PIN, select the Remember your credentials check box. This option is not available if your Contact Center Client profile is shared. Depending on their security role settings, employees may not be prompted to enter a PIN.
- Click Login.Note:
If the Login PIN you entered is invalid the login will fail and you will be asked to enter a valid Login PIN. If you exceed the configured number of failed login attempts, your PIN will lock and you will need to contact your System Administrator to reset your PIN.
If no concurrent voice agent license is available, a "Login failed - No voice agent license" message is displayed and the agent is logged off. A "Blocked voice login" alarm is triggered and visible in Ignite for supervisors.
If you want Contact Center Client to be the top-most window on ringing, select the Bring to front on ringing check box.
If you do not want the screen pop windows to display in Contact Center Client when calls are ringing on the desktop, select the Disable toaster on ringing check box.
- If you selected Soft phone in step 6, under Soft phone settings, configure soft phone options.Note: For the relevant configuration information, contact your supervisor or system administrator.
After Address book source for contacts, select YourSite contacts.
Contact Center PhoneSet Manager and Contact Center Softphone users can access YourSite database phone extensions or Global Address List phone numbers when they handle calls.
- To automatically log off the agent from the telephone system when closing the soft phone, select the Automatically log off this ACD agent when closing the soft phone check box.Note: This option does not apply to MiVoice Analytics users.
- To automatically launch Ignite when logging in to Contact Center Softphone or PhoneSet Manager, select the Automatically launch the Ignite Client on ACD login check box.Note:
This option applies only to voice agents who use Ignite to handle multimedia interactions.
This option does not apply to MiVoice Analytics users.
To synchronize online presence indicators with ACD agent phone states in real-time monitors, select the Synchronize my Lync presence with my ACD phone state check box.
When this option is selected an agent's state changes in sync with Skype for Business presence.
To display call notes in the soft phone and on the Call Notes monitor, select the Display call notes check box.
Click OK.
The Contact Center Client window displays the Soft Phone, Phone and Functions toolbars. See the following figure.Figure 2. Soft phone toolbars
If you want to be able to position the soft phone toolbar elsewhere on your desktop, enable the Float check box.
To move the soft phone toolbar, hover the mouse over the perforated line on the left-side of the toolbar until the four-headed arrow displays. Then click, drag, and drop it to the desired position on your desktop. To re-anchor the toolbar to the ribbon, drag and drop it into position under the ribbon.
If you want to modify the soft phone configuration, click the Configuration icon in the toolbar to reopen the Soft phone configuration window.