After the bootloader migration is complete, the following dialog box is displayed.
NOTES:
If you do not have a 16 GB CF handy, then abort the migration and perform reverse migration. See Software > Migration > Reverse Migration of an AX Controller if the 16 GB CF is unavailable or corrupt in the Troubleshooting Guide.
If you do not have a 16 GB CF handy, and the 2/4 GB CFs are blank, then abort the migration and manually install the pre-9.0 software:
From the communication application, type reboot.
Stop the auto-boot sequence by pressing the Space key three times at the following prompt:
Press <SPACE> key 3 times within 7 seconds to stop autoboot
At the -> prompt, type run upd_bootrom_fromdisk
Power down the AX controller and install the 2/4 GB CF. See Install and Replace Units > Flash Cards (AX) in the Technician's Handbook, pre-9.0 release.
Perform manual installation of pre-90 software. See Software Installation > Install System Software Manually in the Technician's Handbook, pre-9.0 release.
Do one of the following:
Connect to the controller's RTC card through a serial connection with the Maintenance port, and run the appShutdown 3 command. See Maintenance > Access 3300 ICP Controller Through the Maintenance Port in the Technician's Handbook.
Power down the AX controller.
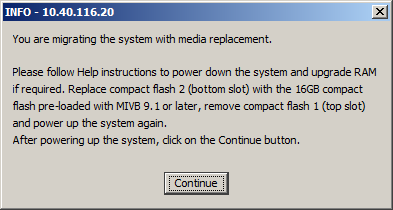
Replace the 2 GB CF Compact Flash 2 slot with a 16 GB CF pre-loaded with the MiVoice Business 9.1 or later software. See Chapter 7 Install and Replace Units > Flash Cards (AX) in the MiVoice Business Technician's Handbook.
Remove the 4 GB CF from the Compact Flash 1 slot.
Power on the AX controller.
Click
Continue.
The tool activates the software, configures the license and restores
the database.
Observe the system output on the communication application. When the
migration is successful, the following dialog box is displayed.
Click OK.
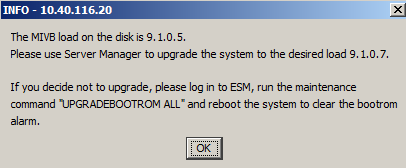
Log in to the System Administration Tool, and run the UPGRADEBOOTROM ALL maintenance command.
Upgrade the software using Server Manager.
If you want to replace the CF at a later time:
Click
Continue.
The tool does not proceed further with the migration. At your leisure,
perform the steps b through
h.
Power down the AX controller.
Replace the 2 GB CF slot with a 16 GB CF pre-loaded with the MiVoice Business 9.1 or later software. See Chapter 7 Install and Replace Units > Flash Cards (AX) in the MiVoice Business Technician's Handbook.
Remove the 4 GB CF from the Compact Flash 1 slot.
Power on the AX controller.
License the system and upgrade using Server Manager.
Restore the database using the System Administration Tool.
Run the UPGRADEBOOTROM ALL command using the System Administration Tool.
After the bootloader migration is complete, the following dialog box is displayed.
Do one of the following:
If you want the tool to perform licensing and restore the database:
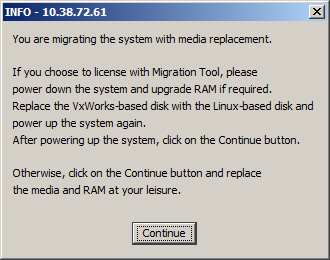
Power down the controller.
Replace the HDD with an HDD containing MiVoice Business 9.1 or later software. See Chapter 7 Install and Replace Units > Disk Drives (3300 ICP Controller) in the MiVoice Business Technician's Handbook.
Power on the controller.
Click
Continue.
The tool activates the software, configures the license and restores
the database.
Upgrade the software using Server Manager.
If you want to replace the HDD at a later time:
Click
Continue.
The tool does not proceed further with the migration. At your leisure,
perform the steps b through
g.
Power down the controller.
Replace the HDD with an HDD containing MiVoice Business 9.1 or later software. See Chapter 7 Install and Replace Units > Disk Drives (3300 ICP Controller) in the MiVoice Business Technician's Handbook.
Power on the controller.
License the system and upgrade the software using Server Manager.
Restore the database using the System Administration Tool.
Run the UPGRADEBOOTROM ALL command using the System Administration Tool.
When the bootloader migration is complete, the following dialog box is displayed. Click Continue.
If you have not
Do one of the following:
- For an AX controller, after the migration, do the following:
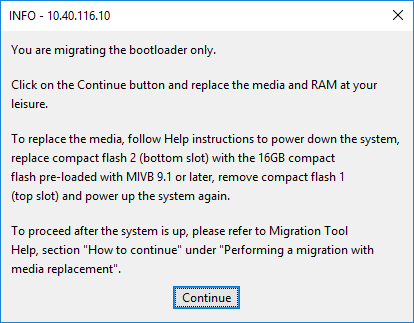
Power down the AX controller.
Replace the 2 GB CF slot with a 16 GB CF pre-loaded with the MiVoice Business 9.1 or later software. See Chapter 7 Install and Replace Units > Flash Cards (AX) in the MiVoice Business Technician's Handbook.
Remove the 4 GB CF from the Compact Flash 1 slot.
Power on the AX controller.
If you are using a new replacement 16 GB CF, then access the bootstrap console and configure the system. For more information, see the Technicians Handbook. If you are reusing a previously migrated 16 GB CF, then skip this step.
License the system using Server Manager.
NOTE: If you are using a new replacement 16 GB CF, then the default credentials is admin and no password for the Server Manager. If you are using a previously migrated 16 GB CF, then enter credentials of the Server Manager. If you do not remember the password, see Reset the password.
Restore the database using the System Administration Tool.
NOTE: If you are using a new replacement 16 GB CF, then the default credentials is system/password for the System Administration Tool If you are using a previously migrated 16 GB CF, then enter credentials of the System Administration Tool. If you do not remember the password, see Reset the password.
Run the UPGRADEBOOTROM ALL command using the System Administration Tool.
Upgrade the system software using Server Manager.
- For CX II, CXi II, and MXe III controllers, after the migration, do the following:
Power down the controller.
Replace the HDD with an HDD containing MiVoice Business 9.1 or later software. See Chapter 7 Install and Replace Units > Disk Drives (3300 ICP Controller) in the MiVoice Business Technician's Handbook.
Power on the controller.
License the system and upgrade the software using Server Manager.
Restore the database using the System Administration Tool.
Run the UPGRADEBOOTROM ALL command using the System Administration Tool.
If the migration is not successful, see Troubleshooting for more information.
If the pre-migration audit is not successful, then see Pre-migration audit report.