Upgrade Management Portal
Follow these steps to upgrade from a minimum of Oria 4.0.275 to Management Portal. Make sure that you upgrade from the latest MiCloud Management Portal support build. Contact product support for the latest patch release. See the latest release notes for details. If you are upgrading from an earlier release of Management Portal, for example Oria 3.0, contact Mitel Professional Services for assistance.
To manage the platform from Management Portal, you must first migrate the platform and users. See Migrate Management Portal.
If you are using system speed call, you must migrate to DID services using the Management Portal migration outlined in Management Portalbefore migrating.
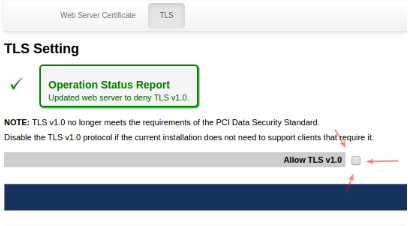
Important: TLS 1.0 has been found to be vulnerable to a number of security attacks. As such, Management Portal disables support for TLS 1.0 by default. Miteldoes not recommend using TLS v1.0. However, should you need to enable support for TLS v1.0, login to the MSL server manager for the server at:
[http://<address]http://<address of Oria server>/server-manager,
go to Security > Web Server > TLS and select Allow TLS v1.0.

When you upgrade to MiCloud Business 4.1, MiCollab Teleworker services are removed.
Upgrade on a Physical Server (Oria 5.0 or 5.1 or 5.2 or 5.3 to Management Portal 6.0 or 6.1)
Note: After an upgrade, all Management Portal history is removed. For example, Active Directory and Bulk Import history.
Step 1 Prepare for the upgrade:
Order a Management Portal license.
Make sure that the Management Portal server has Internet access to perform a DNS lookup and for access to port 22 of Mitel AMC.
Test access to AMC:
ssh to the Management Portal server and login at root level using the same password as admin.
Ping sync.mitel-amc.com and register.mitel-amc.com
If no IP address is resolved, check the DNS.
When the Management Portal license is available in AMC, create a new Management Portal ARID and apply the license to it.
Step 2 Perform a Management Portal backup:
Log into the current Management Portal server using Server Manager.
Perform a backup to the desktop.
In the Status panel, register the server with the ARID created earlier.
Step 3 Upgrade the MSL blade to 10.5 or 10.6 version (see release notes for the latest compatible version):
If you want to upgrade the MSL blade to 10.5 for Management Portal 6.1, use the build 6.1.1.xx or 6.1.2.xx).
If you want to upgrade the MSL blade to 10.6 for Management Portal 6.1, use the build 6.1.3.xx or 6.1.4.xx).
In Server Manager, go to the blades Blades panel.
Upgrade the MSL blade.
Clear the report after the upgrade.
Reboot server from Reconfigure tab in Server Manager. Wait until the server is restarted.
Step 4 Upgrade Management Portal:
In Server Manager, go to the blades Blades panel.
Upgrade the Management Portal blade. Wait until the upgrade is finished.
Clear the report and ensure that there are no more upgrades listed.
Update the default Management Portal password on first access.
Upgrade on a Physical Server (Oria 4.0.275 to Management Portal 6.0 or 6.1)
Step 1 Prepare for the upgrade:
Order a Management Portal license.
Make sure that the Management Portal server has Internet access to perform a DNS lookup and for access to port 22 of Mitel AMC.
Test access to AMC:
ssh to the Management Portal server and login at root level using the same password as admin.
Ping sync.mitel-amc.com and register.mitel-amc.com
If no IP address is resolved, check the DNS.
When the Management Portal license is available in AMC, create a new Management Portal ARID and apply the license to it.
Step 2 Perform a Management Portal backup:
Log into the current Management Portal server using Server Manager.
Perform a backup to the desktop.
Step 3 Upgrade the MSL blade to 10.5 or 10.6 version (see release notes for the latest compatible version):
If you want to upgrade the MSL blade to 10.5 for Management Portal 6.1, use the build 6.1.1.xx or 6.1.2.xx).
If you want to upgrade the MSL blade to 10.6 for Management Portal 6.1, use the build 6.1.3.xx or 6.1.4.xx).
Place the CD in the server optical drive.
Boot from the appropriate drive, and select the Upgrade option during the installation process.
Step 4 Upgrade Management Portal:
Place the CD in the optical drive.
Login into the Server Manager using a supported browser with the user name 'admin' and the root password you gave when configuring the MSL server. The Server Manager is accessed by entering the following URL: http://<www.hostname> OR <IP address of the MSL Server>/server-manager.
Click on Blades, located in the left-side panel under the ServiceLink heading.
Click Update List to ensure an up-to-date listing of software blades.
Click the Install link, located beside the Management Portal blade name. It may take a few minutes for the software to install.
Test the installation:
Click Management Portal, located in the left-side panel under the Applications heading.
If Management Portal is not visible, refresh the browser.
Click Launch, located in the main window.
Step 5 Register the server with the ARID:
In the Status panel, register the server with the ARID created earlier.
Step 6 Run the Management Portal post-upgrade maintenance commands:
Login to the Management Portal service provider portal (http://a.b.c.d/konos/sp/spLogin.do). Replace a.b.c.d with the Management Portal server IP address or FQDN.
Enter this URL in the same active service provider browser session (https://a.b.c.d/konos/commands.jsp) Replace a.b.c.d with the Management Portal server IP address or FQDN. This will open Management Portal Service Provider maintenance command window.
Run the following commands in the Management Portal Service Provider portal to enable features in the Customer Administrator portal: (run again?)
In the command field, enter the following commands individually and click on Submit after each command. Replace custId1 with the assigned customer WebID in Management Portal.
$$GET BUSINESS HOURS$$ custId1
$$GET SUPERVISED TRANSFER$$ custId1
$$SET FACS$$ custId1
To issue the commands for multiple customers, run these commands:
$$GET BUSINESS HOURS$$ custId1, custId2
$$GET SUPERVISED TRANSFER$$ custId1, custId2
$$SET FACS$$ custId1, custId2
To apply the commands to all customers in the Management Portal database, run these commands:
$$GET BUSINESS HOURS$$ ALL
$$GET SUPERVISED TRANSFER$$ ALL
$$SET FACS$$ ALL
Any customer that is using MiVoice Business (MiVB) is upgraded as part of the MiCloud Business 3.2 to MiCloud Business 4.0 upgrade. To update MiVB versions, go to the Management Portal Service Provider maintenance command window and run the following command: $$UPDATE MCD VERSION$$ CUSTOMER, custId
See the Migrate to MiCloud 3.2 Flow Through Provisioning section if you upgraded from MiCloud Business 3.1 to MiCloud Business 3.2. (applies if upgrading from MiCloud Business 2.0 - include in procedure 2)
Upgrade on a Virtual Machine
For virtual deployments in a VMware environment, MSL software is packaged with the application software and delivered as an OVA file which can be installed on a vSphere client using the Deploy OVF Template wizard.
If you are upgrading MiCollab and Management Portal to MiCloud Business 2.0 from a previous version, feature profiles will not automatically be created on MiCollab. To create the feature profiles on MiCollab, you must edit and save the customer and Management Portal will create the Feature Profiles on the MiCollab Client.
Users are not created from the old Standard IPT bundle when you upgrade to Micollab Version 7.1 and up. To be able to add the users, you must manually update the Record ID on MiCollab in the location where IPT licenses are added.
Optionally you can follow the same upgrade process as the physical server upgrade with the following exception:
Upgrade the MVF blade after the MSL upgrade before the reboot.
After an upgrade, all Management Portal history is removed. For example, Active Directory and Bulk Import history.
Step 1 Back up the virtual machine instance:
In the vSphere client, right-click the virtual appliance name and select Shutdown Guest.
Click File > Export > Export OVF Template.
Enter the name of the OVF template file and the directory where you want to save it.
Select one of the following options:
Physical Media (OVA): to export a single .ova file (recommended)
Web: exports multiple filesSelect one of the following Format options:
Single File (OVA): to export a single .ova file (recommended)
Folder of Files (OVF): exports multiple filesClick OK. MSL automatically configures the NIC address for the new virtual machine.
Step 2 Perform a full MSL backup:
Log in as "admin".
Access the server console from the server itself or remotely using an SSH client.
From the console, select the option to Perform backup.
Select a destination to store the backup, for example, your desktop or local network file server.
If backing up to a local network file server do the following:
Enter the IP address of the file server where the backup will be stored.
Enter the domain or workgroup name of the server. For example, mitel.com.
Enter the name of the shared folder where the backup file will be stored. (For example, "Backups".) The shared folder must have permissions set to "Full Control".
Enter the Optional Directory Path where the backup will be stored. If you leave this field blank, the file will be stored at the root of the shared folder.
Enter the username to use when connecting to the backup server. Enter the password to use when connecting to the backup server. The estimated backup size and available storage space are displayed.Click Proceed. When the backup is complete, file verification is performed automatically.
Click Continue.
Step 3 Deploy the Management Portal Virtual Appliance:
The .ova file you downloaded from Mitel Connect > Downloads contains the MSL operating system, the application software, and VMware Tools (a suite of utilities to enhance performance).
Launch the vSphere Client on the network PC:
Click Start > All Programs.
Click VMware > VMware vSphere Client.
Enter the IP address or hostname of the Hypervisor ESX/ESXi Host server OR enter the IP address or hostname of the vCenter Server.
Enter your username and password.
Click OK.In the vSphere Client application, click File > Deploy OVF Template. (The .ova file you downloaded is a template file in OVF format.)
In the Deploy OVF Template screen, specify the storage location of the .ova file you downloaded.
Specify the Source Location for the OVF template file (.ova file extension):
To deploy from a file on the local PC or from a network share, click Browse and navigate to the file.
To deploy from a URL (if the file is on the Internet or is accessible through a web browser) enter the URL of the file location.Click Next. The OVF Template Details screen appears. The information shown is derived from the .ova file to provide a “check” for the correct application and version. Note that the Download size is only an estimate until a deployment configuration is selected later in the process.
Click Next.
Click Accept to accept the end-user license agreement, and then click Next.
Enter a meaningful name for the virtual appliance, or accept the default name, and then click Next.
Click Next. The following three steps are dependent on your configuration.
If you are using the optional vCenter Server, select the appropriate Host/Cluster for this deployment and then click Next.
If you are using the optional vCenter Server, select the appropriate Resource Pool for this deployment and then click Next.
If multiple Datastores are available, select the Datastore for the vNuPoint instance, and then click Next.In the Disk Format screen, select Thick provision Lazy Zeroed.
Click Next.
Configure the network mapping. (This screen is only displayed if the network defined in the OVF template does not match the name of the template on the host to which you are deploying the virtual application.) If required, contact your Data Center administrator for more details on which Network Mapping to use. The required settings are:
Application: Select Restore from backup.
LAN: Enter the IP Address, LAN Netmask, and Default Gateway Address.
Note: If you want to use the IP Address of your existing Management Portal server, ensure that it is shut down. If not, the new updated Management Portal server will detect an IP conflict, and disable its network interface, until the original Management Portal server is off the network.Click Next. The Deploy OVF Template Ready to Complete screen appears.
Review the information and then click Finish.
When the deployment is complete, click Close. The new virtual machine appears in the inventory list in the left-hand pane.
Select the new virtual machine and power up the virtual machine.
Open the virtual machine console.
When the system prompts you with "Do you wish to restore from backup?", click Yes. The MSL console will present 3 choices of Upgrade. DO NOT choose "Restore from Running server". Choose one of the other options to retrieve your Management Portal Backup file, into this new Management Portal server. After you have restored the Management Portal MSL Backup, you will be prompted to Reboot. Again, ensure that the original Management Portal (with the same IP address as this updated Management Portal), is shut down before booting up the new restored Management Portal server.
Note: The Management Portal Service Provider Portal may not be available immediately after the MSL Server Manager is available. It may take a few minutes for all of the Management Portal Services to start.Select Restore from Network Server. You will be prompted to select a network interface to use for the restore (LAN or WAN), the address and netmask of the local MSL server, the address, gateway and domain name of the backup server, the folder name containing the backup file, and the username and password required to log in to the backup server.
Use VSphere, or VCentre to change the virtual machine memory allocation to 8GB.
When the restore is complete, select Reboot.
If you want to use the IP Address of your existing Management Portal server, ensure that it is shut down. If not, the new updated Management Portal server will detect an IP conflict, and disable its network interface, until the original Management Portal server is off the network.
Step 4 Apply the Management Portal ARID and sync with the AMC:
Make sure you have created the Management Portal ARID on the AMC.
Apply the Management Portal ARID in MSL Server Manager.
Synchronize to the AMC.
Step 5 Run the Management Portal post-upgrade maintenance commands:
Login to the Management Portal service provider portal (http://a.b.c.d/konos/sp/spLogin.do) <<replace a.b.c.d with the Management Portal server IP address or FQDN>>
Enter this URL in the same active service provider browser session (https://a.b.c.d/konos/commands.jsp) <<replace a.b.c.d with the Management Portal server IP address or FQDN>> This will open the Management Portal service provider maintenance command window.
In the command field, enter the following commands individually and click on Submit after each command. Replace custId1 with the assigned customer WebID in Management Portal.
$$GET BUSINESS HOURS$$ custId1
$$GET SUPERVISED TRANSFER$$ custId1
$$SET FACS$$ custId1
To issue the commands for multiple customers, run these commands:
$$GET BUSINESS HOURS$$ custId1, custId2
$$GET SUPERVISED TRANSFER$$ custId1, custId2
$$SET FACS$$ custId1, custId2
To apply the commands to all customers in the Management Portal database, run these commands:
$$GET BUSINESS HOURS$$ ALL
$$GET SUPERVISED TRANSFER$$ ALL
$$SET FACS$$ ALLFollow the steps in Migrate to MiCloud 3.2 Flow Through Provisioning if you upgraded from MiCloud Business 2.0 to MiCloud Business 3.2.
Migrate to MiCloud 3.2 flow through provisioning
Any customer that is using MiVoice Business (MiVB) is upgraded as part of the MiCloud Business 2.0 to MiCloud Business 3.2 upgrade.
After the upgrade you may need to clear your browser cache memory for example, when performing a task such as creating or changing a bundle. To clear your browser cache do one of the following:
(preferred) Force reload the page (usually by pressing: CTRL + F5).
Clear browser cache.
Reboot Management Portal.
To update MiVB versions, go to the Management Portal Service Provider maintenance command window and run the following command:
$$UPDATE MCD VERSION$$ CUSTOMER custId
If you upgraded the platforms from MiCloud 2.0 to a MiCloud 3.2, run ONE of the following commands:
Note: Make sure that you run the command BEFORE switching the configuration from FQDN to IP (The FDQN is used to also update any MiVB references in corresponding MBGs). If the FQDN is changed before running the command, the administrator will have to go directly into the MBGs and change the MiVB reference from FQDN to IP.
NAT: Run the following maintenance command for moving from an FQDN to an IP address which is required with MiCloud 3.2 flow through provisioning.
• $$UPDATE MCD CUSTOMER HOST NAME$$ <Management Host Name IP Address>, <New Customer Host Name>
For example:
$$UPDATE MCD CUSTOMER HOST NAME$$ mmg.fqdn1.public.com, 192.168.20.1
non-NAT mode: Change the Host Name from FQDN to an IP address. In non-MMG, there is no Management and Customer Host Names, just one Host Name for the MiVB configuration (in MiVoice Business tab in the Platform Groups UI).
Use this maintenance command to change the Host Name from FQDN to an IP address:
• $$UPDATE MCD HOST NAME$$ <Existing Host Name FQDN/IP Address>, <New Host Name>
For example:
$$UPDATE MCD HOST NAME$$ fqdn1.com, 10.168.20.1
Verify that the command was successful by viewing the MiVoice Business tab in Platform Groups for the corresponding MiCollab platform.