MiVoice Business Integration
Mitel Partners and Account Admins can now integrate, enable, and manage MiVoice Business features from the Mitel Administration. It provides a seamless day-to-day user management experience. It allows the Mitel Partner and Administrators to manage the MiVoice Business solution from the Mitel Administration. You can manage features such as templates, telephony services, and call handling rules for a user.
Following are the instructions for integrating MiVoice Business with CloudLink Platform.
Prerequisites
-
Gateway integration enabled. For more information about enabling and configuring Gateway, see Integrating CloudLink Gateway with Mitel Administration.
Integrating MiVoice Business with CloudLink Account
-
Access the Integrations panel from the Account Information page or from Integrations & Apps option. For more information about accessing the Integrations panel and adding integration to a customer account, see Adding an integration to a customer account.
-
In the Integrations panel, click +Add new. A pop-up screen displays the available integrations.
-
Click the Add button associated with MiVoice Business. Expand to display the features available under MiVoice Business. Enable Customer Admin Portal.
-
Click Done. MiVoice Business is integrated with the customer account.
After MiVoice Business integration is added to an account, MiVoice Business appears in the Integrations panel in the left navigation pane.
Removing MiVoice Business Integration
-
Access the Integrations panel from the Account Information page or the Integrations & Apps from the left navigation menu. For more information about accessing the Integrations panel and adding integration to a customer account, see Adding an integration to a customer account.
-
From the Integrations and Applications page, in the Integrations panel, slide the toggle button associated with MiVoice Business to the left. The Remove MiVoice Business Integration dialog box appears.
-
Click Remove integration. The MiVoice Business integration is removed from the customer account.
For more information about managing MiVoice Business features from the Mitel Administration see, Managing MiVoice Business Features.
CloudLink Daemon for MiVoice Business Integration
Introduction
The CloudLink page enables the CloudLink Daemon, a software component designed for integration with various call servers and platforms. Acting as a user interface, the CloudLink Daemon connects Mitel CloudLink services with on-premises systems like Private Branch Exchanges (PBXs). This integration ensures smooth communication between cloud-based services and traditional on-site telephony infrastructure, enhancing both the functionality and flexibility of communication systems. CloudLink Daemon is available in Mitel Standard Linux (MSL) by default, and the version supported in MSL is 11.0.110 and higher for MiVoice Business Release 10.2
Enabling CloudLink Daemon
-
Log in to the Server Manager.
-
Under Configuration, click CloudLink.
-
In the CloudLink page that opens, click Enable CloudLink Integration.Note: You will see a progress screen. The latest version of the CloudLink Daemon is installed. You can now see the CloudLink Daemon dashboard, where the version details of the installed CloudLink Daemon is mentioned.
Linking CloudLink Daemon to CloudLink
-
After Cloudlink Daemon in enabled, in the CloudLink Daemon page or dashboard that opens, click Link to CloudLink.
-
After the enabled CloudLink Daemon is linked to the CloudLink platform, the CloudLink Daemon dashboard displays the following details:
-
About
-
CloudLink Registration
-
Inventory Report Submission
-
CloudLink Daemon Update
-
Tunnels
-
Enabling the Tunnel
-
In the standard view of the CloudLink Daemon dashboard, under Tunnels, select a component to connect or link to, and then click Start.
Figure 1. Enabling the tunnel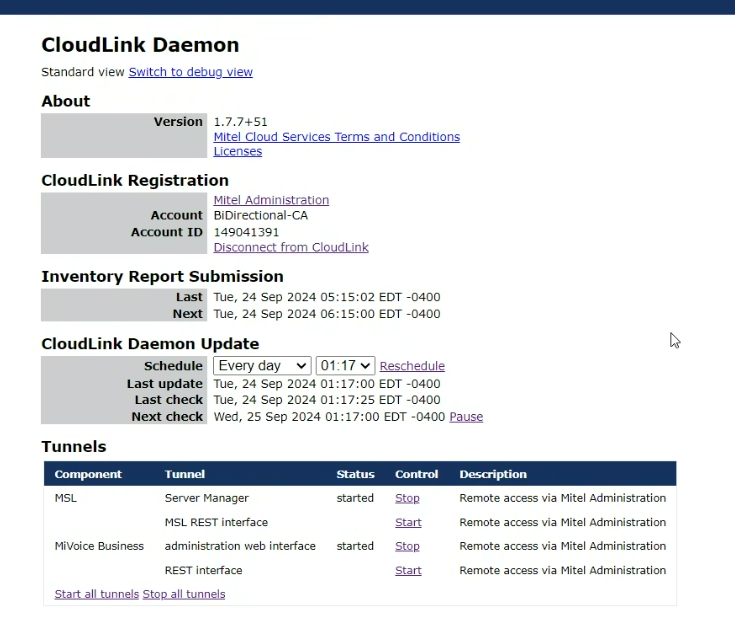
-
Click Yes.
-
Log in to Mitel Administration and navigate to System Inventory > Platforms. The list of Platforms and Applications that are connected from the Tunnel in Server Manager are now populated under Mitel Administration System Inventory page.
Figure 2. System Inventory > Platforms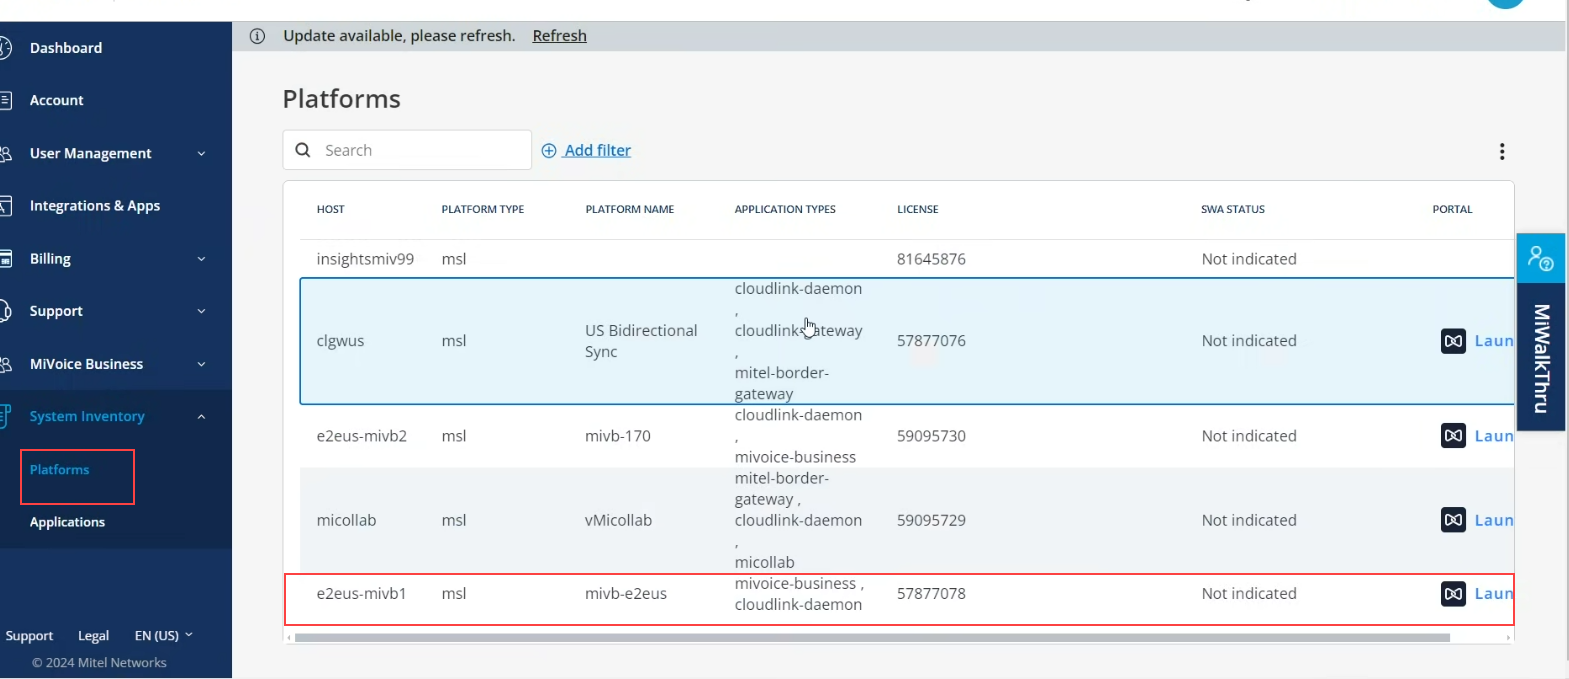
-
Using the Launch button, you can remotely access the CloudLink Daemon for the respective platforms and applications. To use the remote management feature, you need to start the following tunnels:
-
MSL Server Manager
-
MiVoice Business
-
CLGW blade behavior after MiVB upgrade
If the MiVoice Business (MiVB) system includes a CloudLink Gateway (CLGW) blade and you upgrade it by deploying a new OVA and restoring the database from a backup, the CLGW blade isn't restored automatically.
You must manually install the blade after the upgrade to ensure that Mitel Administration functionscorrectly.
Overview of MiVoice Business Submodules
The left navigation pane under MiVoice Business includes distinct configuration sections. Sub menu items appear in the following order, regardless of availability:
- Numbers
- Locations
- Emergency Services (visible if Zoom integration is enabled)
- Voice Gateway
- Tools (visible if MiCollab is present)
Numbers
The Numbers submodule helps you manage extension ranges and assign Direct Inward Dialing (DID) numbers. You can use this section to configure number blocks, assign extensions to users or devices, and ensure accurate routing of incoming calls within the MiVoice Business system.
This submodule allows Mitel Partners or Account Administrators to add, edit, and delete user extension ranges and DID numbers. These ranges define the safe directory number (DN) blocks that can be used for user phone services.
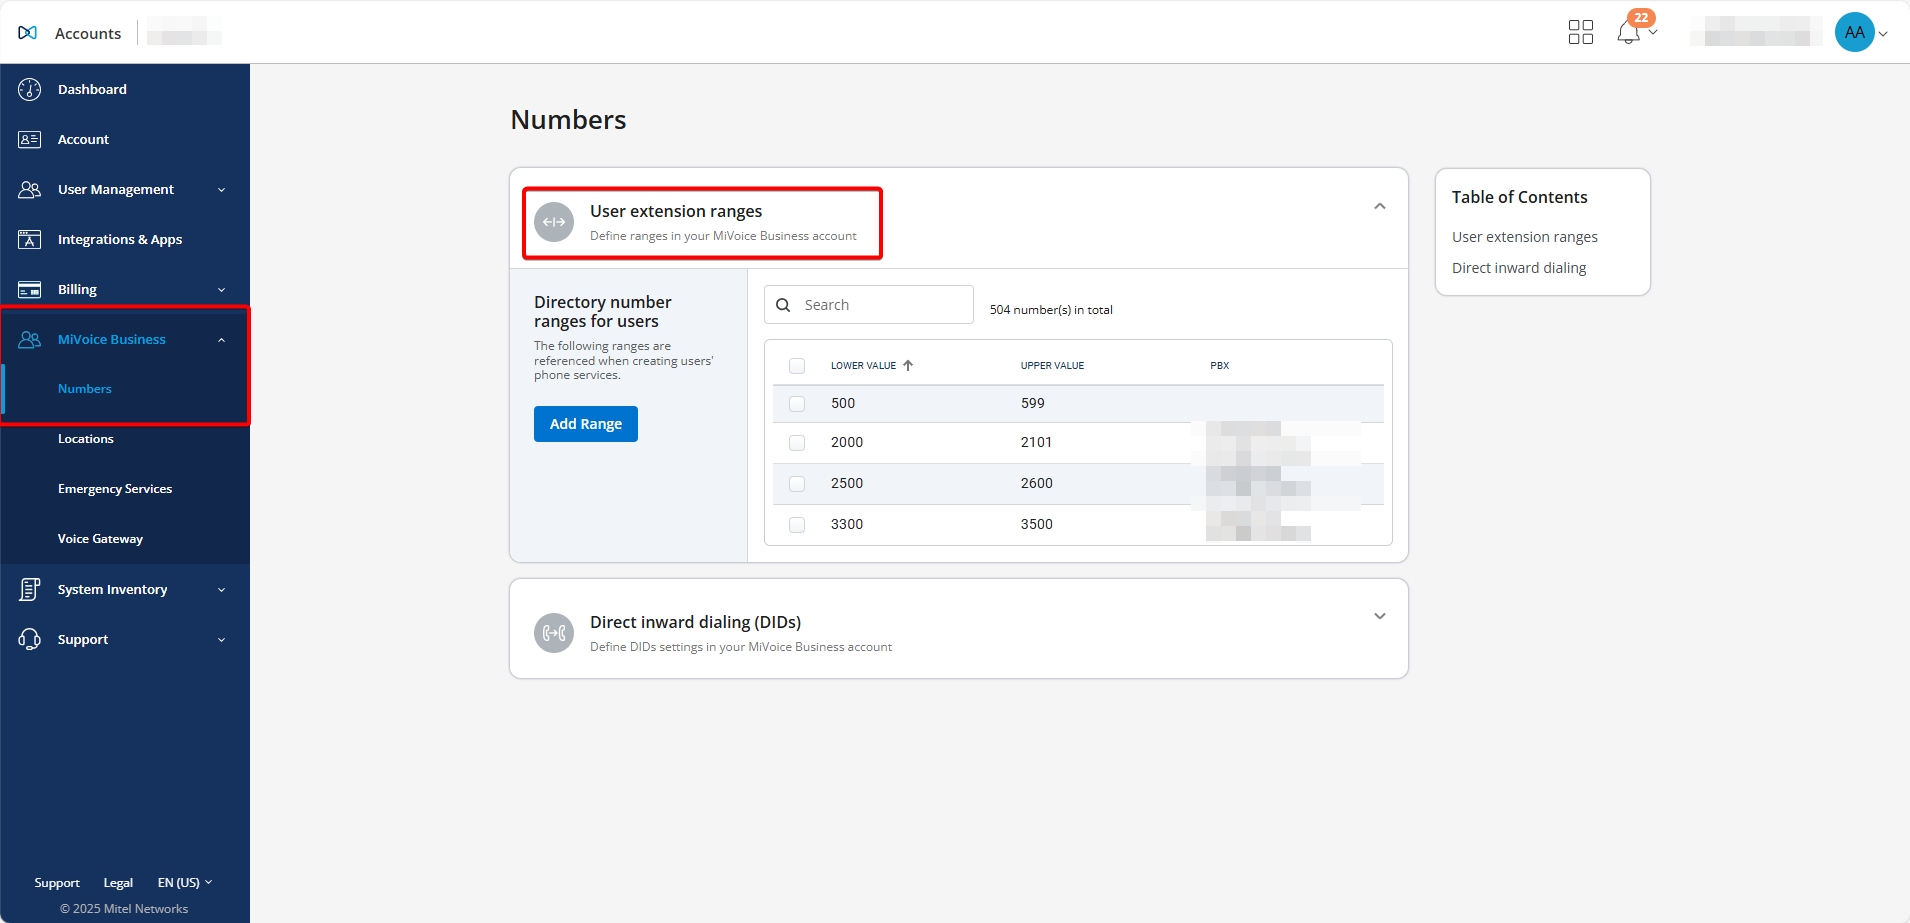
User Extension Ranges
This section facilitates the ability of selecting the next available number when adding a directory number.
-
On the left navigation panel, click MiVoice Business and then click Numbers. The MiVoice Business Settings page is displayed.
-
In the User extension ranges section, click Add Range. The Add Range dialog box is displayed.
-
Enter a start and end number for the user extension range and click Add. The entered range will be displayed in the User extension ranges list.
-
From the User extension ranges list, click the user extension range that you want to edit. The Edit Range dialog box is displayed.
-
Edit the user extension range and click Save. The modified extension range will be displayed in the User extension ranges list.
-
Select the check box(es) associated with the user extension(s) that you want to delete. The Delete selected numbers dialog box is displayed.
-
Click Delete to delete the selected user extension range(s). Clicking Cancel cancels the operation. The selected user extension range(s) will be deleted.
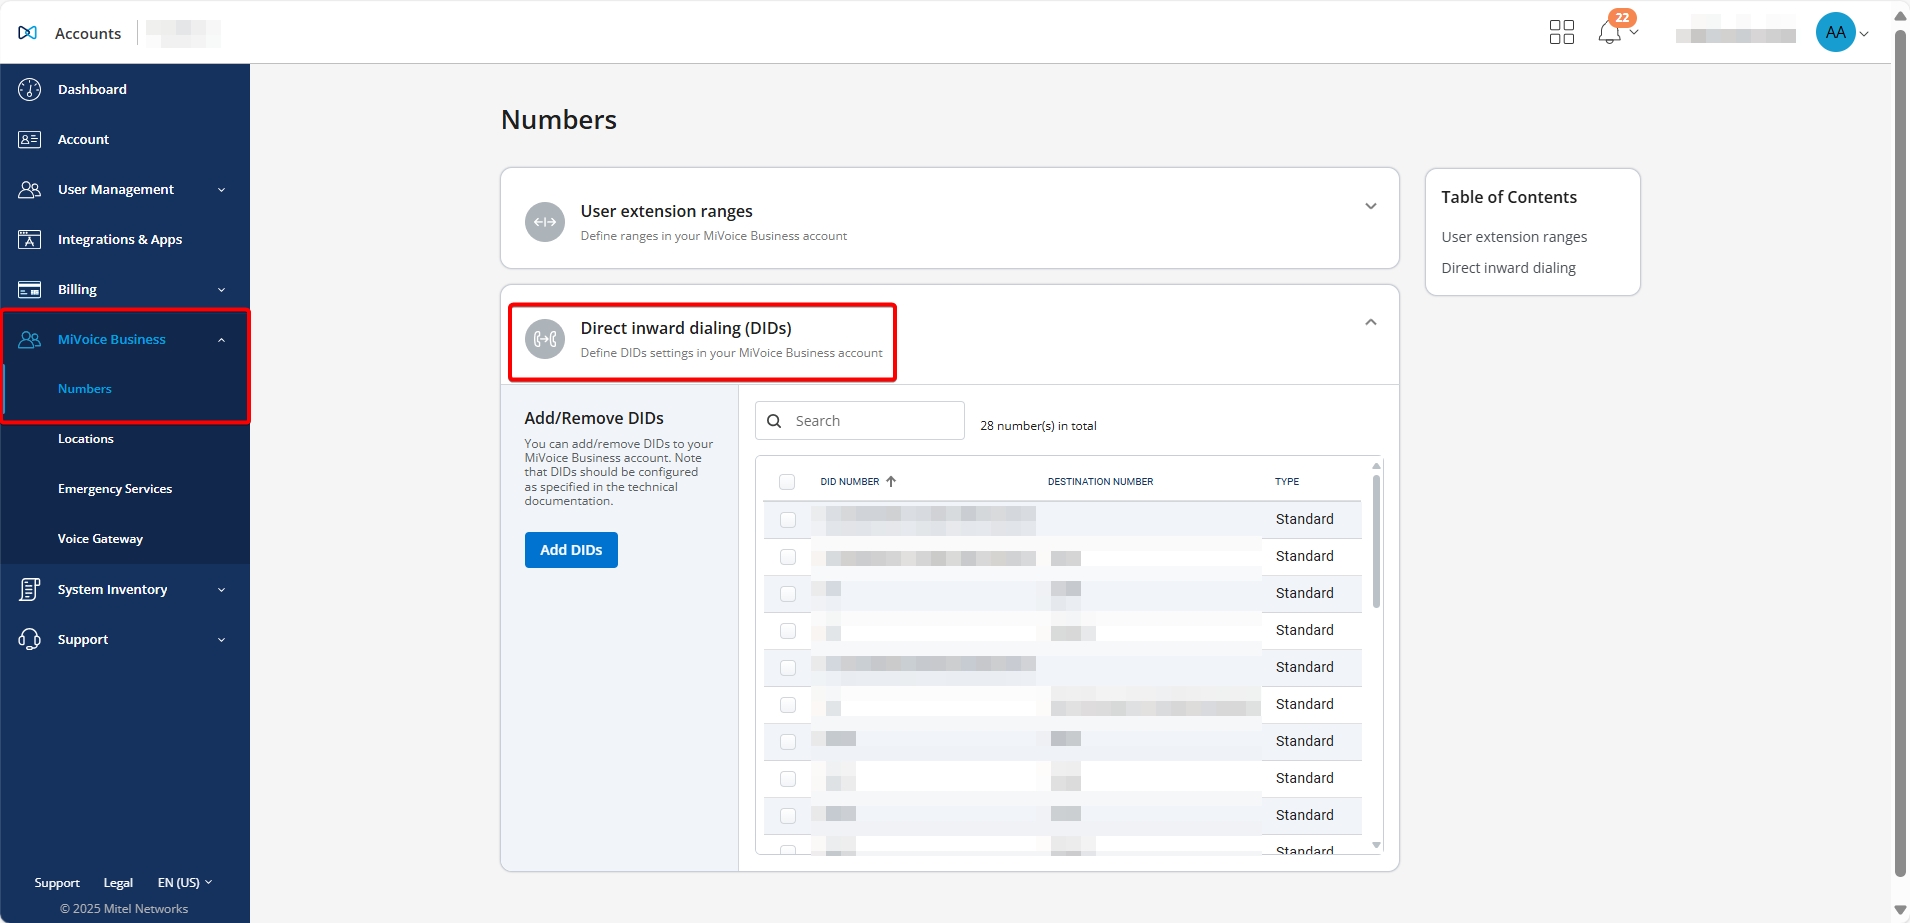
Direct Inward Dialing (DIDs)
This panel displays a pool of external DID numbers mapped to their destination numbers (that is, internal directory numbers or other answer points on the system) in your MiVoice Business.
-
On the left navigation panel, click MiVoice Business and then click Numbers.
-
In the Direct Inward Dialing (DIDs) section, click
 to expand DIDs.
 -
Click Add DIDs. The Add DID Number or Range dialog box is displayed.
-
Enter a single DID number or enter a DIDs range in the Range start and Range end fields.
-
Click Add to save the DID number or DIDs range, or click Cancel to cancel the operation.The entered DID number or DIDs range will be displayed in the Direct Inward Dialing (DIDs) list.
-
From the Direct Inward Dialing (DIDs) list, click the DID number or the DIDs range you want to edit. The Edit Direct Inward Dialing (DID) Number dialog box is displayed.
-
Edit the DID number or DIDs range and click Save, or click Cancel to cancel the operation.
The modified DID number or DIDs range will be displayed in the Direct Inward Dialing (DIDs) list.
-
Select the check box(es) associated with the DID number(s) or DIDs range(s) you want to delete. The Delete Selected button appears.
-
Click Delete Selected to delete the selected DID number(s) or DIDs range(s). The Delete selected number(s) dialog box is displayed. Click Delete to complete deletion, or click Cancel cancel the deletion.
The selected DID number(s) or DIDs range(s) will be deleted.
Locations
The Locations submodule helps you add or remove locations in your MiVoice Business account.
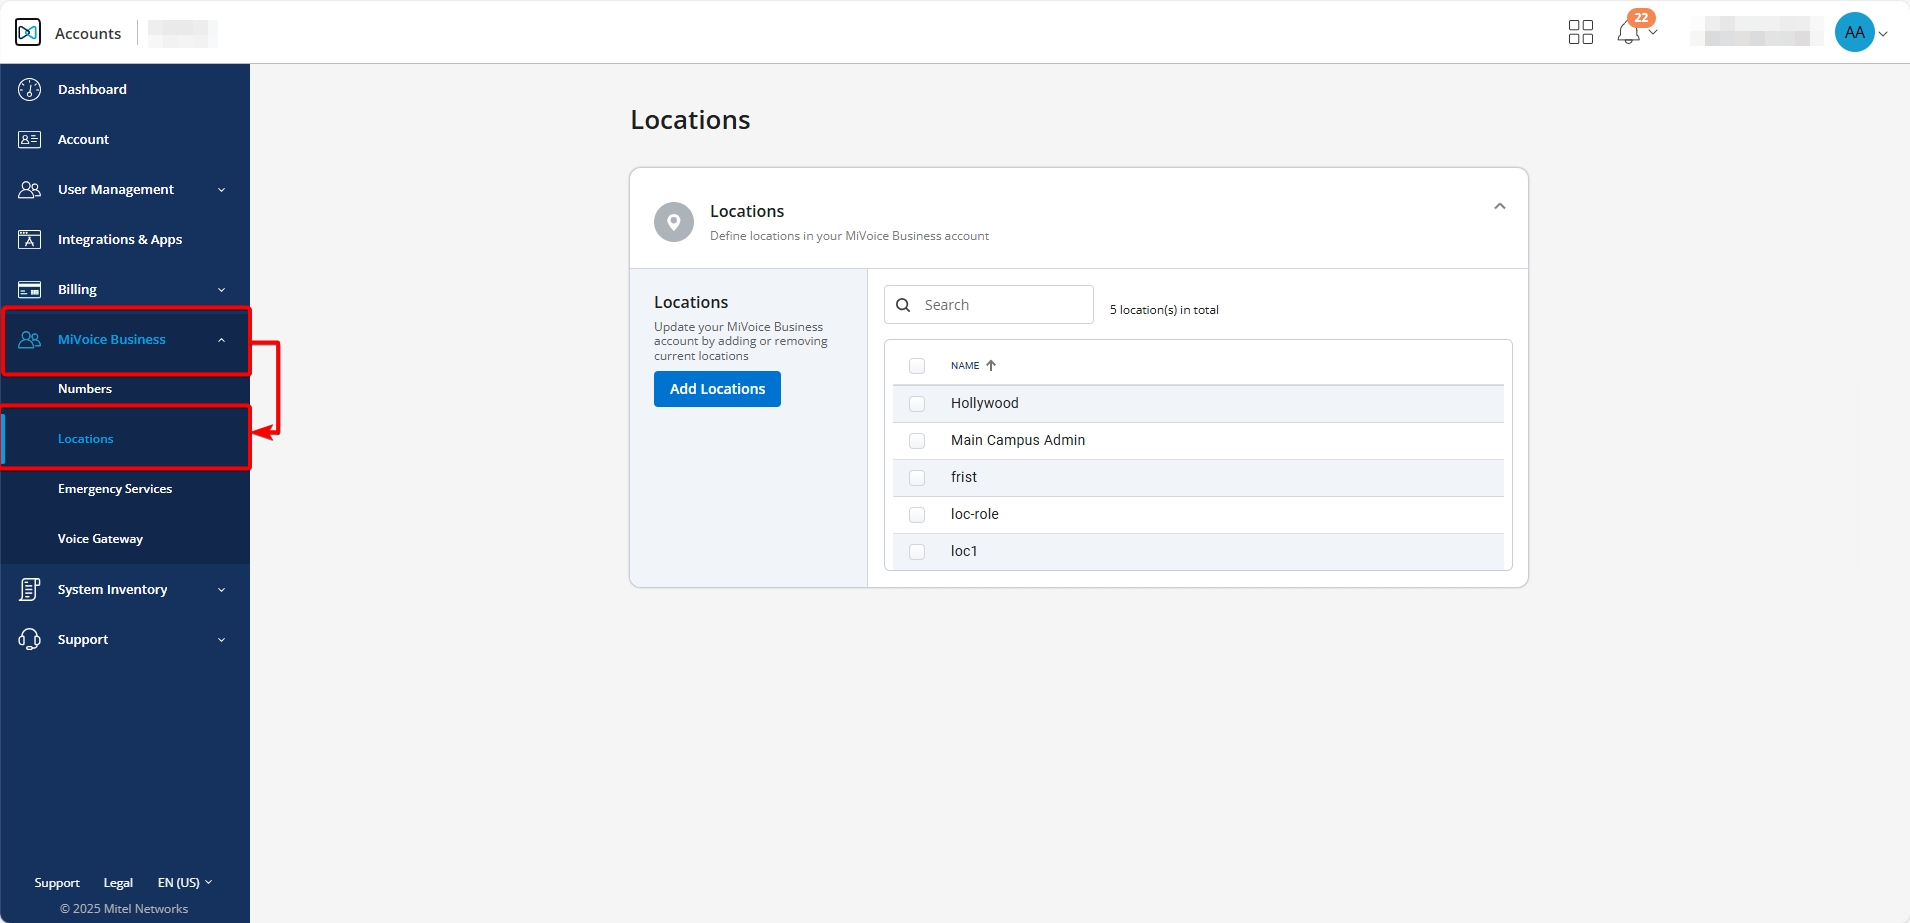
Navigating to the Locations submodule:
- In the left navigation panel, select MiVoice Business.
- Click Locations.
Adding a Location:
- In the Locations section, click Add Locations. The Add Locations dialog box appears.
- Enter the name of the new location.Note: Press Enter after each location name to add multiple entries.
- Click Save. A confirmation message appears when the location is added
successfully.Note: If the action fails, a message appears explaining what went wrong.
Deleting a Location:
- In the Locations section, select the checkbox located before the
location name.Note: The Delete Selected button appears only when at least one location is selected.
- Click Delete Selected. The Delete Locations dialog box appears.
- Click Delete to confirm. A confirmation message appears when the location is deleted successfully.
If a location is in use—for example, assigned to a user through the MiVB license service—an error message appears when you try to delete it:
"The location name specified is being referenced. Delete all references before attempting to delete this location."
To delete the location, remove all references and try again.
Emergency Services
Emergency Services involves setting up fallback emergency numbers and dynamic location providers to ensure a reliable and secure connection during emergency calls.
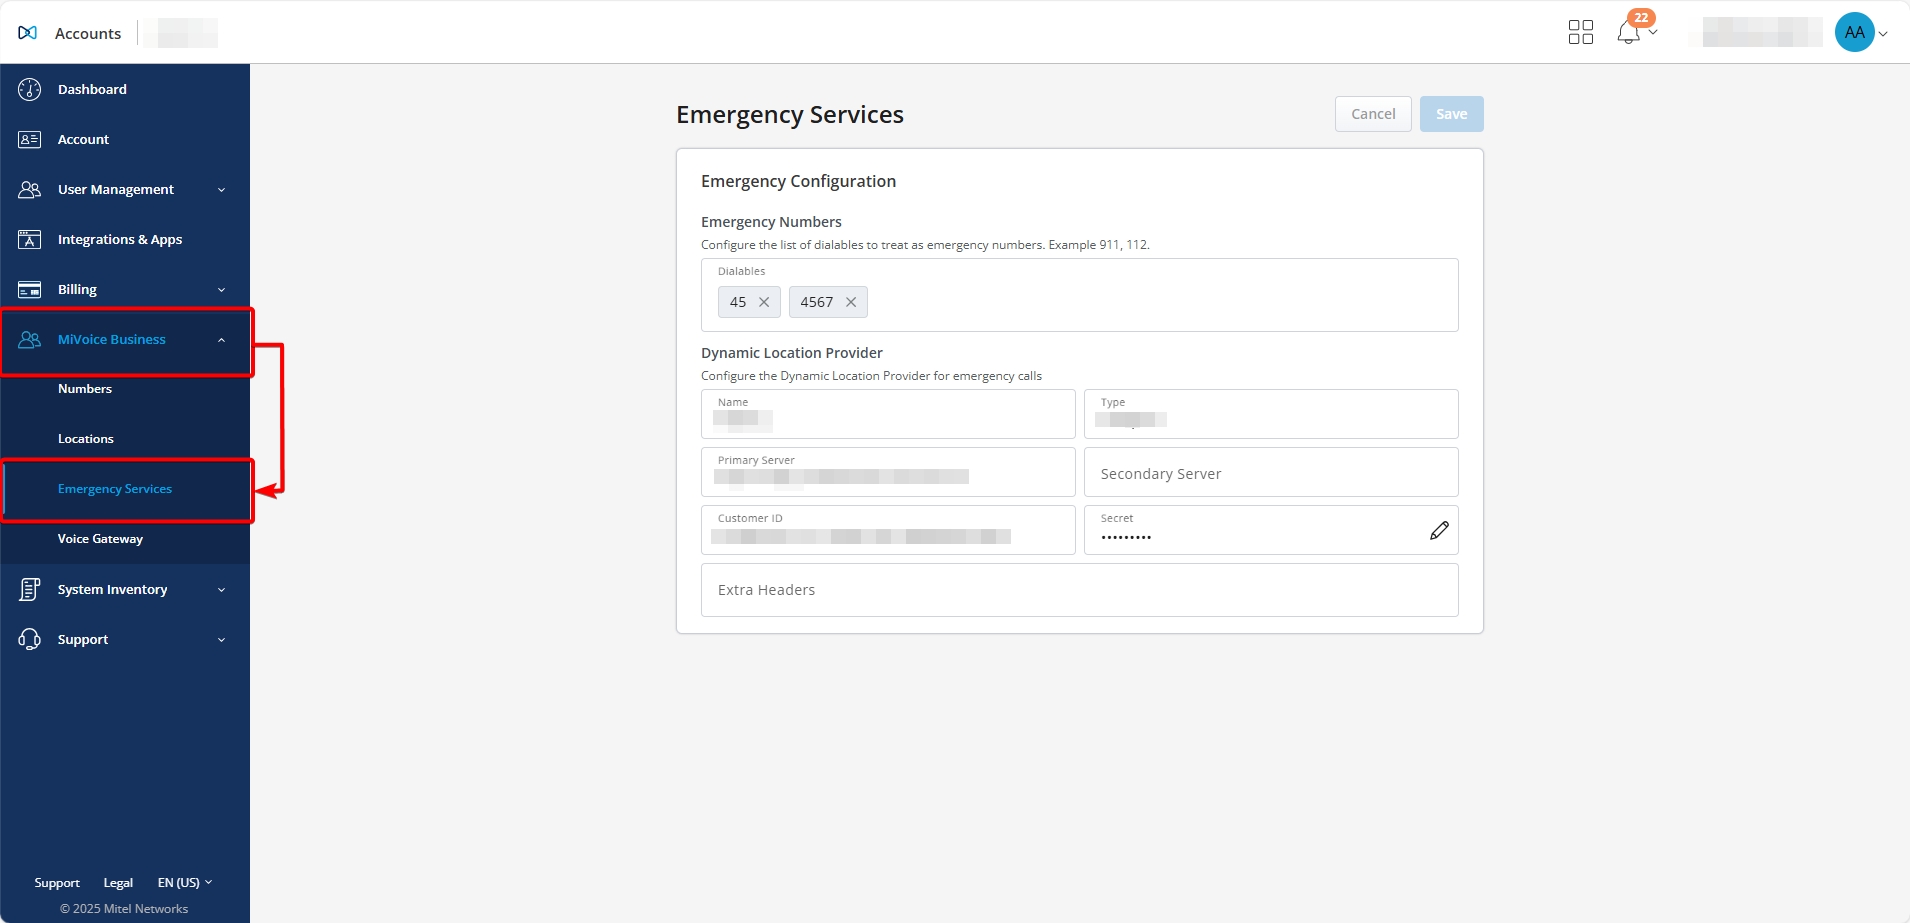
Navigating to the Emergency Services submodule:
- On the left navigation panel, click MiVoice Business.
- Click Emergency Services.
Configuring Fallback Emergency Numbers:
Configuring fallback emergency numbers involves adding, editing, and deleting emergency contact numbers to ensure reliable communication during emergencies.
Adding an Emergency Number:
- Click Dialables.
- Start typing a number for emergency calls, e.g., 911, 112.
- Press Enter, Space, or add a comma (,) to add the number.
Editing an Emergency Number:
Double-click on the number to edit it as needed.
Deleting an Emergency Number:
Click the X icon next to the number to remove it, if necessary.
Configuring a Dynamic Location Provider for Emergency Calls:
-
Enter the following information in the Dynamic Location Provider area:
- Name
- Type
- Primary Server
- Secondary Server
- Customer ID: The unique identifier assigned to your organization by the service provider.
- Secret: The private key or token issued by the service provider to secure communication between the Zoom client and the service. This acts as a password and should be treated with high confidentiality.
- Extra Headers: Additional HTTP headers required by the service provider for platform communication. These headers might include custom authentication schemes, API version, or specific configuration options required by the provider. Input must be added in JSON format.
- Click Save.
Voice Gateway
The Voice Gateway submodule helps you set up MBG and SIP trunks for CloudLink services.
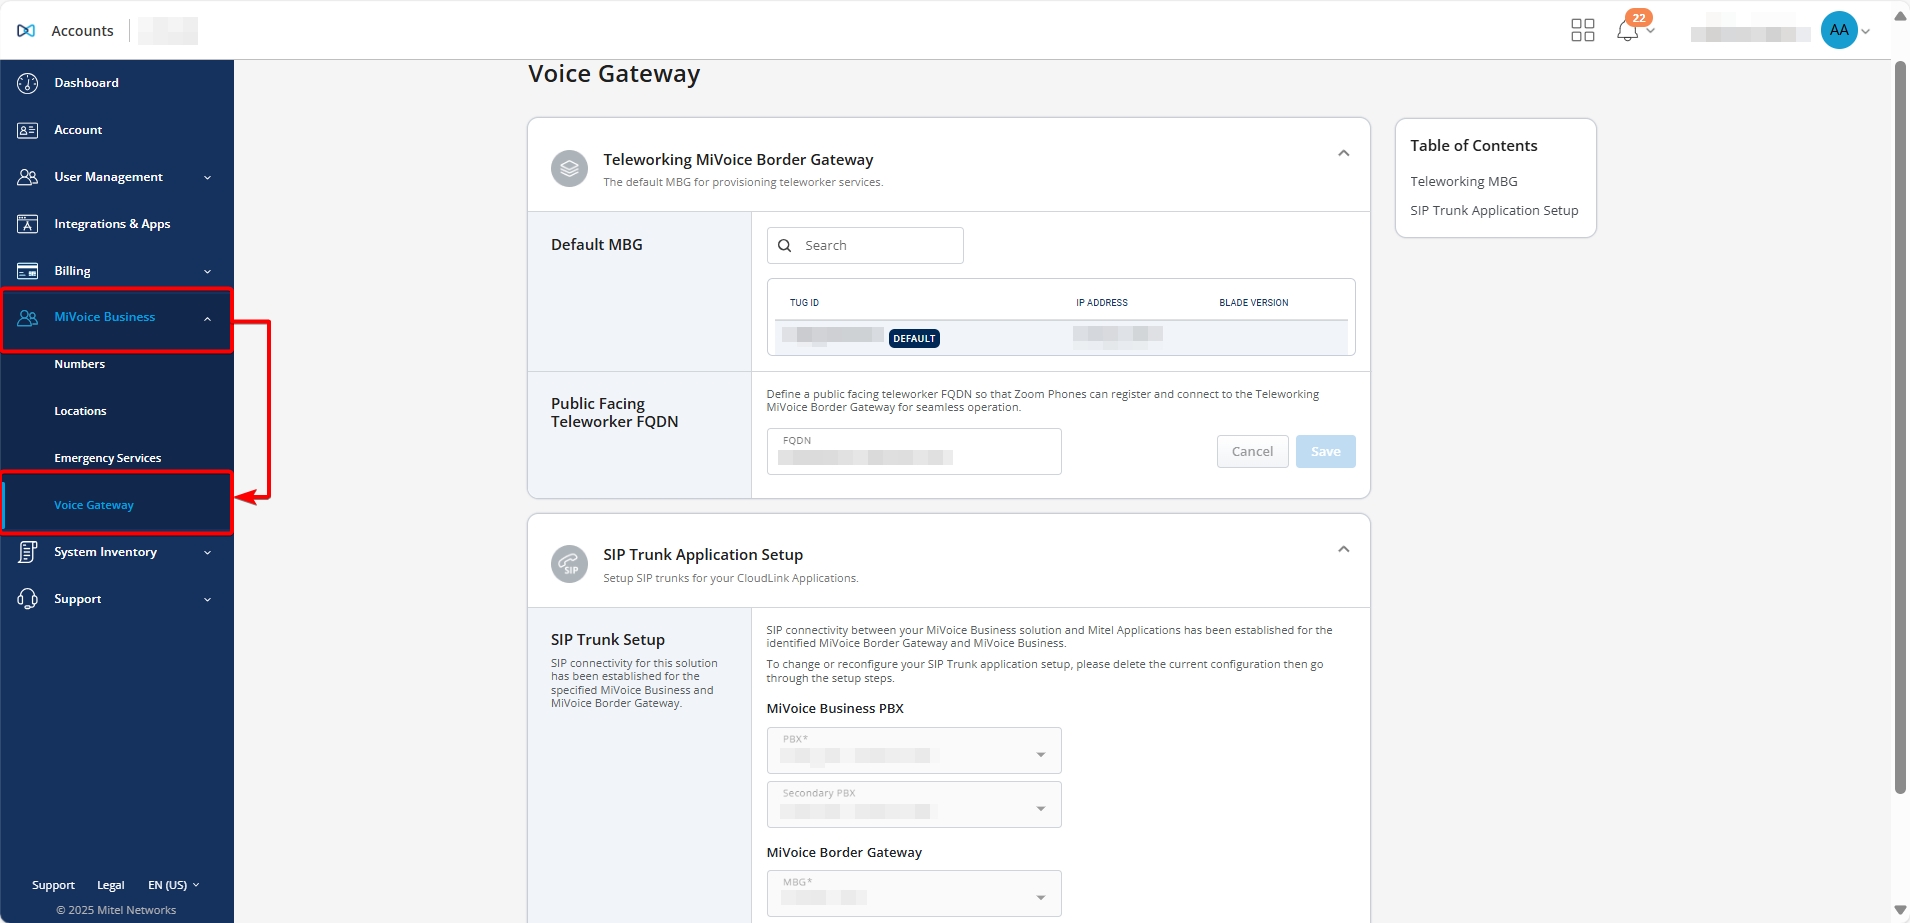
Navigating to Voice Gateway submodule:
- On the left navigation panel, click MiVoice Business.
- Click Voice Gateway.
Configure Teleworking MiVoice Border Gateway:
- Expand the Teleworking MiVoice Border Gateway section
- If multiple MBGs are part of the MiVoice Business solution, set the default
MBG:
- Select Set Default.
- In the Set Default MBG pop-up, choose the default MBG from the drop-down list.
- Select Save.Note: The option to set a default MBG is available only when the CloudLink Gateway is deployed and the CloudLink Daemon is enabled on the relevant MiVoice Business nodes. This option is not available if the CloudLink Gateway is deployed separately from the MiVoice Business nodes.
- If Zoom integration is enabled and teleworker resiliency for Zoom Phones
is required:
- In the FQDN field, enter the public-facing Fully Qualified Domain Name (FQDN) that Zoom Clients use to connect to the Teleworker MiVoice Border Gateway (MBG) cluster.
- Select Save.Note: This FQDN must also be added to the Allowed URL Names list in the MBG settings. If it is not added, Zoom Client registration will fail.
This configuration ensures that Zoom Phones can register and connect to the MBG for seamless and resilient operation.
Configure SIP Trunk Application Setup:
- From the drop-down list, select your Primary and Secondary MiVoice Business PBX.
- From the drop-down list, select your MiVoice Border Gateway.
- Select Save. A success message appears when the SIP trunk is configured
successfully.Note: This setup creates:
- A SIP trunk between the selected MiVoice Border Gateway and the CloudLink Platform.
- A SIP trunk between the MiVoice Business and the same MiVoice Border Gateway.
Tools
The Tools submodule provides access to utilities such as triggering a resynchronization between MiCollab and MiVoice Business.

Navigating to Tools submodule:
- On the left navigation panel, click MiVoice Business.
- Click Tools.
Sync MiVoice Business to MiCollab:
- Select the Sync button next to the item you want to update.
- Select the checkbox before each Name you want to sync.
- Select Sync Selected.
The selected user information is synced from MiVoice Business to MiCollab.