Configure Advanced UM Parameters
Advanced UM can also be configured from the Text console; however, it is not possible to configure Advanced UM from both consoles simultaneously.
Ensure that you have filled out the Advanced Parameters worksheet before you begin configuration.
Configuration
To configure Advanced UM Parameters:
-
From the navigation tree, under Unified Messaging, click Advanced UM.
-
The Advanced UM Configuration screen appears.
-
On the NuPoint tab, enter the following information from your worksheet:
-
Administrator Login
-
Administrator Password
-
Mailbox Poll Interval (in minutes or hours)
-
Permanent Delete (True or False)
-
Sender Domain
Note: If the Administrator Password is changed, you must update this field to show the new password. -
-
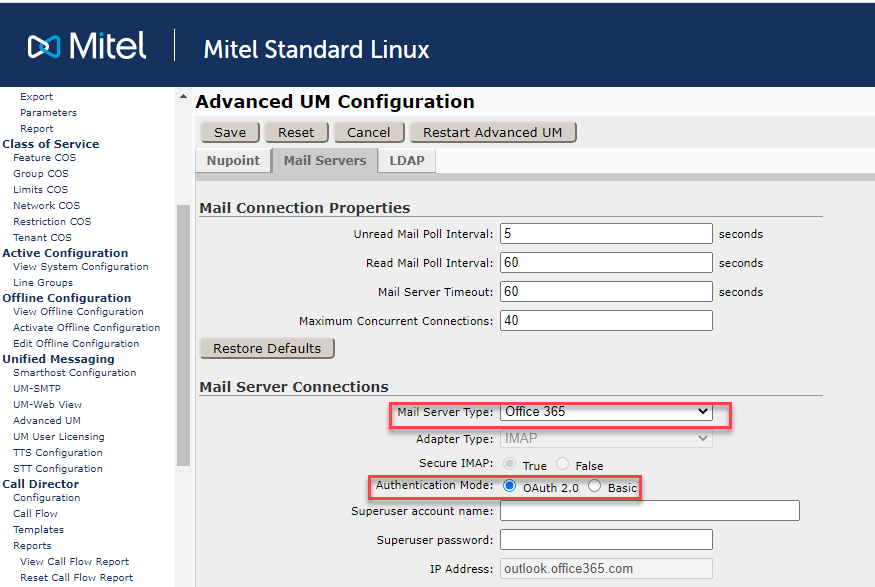
On the Mail Servers tab, enter the following information from your worksheet:
-
Mail Connection Properties:
-
Unread Mail Poll Interval
-
Read Mail Poll Interval
-
Mail Server Timeout
-
Maximum Concurrent Connections
-
-
Mail Server Connections:
-
Mail Server Type - Microsoft Exchange, Google Apps, Office 365
-
Adapter Type - This field defaults to "IMAP" if the Mail Server Type is Google Apps, or Office 365
-
Secure IMAP - True or False
-
Authentication Mode
- Select Auth 2.0 - Authentication will be done with Microsoft Graph API (Recommended)
- Select Basic - Authentication will be done with IMAP Secure
Note: 1)To enable the Authentication Mode as OAuth 2.0 for Office 365 for NPM Advanced UM feature, the pre-requisites are as follows:
-
In Microsoft Azure, the below permissions need to be added to the application for secure OAuth 2.0 to work for Office 365 with Microsoft Graph:
- Mail.Read
- Mail.ReadWrite
- Mail.Send
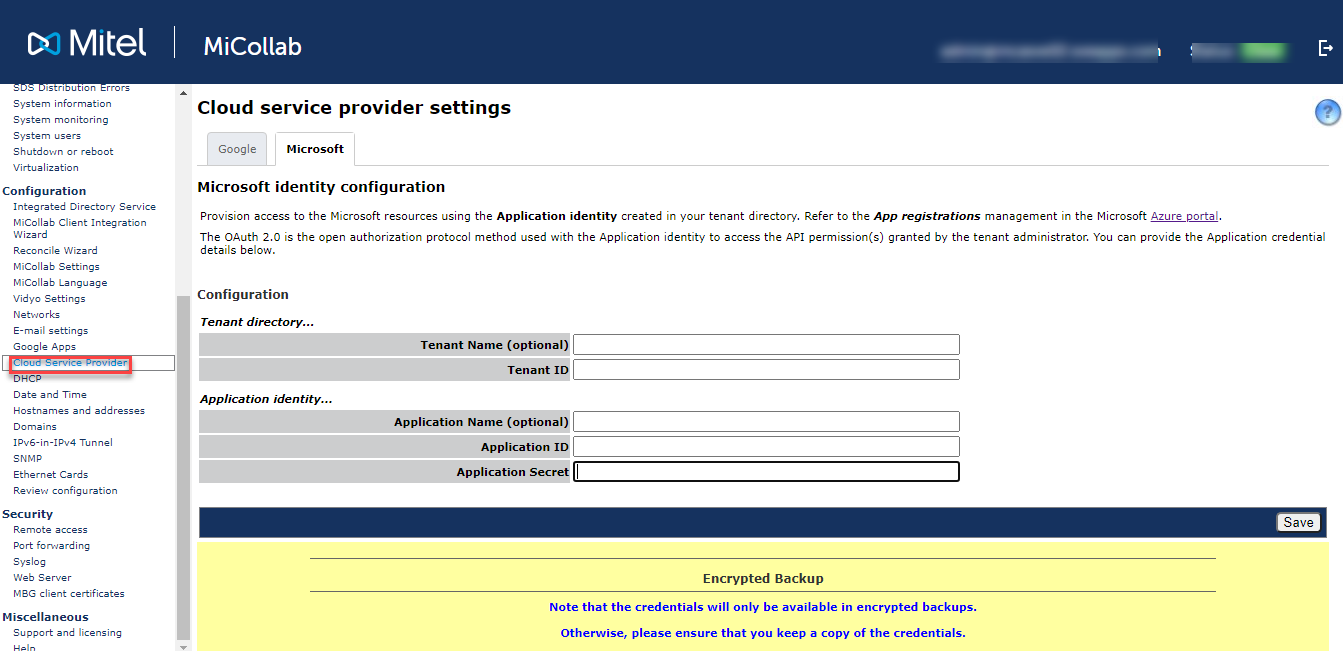
- Configuration is needed at Cloud Service Provider in MSL. See the Configure Microsoft Identity section for details. See the below screenshots for reference
For detailed steps on how to register an application at Office 365, see Steps to register your application at Microsoft Office 365.
The Cloud Service Provider configuration is required at MSL followed by configuration at NPM Advance UM. For details on configuration at MSL, refer to the Microsoft Cloud section. Once the configuration of OAuth 2.0 is successful at MSL, the administrator has to select Authentication Mode OAuth 2.0
Note: 2)NPM can receive voice messages from:
-
External callers
-
Internal callers
The internal callers can be categorized into:
- User having mailbox configured and with valid O365 domain
- User with no mailbox configured
- User having mailbox configured and invalid O365 domain
- User having mailbox configured but no email configured
For Users having mailbox configured and with valid O365 domain, in advanced UM emails:
- The To field will show the recipient's Email Id and the From field will show the sender's Email Id.
- Sender information will also be present in the subject line and Email body.
For a, b(ii), b(iii) and b(iv), in advanced UM emails:
- The To and From fields in the Email will show the recipient's Email Id. This is because the Graph API does not support the send operations for the invalid O365 domain.
- Sender information will be present in the Subject line and in the Email body.
-
Superuser account name - IMAP superuser account name.
-
Superuser password - IMAP superuser password.
-
Port No. / Hosted Exchange - If your implementation has a Microsoft Exchange server in a hosted environment, you can use these fields to specify a non-default IMAP inbound connector port up to five digits in length. This port number must also be configured on the Exchange server. For configuration details, see the Advanced Parameters Worksheet.
-
IP Address - This field defaults to "imap.gmail.com" if the Mail Server Type is Google Apps and "outlook.office365.com" if the Mail Server Type is Office 365. Hostnames must be resolvable by the corporate DNS server defined in MSL. If a connection is being made to a Client Access Server (CAS), enter the address of the CAS in place of the mail server address. Note that either a load balancer or an Exchange server can function as a CAS.
-
Note:To take advantage of Secure IMAP, you must enter the correct authentication settings in the Exchange Server. For details, see IMAP Setup for Exchange Server.
-
-
On the LDAP tab, enter the following information from your worksheet:
-
LDAP Server Address
-
LDAP Administrator DN
-
LDAP Login Password
-
LDAP Search Base
Note:-
LDAP is not available for Google Apps.
-
LDAP DN syntax refers to the creation of a Distinguished Name, which is a series of name components forming a unique identifier, similar to a path to a file. The abbreviations cn and dc refer to Common Name and Domain Component, respectively. For more information about LDAP, refer to the Microsoft TechNet Library at http://technet.microsoft.com/en-us/library/.
-
This account is used to perform queries, not updates. As such, it only requires "read" access to the database. It does not require administrative rights with "read/write" access.
-
-
On the Mail Servers or LDAP tab, click Verify Connection to test your configuration settings.
Note: The Verify Connection function detects only one error at a time. -
Click Save. The system validates your input and, when all parameters are validated successfully, a confirmation box appears indicating that the Advanced UM server must be restarted for your changes to be applied.
-
Click OK.
Note: Restarting the Advanced UM server may cause an interruption to Advanced UM service. Voice mail ports are not affected.
Advanced UM Form Button Actions
Button |
Action |
|---|---|
Save |
Saves the configuration. |
Reset |
Resets all fields on the screen to their default values. |
Cancel |
Exits the screen without making any changes. |
Restart Advanced UM |
Restarts the Advanced UM service while all other NuPoint UM services remains running. |