Enterprise Tab
The Enterprise tab includes fields and options for the Enterprise or company.
The first step to provisioning MiCollab Client is to create an Enterprise. Click Create Enterprise.
After you have created an Enterprise, select it from the list box and then configure the fields and options for the Enterprise from the following areas.
Settings
The Settings area includes fields for specifying basic Enterprise information.
- If required, edit the following Enterprise settings:
- Description: (Required) Type a description for the Enterprise, for example, Acme Company-Phoenix Arizona. By default this field is blank. The Enterprise Description:
- is limited to 1-128 characters in length.
- must contain alpha-numeric characters (dashes included).
- cannot contain vertical bars (|).
- Enterprise domain: (Required) Type a domain for the Enterprise. The Enterprise domain does not need to be a resolvable DNS name or a registered domain name, however, it does need to follow the DNS suffix format. The Enterprise domain should be unique to the Enterprise so that peered servers do not have the same Enterprise domain. Mitel suggests using the site location or Enterprise ID as part of the Enterprise domain (for example, Phoenix.xyzcompany.com, where Phoenix is the Enterprise ID).
- Voice mail server: (Optional)
- When NuPoint is selected, the Voicemail server field displays the FQDN of the NuPoint server. The field is "read-only" in this case.
- When Embedded is selected, the Voicemail server field is hidden.
-
When MiCollab Advanced Messaging is selected, the Voicemail server field is enabled and administrator needs to provide the URL for the clients accessing MiCollab Advanced Messaging Web Client.
MiCollab Advanced Messaging (MAM) integration
The integration of MiCollab Advanced Messaging provides the user access to the responsive Web-interface for managing Voicemails.
The user needs to provide the credentials to the MiCollab Advanced Messaging Web Client on MiCollab Clients. The credentials to access MiCollab Advanced Messaging are not stored by the MiCollab Client but cached by the web interface (depending on user's browser settings on the device).
Precondition:-
The user needs to have a valid Visual Voicemail license.
-
The server hosting for MiCollab Advanced Messaging must have a valid, trusted certificate. Refer to the MiCollab Advanced Messaging documentation for details.
-
The MiCollab Advanced Messaging Web Client should be enabled for HTTPS and have a valid trusted certificate.
-
For PBX platforms that supports MiCollab Advanced Messaging. Refer to the MiCollab Client Administrator Guide > Table 20: Voice Mail Server Types.
-
The MiCollab Advanced Messaging must have the MiCollab Advanced Messaging Web Client installed.
Note: The MAM Client URL should be resolvable and accessible from the internet when the MiCollab Client will be used outside on the local LAN.
Enabling MiCollab Advanced Messaging for a new MiCollab installation
The type of Voicemail for the installation needs to be selected in the Server Manager on the following page: MiCollab Client Service > Configure MiCollab Client Service > Enterprise > Settings > Voice mail server type.
Enabling MiCollab Advanced Messaging for an existing MiCollab installation
An existing MiCollab user will not get the new roles/templates automatically when upgraded to MiCollab 8.0. The admin must manually create the role/template to remove NuPoint and to change the MiCollab Client feature profile. This is required to let the clients show the MiCollab Advanced Messaging in the Voicemail tab.
-
- Administrator e-mail: (Optional) Type the e-mail address for the MiCollab Client Service administrator. An e-mail message is sent to this address when On-Demand presence is enforced. The maximum length for this field is 255 characters.
-
Switch type: This field is editable when there are no PBX nodes defined on the PBX nodes tab. Once the Switch type field is set, all PBX Nodes created will be that type. After a PBX Node is created, the Switch type field cannot be changed unless all PBX Nodes are deleted.
When creating a new enterprise that will not have any PBX nodes and only have Teamwork Mode accounts, the switch type can be left at the default value of “Mitel Communications Director” (the value will be ignored).
- Collaboration server type: (Optional) Select a collaboration server to use with MiCollab Client. Options include:
- None (default)
-
MiCollab Audio, Web and Video Conferencing
If you do not intend to use collaboration features, set this field to None (default). If you have already added and configured a collaboration server, you cannot configure the option here.
Note: The Mitel Your Assistant Collaboration Module is no longer supported as a collaboration server type. Refer to the Collaboration tab topic for more information.
- Avatar URL: To enable MiCollab Avatars for Aquarius 69xx Sets (6920, 6930 and 6940), configure the Avatar URL displayed in this field on MiVoice Business in Online Services URL Form.
- Language: (Required) Select a language for the Enterprise from the list. You can configure the language parameter on the Enterprise, PBX, or account level. The Enterprise language field sets the default language for all accounts on the Enterprise. The PBX language setting overrides the Enterprise setting, and the account setting overrides the PBX setting. The user's language setting determines which language the Welcome E-mail Message is generated in for that user.
- Time zone: (Required) Select the time zone where the Unified Communications server is physically located from the list box. The time zone where the Unified Communications server is located may be different than the time zone where the Enterprise is located.
- Description: (Required) Type a description for the Enterprise, for example, Acme Company-Phoenix Arizona. By default this field is blank. The Enterprise Description:
- Click Apply to save the information, or click Reset to clear your changes.
Calendar Integration
This feature enables the MiCollab Client administrator to configure either a Google Server, Office 365, or an Exchange Server from which the MiCollab Clients can fetch calendar availability information and update their Dynamic Statuses. Exchange Integration supports Exchange 2013, Exchange 2016, and Exchange 2019.
From the Calendar Type drop-down menu, select Google, Office 365, or MS Exchange.
Some of the user permissions that are mandatory are as follows:
-
When Calendar Integration is done with Office 365 using OAuth 2.0:
-
API Permissions - The Office 365 administrator has to grant full_access_as_app application permissions for Office 365 Exchange Online API.
-
URL Access required - Client's firewall should allow the URL's mentioned below:
-
outlook.office365.com - Access for URL outlook.office365.com is also required when Calendar Integration is done with Office 365 using Basic authentication
-
login.microsoftonline.com
-
-
- When Calendar Integration is done with Office 365 using OAuth 2.0 (Microsoft Graph):
API Permissions - The Office 365 administrator must grant following API permissions from Microsoft Graph:
Delegated Permissions:- Calendars.Read
- Calendars.Read.Shared
- Calendars.ReadWrite
- Calendars.ReadWrite.Shared
- Calendars.Read
- Calendars.ReadWrite
-
URL Access Required - Client's firewall should allow the URL's mentioned below:
-
login.microsoftonline.com
-
graph.microsoft.com
Note:If permissions are not given and test connection is performed, the administrator may get the error message:
"Invalid calendar server credentials.: Invalid credentials."
To overcome this, the administrator must provide the API permissions mentioned above.
- Enter the URL of your Exchange Server. The URL corresponds to Exchange Web Services (EWS). The exact URL depends on how your exchange server is configured but is usually in the format https://<hostname>/EWS/exchange.asmx. For Office 365, refer to https://outlook.office365.com/ews/exchange.asmx.
- The version of the Exchange Server is entered automatically when you successfully test the connection. Note: When connecting to a 2010 SP3 Exchange Server, the version may still be shown as SP2 on the MiCollab Client server-manager.
- Enter the username and password which is used to log into the Exchange Server. For Azure Active Directory, the username and password should be with Application Permissions to the App ID/Secret key issued for connection to the Azure AD. This user does not necessarily need to have administrative privileges on the Exchange Server. Any user who can view other users' calendar availability information will suffice.
- If you want to use Impersonation, select the appropriate radio button. If Impersonation is enabled, then MiCollab Client users will not have to provide their exchange password to use Calendar Integration. However, they still have to provide their Exchange username and primary e-mail address
- Enabling Impersonation can have security implications and requires administrative privileges on the Exchange Server.
- If you want to use Delegation, select the appropriate radio button.
Refer to the following Microsoft websites for more details on Microsoft Exchange version details:Settings required on Exchange Server for MiCollab Meeting Center-
Exchange Subscription Type selected as Impersonation or Delegation.
-
For Impersonation, users need to have ApplicationImpersonation as Management Role and Access Rights as LimitedDetails.
-
For Delegation, users need to have Access Rights as LimitedDetails.
Use following command to change Management Role on Exchange Management Shell, where serviceAccount is username: New-ManagementRoleAssignment –Name:impersonationAssignmentName –Role:ApplicationImpersonation –User:serviceAccount
Use following command to change Access Rights on Exchange Management Shell: Add-MailboxFolderPermission -Identity user1@mitel.com:\Calendar -User user2@mitel.com -AccessRights LimitedDetails
where,-
user1: user ID of the mailbox or calendar you want to get access to.
-
user2: user ID of the service account you use or configure on Admin portal.
Note: Only Basic Authentication is supported on MiCollab while communicating with the Exchange Server. - You can access the Advanced Calendar Integration Settings. The default values for these settings works appropriately under most circumstances so normally, these do not need to be adjusted. Change them only if you have very particular needs, such as high network latency. Be aware that changing these values affects calendar integration across ALL enterprises.
- Test your connection to ensure that MiCollab Client can connect to either the Google Server or Exchange Server and communicate with it properly. If after clicking on the Test Connection button you receive an error stating "Invalid calendar server credentials", you need to troubleshoot the issue.
- Click Apply to save the changes or Reset to clear the changes.
Calendar Integration for Office 365
The authentication protocol for Calendar Integration with Office365 can be either Open Standard for Authentication 2.0 (OAuth 2.0), OAuth 2.0 (Microsoft Graph), or Basic Authentication protocol.
A service account with a valid Office365 user license is required to enable the mailbox.
Basic Authentication mechanism is a process where the username and password are provided for authentication purposes, whereas in case of OAuth 2.0 tokens are being used for authorization.
OAuth 2.0 (Microsoft Graph) also uses the OAuth 2.0 tokens, with the difference being, instead of Exchange it uses Microsoft Graph Server APIs to fetch the calendar details.
To use OAuth 2.0, an application must have an application ID issued by Azure Active Directory. On the Request API page, select Exchange under Supported Legacy APIs followed by Application Permissions and then select full_access_as_app. Then click Add Permissions.
For more details on configuration, refer to MiCollab Users and Services Provisioning > Configuration > Cloud Service Provider section.Note: In case of any changes in API permission from Microsoft Graph and EWS OAuth2.0 in Office 365, the same will be reflected in MiCollab after 60 minutes.To use OAuth 2.0 (Microsoft Graph), an application must have an application ID issued by Azure Active Directory. On the API Permissions page, select Microsoft Graph then Delegated Permissions and give Calendars.Read, Calendars.Read.Shared, Calendars.ReadWrite, Calendars.ReadWrite.Sharedpermissionsfollowed by Application Permissions with Calendars.Read, Calendars.ReadWrite permissions. Then click Add PermissionsandGrant Admin consent
Once the configuration under Cloud Service Provider is successful, the MiCollab Administrator can enable Calendar integration from MiCollab Client Services.
-
Navigate to the Applications > MiCollab Client Service > Enterprise.
-
Under Calendar Integration, select the Calendar Type as MS Office365.
-
The administrator can select the Authentication Protocol for Office 365 as:
-
Basic,
-
OAuth 2.0, or
-
OAuth 2.0 (Microsoft Graph)
In order to enable OAuth 2.0 or OAuth 2.0 (Microsoft Graph), the administrator must select the respective Authentication Protocol's radio button.
-
- For Exchange Subscription Type:
-
the default option selected is Impersonation, if OAuth 2.0 is selected as Authentication Protocol. It will be applicable for all 9.2 servers including the new deployed and upgraded servers.
-
the default option selected is Impersonation, if OAuth 2.0 (Microsoft Graph) is selected as Authentication Protocol. It will be applicable for all 9.6 servers including the new deployed and upgraded servers
-
Default subscription type is not supported in Calendar Integration for Office 365 with OAuth 2.0 Authentication Protocol.
In the Default subscription type, the MiCollab users have to provide their Exchange or Office 365 password from the client (Web, PC, or Mobile client) to use Calendar Integration.
Default subscription type is not supported in Calendar Integration for Office 365 with OAuth 2.0 (Microsoft Graph) Authentication Protocol.
For more information on different calendar sharing options, refer to the following Microsoft links:
Trusted Servers
- Description: Indicates the description you provide for the trusted server.to
- IP address/hostname: Indicates the server's IP address or hostname.
- Type: Indicates one of the following trusted server types:
- Presence Proxy: Presence proxy servers are required to provide presence information such as status and login notification to remote users. If you do not have any remote users (all users are located at the site where the Unified Communications server is located), you do not need to add presence proxy servers.
- IM: An IM trusted server provides Instant Messaging presence to MiCollab Client users on the local Enterprise.
- Peer: A peer trusted server provides presence information for corporate contacts on peered MiCollab Client Services.
- Click the Add Server link to add a new trusted server.
- Click the server name link to edit the corporate location.
- Delete a trusted server.
If you delete a peered server, you can also delete it as a trusted server, as part of your cleanup activities.
To delete a trusted server:-
Select the server you want to delete from the Trusted Servers table.
-
Click the Delete Server link. A dialog box appears prompting you to confirm the deletion.
-
Click OK to delete the server, or click Cancel to cancel the deletion.
-
Launchpad Settings
- Label: Indicates the label or description that you provide for Launchpad entry.
- Action: Indicates what occurs when the user accesses the Launchpad item. There are two actions that you can configure for the user: Dial a number, and Browse to a URL.
- Value: Indicates the phone number or URL that corresponds to the action you selected.
You can Add, Edit, and Delete Launchpad entries. Any changes you make to Launchpad settings will not be shown in the Desktop Client until the user restarts the client.
USB Devices
The MiCollab Client Desktop Client supports several headsets and handsets (see list under Requirements).
To use a USB device with MiCollab Client , users must create a USB device profile using the MiCollab Client Desktop Client. If the user's account includes the User can manage USB device profiles option (Account Details Page – Account Settings – USB Devices), he or she can upload the profile to the Unified Communications server.
The USB devices displayed in this area include the device information from the profiles created and uploaded by users. The device information is read-only and cannot be edited. You can however, Sort the information and Delete USB devices from the server.
Plus Dialing Settings
This area of the Enterprise tab includes fields for specifying plus dialing settings.
- At the enterprise level:
- Plus Dialing settings -> Country code
- Plus Dialing settings -> International access code
- Plus Dialing settings -> Long distance access code
- At the PBX Node details level:
- Plus Dialing settings -> Country code
- Plus Dialing settings -> International access code
- Plus Dialing settings -> Long distance access code
- Extension length
- Dialing prefix
-
Country code: This field should be set to the country code of the country where the PBX resides. If an E.164 call is placed to a number within the user's "home" country, the country code will be stripped off of the digit string by MiCollab Client .
-
International access code: This field indicates the international dial code that must be dialed for international calls from the country where the PBX resides. If the MiCollab Client determines that the call is being placed outside of the user's country (based on the PBX country code), MiCollab Client will pre-pend the International Prefix.
-
Long distance access code: This field indicates the Toll digit for the country where the user's PBX resides. For any E.164 dialed calls within the user's home country, MiCollab Client will prepend the toll digit.
Note: It is important that sites using E.164 (plus dialing) settings set up ARS on the PBXs to strip the Toll Digit for local calls.Note: During an avatar search, the CLID translation string is stripped off from the directory number.
CLID Translation
Default Account Settings
This area of the Enterprise tab includes the default values that will apply to MiCollab Client accounts when they are created. The values you configure here apply to all accounts whether you create them manually (Adding and Editing Accounts), or you create them automatically by configuring an AD/LDAP or PBX Node synchronizer (Synchronization tab).
If required, you can edit the values for any account from the Account Details page.
- Perform the following changes under the Default Account Settings:
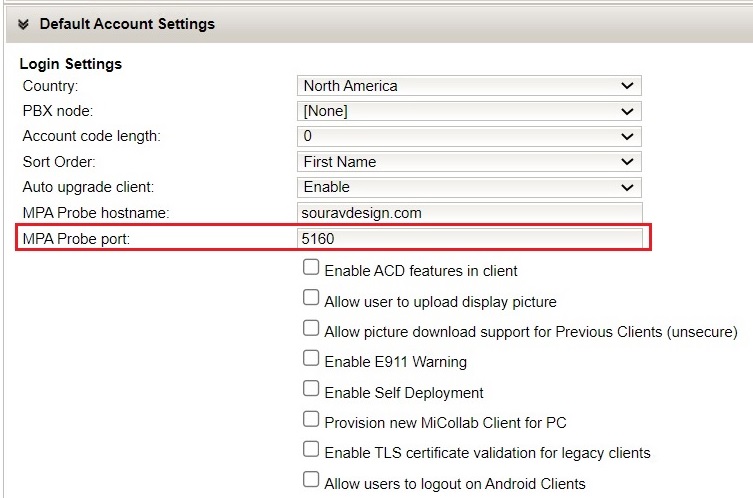
Login Settings
- Country: Select the country that the MiCollab Client users reside in. By default, this option is set to United States.
- PBX node: Select the PBX node that services users from the list box. The list includes all the PBX nodes you have configured on the PBX Nodes tab. If you have not configured PBX Nodes yet, the list box is empty.
- Account code length: Account codes provide a way to track phone usage. Select the account code length from the list box. Options include 0-12. You can configure account code details on the ACD Settings tab.
-
Sort Order: Select the order type you want for displaying the names on MiCollab Clients.
-
Select First Name to display the contacts’ first name in the directory and search results. By default, First Name is selected as sort order.
-
Select Last Name to display the contacts’ last name in the directory and search results.
Note: Changing the sort order value at server will not impact the setting of existing users. Sort order value of server will come into effect only for new users.Note: If an existing server is upgraded to include this setting, the server will have default value as First Name. It will not have any impact on the Client setting.Note: If the sorting value is changed to Last Name, this value will persist even after the upgrade or on restoring backups. -
- Auto Upgrade Client: Auto upgrade client provides an option to control the automatic client upgrades.
- Select Enable to push the client upgrade pop-up notification (if there is a new version of the client available) for all users under the Enterprise (provided that Default or Enable is set in Accounts > Account Settings). By default, this option is enabled. The users will get a client upgrade pop-up notification.
- Select Disable to disable the client upgrade notification for all users under the Enterprise (provided that Enable is not set in Accounts > Account Settings).
- MPA Probe hostname: Enter the MPA Probe hostname details which is used to collect the softphone voice quality reports from the Clients.
- MPA Probe port: The default value is 5160. The MPA Probe port is used to collect the softphone voice quality reports from the Clients.
- Enable ACD features in client: Select this option to provide users with Automatic Call Distribution (ACD) features in the MiCollab Client Desktop Client.
- Allow user to upload display picture: Determines if users can upload their own display picture from the Desktop Client.
- Allow picture download support for Previous Clients (unsecure): Allows users to download picture for previous MiCollab Clients.
- Enable E911 Warning: Displays a warning whenever the user launches the softphone client. The warning states that the softphone may not be able make calls to the appropriate emergency 911 public safety authorities in some locations. By default, this option is enabled.
- Enable Self Deployment: Allows the user to self-deploy MiCollab Client.
- Provision new MiCollab Client for PC: Select to provision MiCollab Client for PC for all users under the Enterprise. By default, this option is disabled.
- Enable TLS certificate validation for legacy clients: Select to enable validation of TLS certificate for legacy clients. By default, this option is disabled.
- Allow users to logout on Android Clients: By default, this setting remains disabled and users will not be able to logout of the Android clients. The administrator needs to enable this flag to allow users to logout from the Android clients.
- Corporate Directory Settings:
- Download limit
- The (Really Simple Syndication) RSS Window is an optional embedded window that provides RSS feeds from a selected URL to the user's Legacy Desktop Client. Configure the following RSS Window settings:
- URL: Type the URL to use as the default RSS Window location.
- Always On: Select this option if you want the RSS Window to always appear on the user's Desktop Client.
- User modifiable: Select this option if you want to allow users to change the default URL.
- Select a Collaboration Server from the list. The list includes all the collaboration servers you have configured on the Collaboration tab. If you have not configured collaboration servers yet, this field displays the message, "No collaboration servers defined."
- If desired, enable the Users can manage MiCollab corporate locations. This field allows users to manage Corporate Locations from their MiCollab Mobile Client and upload the information to the MiCollab Client Service. By default, this option is disabled.
- The MiCollab Client Desktop Client supports various Universal Serial Bus (USB) devices. Configure account USB Devices options:
- User can configure local USB devices: Select this option to allow users to configure USB devices in the MiCollab Client Desktop Client.
- User can manage USB device profiles: Select this option to allow users to manage (upload, edit, delete) USB device profiles on the Unified Communications server from their desktop client. When you enable this option, the User can configure local USB devices option is automatically enabled.
- Click Apply to save the information, or click Reset to clear your changes.
Corporate Locations
- Name: The name that you provided for the location.
- Radius: The circular area surrounding the location.
- Latitude: The latitude of the location.
- Longitude: The longitude of the location.
- Click the Add Location link to add a new corporate location.
- Click the location name link to edit the corporate location.
- Click
 to show the corporate location on Google Maps ™ .
 - Delete a corporate location. To delete a corporate location:
-
Select the corporate location that you want to delete from the table.
-
Click the Delete Location link. A dialog box appears prompting you to confirm the deletion.
-
Click OK to delete the server, or click Cancel to cancel the deletion.
-
Call Log Settings
This field allows the option to Show Missed Calls for Key Line. Once enabled, the Call History will display missed calls for key line numbers.
This feature is disabled by default.
To enable the Centralized Call History feature for MX-ONE, refer to Adding and Editing PBX Nodes > Subscribing Centralized Call History from MiVoice MX-ONE section for more details.
Reset Password Settings
The Reset Password on Login checkbox under Reset Password Settings allows Non-SSO users to reset their MiCollab Client password from MiCollab Client. This checkbox is disabled by default. By enabling the Reset Password on Login checkbox, a pop-up screen notification appears to confirm with the following message.
Activating this feature affects all users who are not using single sign-on or Active Directory authentication. Mitel recommends that all users be notified of this security enhancement prior to it being activated.
- Upon the user's next logout from the MiCollab client (including computer restarts), users shall see a prompt to change their MiCollab password when they start the MiCollab client.
- Part of that password change process requires users to enter their current password. Users who do not recall their current password can click the "Forgot password" button to receive an email with a temporary password. The users shall use this password to login to MiCollab, and the system shall prompt them to change this temporary password to a permanent password of their choice.
Prior to activating this feature, please alert all users who are not using single sign-on or Active Directory authentication of this pending action.
External Ldap Search Settings
-
Tick the External Ldap Search Settings checkbox. By default, this checkbox is disabled. Similarly, uncheck the checkbox to disable the external LDP search.
-
Click Apply to save the information.
Jetty Configuration Settings
-
Tick the Enable Jetty Process checkbox. By default, this checkbox is enabled. Similarly, uncheck the checkbox to disable the jetty process.
-
Click Apply to save the information.
MiTeam Classic Configuration
Going forward with Release 9.7, the MiTeam Classic feature will be removed from MiCollab. For the Enterprises which have disabled the MiTeam Classic before the upgrade, the MiTeam Classic Configuration Settings panel will not be visible to them under the Enterprise tab.
The Enterprises which have enabled MiTeam Classic before the upgrade will continue to see the MiTeam Classic Configuration Settings panel. If they choose to disable it, then the MiTeam Classic Configuration Settings panel will be removed permanently from this Enterprise tab.
MiTeam Classic provides Cloud-based collaboration features for UCC Premium users. Note that MiTeam Classic is only supported for MiCollab Client in Integrated mode. Refer to the MiCollab Client Administrator Guide for MiTeam Classic integration requirements.
Email Notification Settings
The textbox contains the default from email address for sending notifications mails. The default value is uca.no.reply@<servername>.<domain name>.
The address can be changed so that emails will be sent from the updated email address.
Presence Privacy Configuration Settings
This setting controls whether the user's presence information (dynamic status, telephony status, video availability, and calendar advisory) is displayed to other users or not. The user's IM availability is not controlled by this setting.
-
Set the Presence Privacy Service value to Disabled to disable the presence privacy feature.
-
Set the Presence Privacy Service value to Enabled to enable the presence privacy feature.
-
If this setting is checked, the presence information of users on local and peered servers is displayed.
-
If this setting is unchecked, no presence is shown to users on local and peered servers unless they are added in the presence allowed list of the user.
-
The server will not send updated presence packet on toggling presence Presence Privacy Service setting at the server. Presence will be updated only when there is change in the presence status or when the user logs out and then logs in.
-
Presence Privacy Service is not supported in Co-located mode.
-
On peered servers, the Presence Privacy setting at the local server will be given preference. For example, if the setting on peered server A is Enabled and the setting on peered server B is Disabled, peered user's presence will be displayed based on the local server setting and not the server where the user actually exists.
-
Telephony presence status of other users does not turn off immediately. The user must re-login to the client. When user is re-logged into the client, telephony presence will turn off from corporate directory, call history, search tab, and from legacy console.
-
Video call functionality will not work for users when the presence privacy setting is enabled.
- Click the Add an Enterprise link to create a new Enterprise.
-
Click the Delete This Enterprise link to delete an Enterprise.
To delete an Enterprise:-
Select the Enterprise from the list box.
-
Click the Delete this Enterprise link. A dialog box appears prompting you to confirm the deletion.
-
Click OK to delete the Enterprise, or click Cancel to cancel the deletion.
-